HP Mini 210-3060nr Getting Started Mini - Windows 7 - Page 41
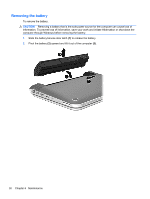
Installing the hard drive, and then slide the door
 |
View all HP Mini 210-3060nr manuals
Add to My Manuals
Save this manual to your list of manuals |
Page 41 highlights
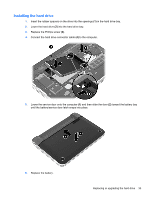
Installing the hard drive 1. Insert the rubber spacers on the drive into the openings (1) in the hard drive bay. 2. Lower the hard drive (2) into the hard drive bay. 3. Replace the Phillips screw (3). 4. Connect the hard drive connector cable (4) to the computer. 5. Lower the service door onto the computer (1) and then slide the door (2) toward the battery bay until the battery/service door latch snaps into place. 6. Replace the battery. Replacing or upgrading the hard drive 33
-
 1
1 -
2
-
3
-
4
-
5
-
6
-
7
-
8
-
9
-
10
-
11
-
12
-
13
-
14
-
15
-
16
-
17
-
18
-
19
-
20
-
21
-
22
-
23
-
24
-
25
-
26
-
27
-
28
-
29
-
30
-
31
-
32
-
33
-
34
-
35
-
 36
36 -
 37
37 -
 38
38 -
 39
39 -
 40
40 -
 41
41 -
 42
42 -
 43
43 -
 44
44 -
 45
45 -
 46
46 -
47
-
48
-
49
-
50
-
51
-
52
-
53
-
54
-
55
-
56
-
57
-
58
-
59
 |
 |

Installing the hard drive
1.
Insert the rubber spacers on the drive into the openings
(1)
in the hard drive bay.
2.
Lower the hard drive
(2)
into the hard drive bay.
3.
Replace the Phillips screw
(3)
.
4.
Connect the hard drive connector cable
(4)
to the computer.
5.
Lower the service door onto the computer
(1)
and then slide the door
(2)
toward the battery bay
until the battery/service door latch snaps into place.
6.
Replace the battery.
Replacing or upgrading the hard drive
33