HP Mini 5101 HP Mini 5101 - Maintenance and Service Guide - Page 105
Recovering, Start, All Programs, Maintenance, Backup and Restore Center, Computer, Help and Support - drivers for windows 7
 |
View all HP Mini 5101 manuals
Add to My Manuals
Save this manual to your list of manuals |
Page 105 highlights
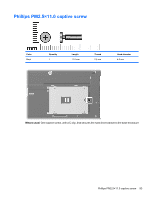
The screen image is added to the document. 4. Save the document. ● When backing up to discs, use any of the following types of discs (purchased separately): CD-R, CD-RW, DVD+R, DVD+R DL, DVD-R, DVD-R DL, or DVD±RW. The discs you use will depend on the type of optional external optical drive you use. NOTE: DVDs and DVDs with double-layer (DL) support store more information than CDs, so using them for backup reduces the number of recovery discs required. ● When backing up to discs, number each disc before inserting it into the optional external optical drive. To create a backup using Backup and Restore Center, follow these steps: NOTE: Be sure that the computer is connected to AC power before you start the backup process. NOTE: The backup process may take over an hour, depending on file size and the speed of the computer. 1. Click Start > All Programs > Maintenance > Backup and Restore Center. 2. Follow the on-screen instructions to back up your entire computer (select models only) or your files. NOTE: Windows includes the User Account Control feature to improve the security of your computer. You may be prompted for your permission or password for tasks such as installing software, running utilities, or changing Windows settings. Refer to Help and Support for more information. Recovering In case of system failure, use the f11 recovery tool to recover your original hard drive image. NOTE: The image includes the Windows® operating system and software programs installed at the factory. CAUTION: Using f11 completely erases hard drive contents and reformats the hard drive. All files you have created and any software installed on the computer are permanently removed. The f11 recovery tool reinstalls the operating system and HP programs and drivers that were installed at the factory. Software not installed at the factory must be reinstalled. Personal files must be restored from a backup. 1. If possible, back up all personal files. 2. If possible, check for the presence of the HP Recovery partition. To find the partition, click Start > Computer. NOTE: If the HP Recovery partition has been deleted, you will need to recover your operating system and programs using the Windows Vista Operating System and the Driver Recovery discs (purchased separately). For additional information, contact technical support by selecting Start > Help and Support > Contact support. 3. Turn on or restart the computer, and then press esc while the "Press the ESC key for Startup Menu" message is displayed at the bottom of the screen. 4. Press f11 while the "Press f11 for recovery" message is displayed on the screen. 5. Follow the on-screen instructions. Windows Vista backup and recovery 97
-
 1
1 -
2
-
3
-
4
-
5
-
6
-
7
-
8
-
9
-
10
-
11
-
12
-
13
-
14
-
15
-
16
-
17
-
18
-
19
-
20
-
21
-
22
-
23
-
24
-
25
-
26
-
27
-
28
-
29
-
30
-
31
-
32
-
33
-
34
-
35
-
36
-
37
-
38
-
39
-
40
-
41
-
42
-
43
-
44
-
45
-
46
-
47
-
48
-
49
-
50
-
51
-
52
-
53
-
54
-
55
-
56
-
57
-
58
-
59
-
60
-
61
-
62
-
63
-
64
-
65
-
66
-
67
-
68
-
69
-
70
-
71
-
72
-
73
-
74
-
75
-
76
-
77
-
78
-
79
-
80
-
81
-
82
-
83
-
84
-
85
-
86
-
87
-
88
-
89
-
90
-
91
-
92
-
93
-
94
-
95
-
96
-
97
-
98
-
99
-
 100
100 -
 101
101 -
 102
102 -
 103
103 -
 104
104 -
 105
105 -
 106
106 -
 107
107 -
 108
108 -
 109
109 -
 110
110 -
111
-
112
-
113
-
114
-
115
-
116
-
117
-
118
-
119
-
120
-
121
-
122
-
123
-
124
-
125
 |
 |
