HP Mini CQ10-610CA HP Notebook Reference Guide - Windows 7 - Page 18
Inserting a SIM, Removing a SIM, Getting Started
 |
View all HP Mini CQ10-610CA manuals
Add to My Manuals
Save this manual to your list of manuals |
Page 18 highlights
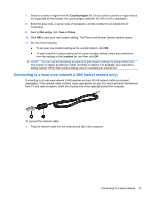
Inserting a SIM NOTE: To identify the SIM slot location, refer to the Getting Started guide. 1. Shut down the computer. If you are not sure whether the computer is off or in Hibernation, turn the computer on by pressing the power button. Then shut down the computer through the operating system. 2. Close the display. 3. Disconnect all external devices connected to the computer. 4. Unplug the power cord from the AC outlet. 5. Remove the battery. 6. Insert the SIM into the SIM slot, and gently press the SIM into the slot until it is firmly seated. CAUTION: When inserting a SIM, position the card to match the icon next to the SIM slot on the computer. If a SIM is inserted incorrectly, it could damage the SIM and the SIM connector. To reduce the risk of damage to the connector, use minimal force when inserting a SIM. 7. Replace the battery. NOTE: HP Mobile Broadband is disabled if the battery is not replaced. 8. Reconnect external power and external devices. 9. Turn on the computer. Removing a SIM NOTE: To identify the SIM slot location, refer to the Getting Started guide. 1. Shut down the computer. If you are not sure whether the computer is off or in Hibernation, turn the computer on by pressing the power button. Then shut down the computer through the operating system. 2. Close the display. 3. Disconnect all external devices connected to the computer. 4. Unplug the power cord from the AC outlet. 5. Remove the battery. 6. Press in on the SIM, and then remove it from the slot. 7. Replace the battery. 8. Reconnect external power and external devices. 9. Turn on the computer. 8 Chapter 2 Networking (select models only)
-
 1
1 -
2
-
3
-
4
-
5
-
6
-
7
-
8
-
9
-
10
-
11
-
12
-
 13
13 -
 14
14 -
 15
15 -
 16
16 -
 17
17 -
 18
18 -
 19
19 -
 20
20 -
 21
21 -
 22
22 -
 23
23 -
24
-
25
-
26
-
27
-
28
-
29
-
30
-
31
-
32
-
33
-
34
-
35
-
36
-
37
-
38
-
39
-
40
-
41
-
42
-
43
-
44
-
45
-
46
-
47
-
48
-
49
-
50
-
51
-
52
-
53
-
54
-
55
-
56
-
57
-
58
-
59
-
60
-
61
-
62
-
63
-
64
-
65
-
66
-
67
-
68
-
69
-
70
-
71
-
72
-
73
-
74
-
75
-
76
-
77
-
78
-
79
-
80
-
81
-
82
 |
 |