HP Model 720 hp DDS-2 tape drive user's guide (a1658-90689) - Page 45
Removing and Replacing the DDS-2 Drive, Adding or Removing the DDS-2 Drive Bezels and Expansion
 |
View all HP Model 720 manuals
Add to My Manuals
Save this manual to your list of manuals |
Page 45 highlights
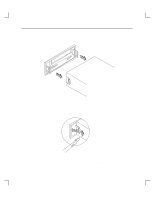
Troubleshooting and Removal/Replacement Procedures Removing and Replacing the DDS-2 Drive To open your system, remove and reinstall the DDS-2 drive, refer to the Owner's Guide that came with your system. Read "Preparing to Install the DDS-2 Drive" in Chapter 1 of this guide before beginning an installation. Adding or Removing the DDS-2 Drive Bezels and Expansion Brackets Depending on the size of the drive opening in your system, you may need to add or remove a bezel or expansion brackets to ensure that your DDS-2 drive fits in your system. NOTICE: Before performing any of these changes, make sure there is not a cassette in the drive. • To add a bezel (it can be a 3.5-in bezel, or a 5.25-in bezel) to your drive, push onto the drive, making sure the tabs click into place. Refer to Figure 3-1. • To remove a bezel from a drive, use a straight blade screwdriver to lift the bezel tabs from the sides of the drive. Refer to Figure 3-2. • To add or remove expansion brackets to the drive, use a T10 torx wrench to ei- ther tighten or remove the four torx screws that hold each expansion bracket to the drive. Refer to Figure 3-3. 3-10
-
 1
1 -
2
-
3
-
4
-
5
-
6
-
7
-
8
-
9
-
10
-
11
-
12
-
13
-
14
-
15
-
16
-
17
-
18
-
19
-
20
-
21
-
22
-
23
-
24
-
25
-
26
-
27
-
28
-
29
-
30
-
31
-
32
-
33
-
34
-
35
-
36
-
37
-
38
-
39
-
 40
40 -
 41
41 -
 42
42 -
 43
43 -
 44
44 -
 45
45 -
 46
46 -
 47
47 -
 48
48 -
 49
49 -
 50
50 -
51
 |
 |