HP NetServer LH 6000 Installation Guide for Compaq 4000/7000 Racks - Page 17
Installing the Bezel, order to install the bezel for use with a Compaq rack, the HP-bezel anchors
 |
View all HP NetServer LH 6000 manuals
Add to My Manuals
Save this manual to your list of manuals |
Page 17 highlights
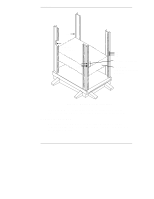
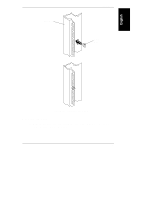
Installation 3. Install two screws through the two holes on either side of the NetServer front panel (see Figure 3-6) and into the rack nuts in the columns (previously installed). Figure 3-6. Securing the NetServer to the Rack Columns 4. Replace the hot-swap disk modules into the NetServer. Installing the Bezel This NetServer ships with bezel anchors for use with an HP-rack bezel. In order to install the bezel for use with a Compaq rack, the HP-bezel anchors must be replaced with Compaq-bezel anchors. 1. Remove the two screws that secure each bezel anchor to each end of the NetServer front panel, and remove the anchors (see Figure 3-7). 13
-
 1
1 -
2
-
3
-
4
-
5
-
6
-
7
-
8
-
9
-
10
-
11
-
 12
12 -
 13
13 -
 14
14 -
 15
15 -
 16
16 -
 17
17 -
 18
18 -
 19
19 -
 20
20 -
 21
21 -
 22
22 -
23
 |
 |

Installation
13
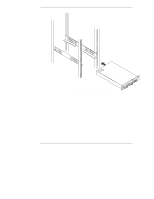
3.
Install two screws through the two holes on either side of the NetServer
front panel (see Figure 3-6) and into the rack nuts in the columns
(previously installed).
Figure 3-6.
Securing the NetServer to the Rack Columns
4.
Replace the hot-swap disk modules into the NetServer.
Installing the Bezel
This NetServer ships with bezel anchors for use with an HP-rack bezel. In
order to install the bezel for use with a Compaq rack, the HP-bezel anchors
must be replaced with Compaq-bezel anchors.
1.
Remove the two screws that secure each bezel anchor to each end of the
NetServer front panel, and remove the anchors (see Figure 3-7).