HP NetServer LP 1000r HP Netserver E 60, LC 3, LH 3/3r, and LPr Processor Upgr - Page 50
Replace the Cover
 |
View all HP NetServer LP 1000r manuals
Add to My Manuals
Save this manual to your list of manuals |
Page 50 highlights
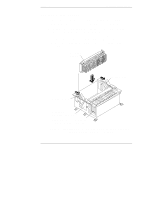
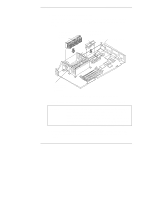
Chapter 4 Installation in E 60 and LPr 2. Insert the terminator board into the secondary processor position. 3. Verify that the terminator board is installed completely in the slot. Setting System Switches After installing processors, verify that the system switches are set to the correct processor clock speed (frequency). If the switches are not set correctly, set them accordingly. To set the system switches: 1. Locate the system switches on the system board (see Figure 4-1 or 4-2). 2. Look up the appropriate switch settings for the speed (frequency) of the processor modules installed in the NetServer. Tables of system switch settings are located next to the system switches and on the Technical Reference Card. 3. Set the switches accordingly. CAUTION Processor modules are designed to operate at the speed that is printed on the module. Do not set the processor speed switches to a different speed. Setting the processor speed to another speed may result in unreliable or intermittent performance. Data integrity may also be placed at risk if processors are operated at speeds other than that specified on the processor module. Replace the Cover NOTE In an HP NetServer E 60, reposition the cooling duct over the processor modules, and snap it into place. 1. Reinstall any accessory boards that you removed. 2. Replace the cover. 46
-
 1
1 -
2
-
3
-
4
-
5
-
6
-
7
-
8
-
9
-
10
-
11
-
12
-
13
-
14
-
15
-
16
-
17
-
18
-
19
-
20
-
21
-
22
-
23
-
24
-
25
-
26
-
27
-
28
-
29
-
30
-
31
-
32
-
33
-
34
-
35
-
36
-
37
-
38
-
39
-
40
-
41
-
42
-
43
-
44
-
 45
45 -
 46
46 -
 47
47 -
 48
48 -
 49
49 -
 50
50 -
 51
51 -
 52
52 -
 53
53 -
 54
54 -
 55
55 -
56
-
57
-
58
-
59
-
60
-
61
-
62
-
63
-
64
-
65
 |
 |