HP OfficeJet Enterprise Color X555 Officejet Enterprise Color X555 and MFP X58 - Page 1
HP OfficeJet Enterprise Color X555 Manual
 |
View all HP OfficeJet Enterprise Color X555 manuals
Add to My Manuals
Save this manual to your list of manuals |
Page 1 highlights
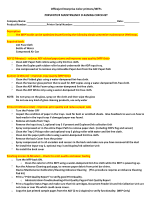
Officejet Enterprise Color printers/MFPs PREVENTIVE MAINTENANCE CLEANING CHECKLIST Company Name Date Product Number Printer Serial Number Description: The MFP health can be optimized by performing the following simple preventive maintenance (PM) steps. Required tools: Lint Free Cloth Bottle of Water Compressed Air Can ADF (3 Minutes) - reduces ADF related paper jams and improves copy quality (MFP Only) Clean ADF Paper Path rollers using a dry lint-free cloth. Clean the Duplex path rubber roller located underneath the ADF input tray. Use compressed air to remove any noticeable Paper dust from the ADF Paper Path Scanner (2 Minute) - Improves copy quality (MFP Only) Clean the Flatbed glass using a water-dampened lint-free cloth. Clean the Scanner glass portion that is used for ADF copies using a water-dampened lint-free cloth. Clean the ADF White Foam using a water-dampened lint-free cloth. Clean the ADF White strip using a water-dampened lint-free cloth. NOTE: Do not spray on the glass, spray on the cloth and then wipe the glass Do not use any kind of glass cleaning products, use only water Printer (6 Minutes total) - Improves print quality and reduces paper jams Turn the Printer OFF Inspect the condition of paper in the trays. Look for bent or wrinkled sheets. Give Feedback to users on how to load media in the input trays if damaged paper was found. Remove all media from Trays Remove the Input tray 2, optional tray 3 if present and Duplexer/Ink collection Unit Spray compressed air in the entire Paper Path to remove paper dust. (including OOPs flag and sensor) Clean the Tray 2 Pickup roller and optional tray 3 pickup roller with water and lint free cloth. Clean ALL the paper path rollers using a water-dampened lint-free cloth. Remove the back Cover from the printer Spray compressed air to all encoders and sensors in the back and make sure you have removed all the dust Re-install the Input tray 2, optional tray 3 and Duplex/Ink collection Unit Re-install the back cover Finishing process (6 Minutes) - Check for print quality and paper feeding Turn the MFP back ON. o Clean the exterior of the MPF using a water-dampened lint-free cloth while the MFP is powering up. Run the Advance Cleaning pad page, to remove paper debris from print bar shims. Device Maintenance>Calibration/Cleaning>Advance Cleaning (This procedure requires an Advance Cleaning Pad kit) Print a "Print Quality Report" to verify good Print Quality. o Administration>Troubleshooting>Print Quality Pages>Print Quality Report Print a Supplies Status Page and make sure that ink cartridges, Document Feeder kit and Ink Collection Unit are not close or over life which could cause issues. Copy the just printed sample pages from the ADF (2 to 2 duplex) to verify functionality. (MFP Only)
-
 1
1
 |
 |