HP Officejet v40 HP OfficeJet V Series - (English) Front Panel Menu Layout - Page 1
HP Officejet v40 - All-in-One Printer Manual
 |
View all HP Officejet v40 manuals
Add to My Manuals
Save this manual to your list of manuals |
Page 1 highlights
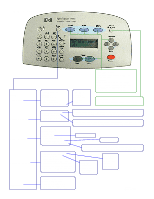
hp officejet v series front panel menu guide Setup: 1: Print Report 2: Speed Dial Setup 3: Basic Fax Setup 4: Advanced Fax Setup 5: Maintenance 1: Last Transaction 2: Fax Log 3: Speed Dial list 4: Menu Settings 5: Self-Test Report 6: Automatic Reports Setup * Every Error Send Error Receive Error Every Fax Send Only Off Scan, Fax, Copy: Press one of these buttons to select the desired operation. Options: Press this button after the Fax or Copy button to change the operation's settings. Start Black or Start Color: Starts the operation in black or color. Photo fit to Page: Press this button to automatically enlarge smaller standard photos to fit on the selected paper size. 1: Individual Speed Dial 2: Group Speed Dial 3: Delete Speed Dial 4: Print Speed Dial List Select an unassigned speed dial number by using the left/right buttons and Enter. Input the fax number and name using the same keys. Select an unassigned number by using the left/right buttons and Enter. Select the desired assigned speed dial numbers then input a name for the group. 1: Date and Time 2: Fax Header 3: Rings to Answer (1-6) 4: Paper Size 5: Tone or Pulse Dialing 6: Ring and Beep Volume 7: Fax Forwarding Black Only * Letter, A4, Legal * Loud, Soft, Off Select the forwarding fax number followed by the date and time the forwarding will take place. Use the left/right and Enter buttons. 1: Automatic Reports Setup 2: AnswerRing Pattern 3: Busy Redial (*yes, no) 4: No Answer Redial (yes, *no) 5: Automatic Reduction (*yes, no) 6: Backup Fax Reception (*yes, no) 7: Error Correction Mode (*on, off) 8: Silent Detect (on, *off) * All Rings Single Rings Double Rings Triple Rings Double and Triple * Every Error Send Error Receive Error Every Fax Send Only Off 1: Clean Print Cartridges 2: Align Print Cartridges 3: Restore Factory Defaults 4: Reprint Faxes in Memory 5: Set Language and Country Copyright 2001 Hewlett Packard
-
 1
1
 |
 |
