HP P1230 Users Guide CRT Monitor p1230 - Page 22
Troubleshooting, User's Guide, Use the OSD Geometry - crt monitor monitor
 |
View all HP P1230 manuals
Add to My Manuals
Save this manual to your list of manuals |
Page 22 highlights
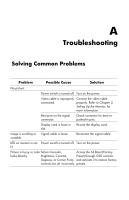
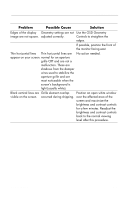
Troubleshooting Problem Possible Cause Solution Edges of the display Geometry settings are not Use the OSD Geometry image are not square. adjusted correctly. Controls to straighten the edges. If possible, position the front of the monitor facing east. Thin horizontal lines Thin horizontal lines are No action needed. appear on your screen. normal for an aperture grille CRT and are not a malfunction. These are shadows from the damper wires used to stabilize the aperture grille and are most noticeable when the screen's background is light (usually white). Black vertical lines are Grille element overlap Position an open white window visible on the screen. occurred during shipping. over the affected area of the screen and maximize the brightness and contrast controls for a few minutes. Readjust the brightness and contrast controls back to the normal viewing level after this procedure. User's Guide A-3
-
 1
1 -
2
-
3
-
4
-
5
-
6
-
7
-
8
-
9
-
10
-
11
-
12
-
13
-
14
-
15
-
16
-
 17
17 -
 18
18 -
 19
19 -
 20
20 -
 21
21 -
 22
22 -
 23
23 -
 24
24 -
 25
25 -
 26
26 -
 27
27 -
28
-
29
-
30
-
31
-
32
-
33
-
34
 |
 |