HP P2000 HP StorageWorks I/O Module Installation Instructions (590340-003, Feb - Page 2
to a dual-I/O module system - msa
 |
View all HP P2000 manuals
Add to My Manuals
Save this manual to your list of manuals |
Page 2 highlights
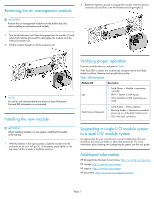
Removing the air management module 2. Rotate the latches upward to engage the module with the internal connector (2) and then, turn the thumbscrews finger-tight (3). IMPORTANT: Remove the air management module from the bottom bay only when installing an optional second module. 1. Turn the thumbscrews until they disengage from the module (1) and rotate both latches downward to disengage the module from the internal connector (2). 2. Pull the module straight out of the enclosure (3). NOTE: For clarity, only relevant details are shown in these illustrations. Port and LED information is not included. Installing the new module IMPORTANT: When installing modules in a new system, install the first module in the top bay. 1. With the latches in the open position, slide the module into the enclosure as far as it will go (1). If necessary, press lightly on the top-center of the module to facilitate insertion. Verifying proper operation Examine module status as indicated in Table 1. If the Fault LED is amber, the module has not gone online and likely failed its self-test. Remove and reinstall the module. Table 1 LED descriptions Module LED Description • Solid Green = Module is operating normally OK • Blink = System is starting up. • Off = Module is NOT operating normally Fault/Service Required • Solid Amber = Fault condition • Blinking Amber = Hardware-controlled power-up or cache flush/restore error • Off = No fault conditions Upgrading a single-I/O module system to a dual-I/O module system As appropriate for your environment, connect cables from this new module to the array controller or other disk enclosures. For more information about cabling and configuring the system, see the user guide. Additional information HP StorageWorks Modular Smart Arrays: http://www.hp.com/go/msa HP storage: http://www.hp.com/storage HP support: http://www.hp.com/support HP documents: http://www.hp.com/support/manuals Page 2
-
 1
1 -
 2
2
 |
 |
