HP P6000 HP Disk Drive Replacement Instructions (652989-001, June 2011) - Page 5
Installing a disk drive, Verifying proper operation, Adding the disk to a disk group, Returning - eva
 |
View all HP P6000 manuals
Add to My Manuals
Save this manual to your list of manuals |
Page 5 highlights
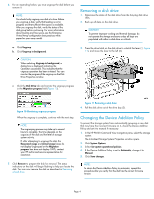
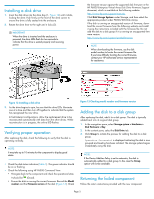
Installing a disk drive 1. Insert the disk drive into the drive bay (1, Figure 12) until it clicks, locking the drive. Push firmly on the front of the drive carrier to ensure the drive is fully seated into the enclosure. 2. Rotate the drive lever to the right until it locks (2). IMPORTANT: When the drive is inserted and the enclosure is powered, the drive LEDs flash for two seconds to indicate that the drive is seated properly and receiving power. the firmware version against the supported disk firmware in the HP P6000 Enterprise Virtual Array Disk Drive Firmware Support document, which is available at the following website: http://www.hp.com/support/manuals Click Disk Storage Systems under Storage, and then select the appropriate product under P6000/EVA Disk Arrays. If the disk is running an unsupported version of firmware, download the correct firmware from the following website and install it using the instructions included with the firmware file. Do not add the disk to a disk group if it is running an unsupported firmware version. http://www.hp.com/support/evadiskfirmware NOTE: When downloading the firmware, use the disk model number to locate the correct firmware file. If you have difficulty locating the correct firmware, contact your HP-authorized service representative for assistance. Figure 12 Installing a disk drive . 3. As the drive begins to spin, be sure that the drive LEDs illuminate one at a time and then turn off together to indicate that the system has recognized the new drive. In fault-tolerant configurations, allow the replacement drive to be reconstructed automatically with data from the other drives. While reconstruction is in progress, the online LED flashes. Verifying proper operation After replacing the disk, check the following to verify that the disk is operating normally: NOTE: It may take up to 10 minutes for the component to display good status. • Check the disk status indicators (Table 1). The green indicator should be on or flashing. • Check the following using HP P6000 Command View: • Navigate back to the component and check the operational state. It should be (Good). • Ensure the disk is running the correct firmware. Record the Model number and the Firmware version of the disk (Figure 13). Check Figure 13 Checking model number and firmware version . Adding the disk to a disk group After replacing the disk, add it to a disk group. The disk is typically added back into its original disk group. 1. In the navigation pane, select Storage system > Hardware > Disk Enclosure > Bay. 2. In the content pane, select the Disk Drive tab. 3. Click Group to initiate the process for adding the disk to a disk group. Operation Successful is displayed indicating the disk is now grouped and leveling has been initiated. The storage system begins immediately using the disk. NOTE: If the Device Addition Policy is set to automatic, the disk is automatically added to a disk group. In this case the Group option will not be available. Returning the failed component Follow the return instructions provided with the new component. Page 5
-
 1
1 -
 2
2 -
 3
3 -
 4
4 -
 5
5
 |
 |
