HP PL4260N Quick Setup Poster for PE4240N - Page 1
HP PL4260N - 42" Plasma TV Manual
 |
View all HP PL4260N manuals
Add to My Manuals
Save this manual to your list of manuals |
Page 1 highlights
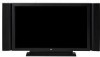
HP PE4240n 42" Plasma Television Start Here Thank you for purchasing an HP PE4240n 42" Plasma Television. ■ Identify the type of connectors your home entertainment equipment uses, then go to the corresponding step on this poster and follow the directions. Example: To connect a cable or satellite set-top box which connects via S-video cabling, refer to step 5, "Connect an S-video device." ■ Refer to the user documentation for advanced connections. ■ Apply Power to all components and then to the TV. ■ Finally, refer to the section titled "Setting up TV channels (Auto Scan)" in your user documentation to finalize your TV setup. Contents ■ HP plasma TV ■ TV stand ■ Speakerbars (2) (optional) ■ Documentation kit ■ Remote control with AA batteries (2) ■ Speaker cables (2) (optional) ■ Antenna cable ■ AC power cable The information in this document is subject to change without notice. 1 TV Connector Panels 21 Video Right Video Inputs Left L Audio R Outputs S-Video Right S-Video Inputs Left Y YPBPR1: 480P/720P/1080i YPBPR2: 480i PB Component PR Video Inputs Right Left 21 TV ANTENNA CABLE IN 3 Connect a PC or Other Device by DVI DVI © 2004 Hewlett-Packard Development Company, L.P. Printed in www.hp.com 7 Analog Video from PC TV OUT 2a Attach Brackets to Speakers (optional) Right speaker Left speaker 2b Attach Speakers to TV 2c Connect Speaker Cables to TV Step 1 Step 2 Step 3 4 Connect a Component (YPbPr) Device 5 Connect an S-video Device 6 Connect a Composite Device Component Video Outputs Y Pb Pr R L Y YPBPR1: 480P/720P/1080i YPBPR2: 480i PB Component PR Video Inputs Right Left 21 S-video Outputs S-Video S-Video Right Inputs Left Composite Video Outputs 21 Video Video Right Inputs Left 8 Outdoor Antenna Connection Wall Coaxial Cable Signal TV ANTENNA CABLE IN 9 Remote Control 10 Power On Once the power cable is connected, power on TV by pressing PWR on the remote control. Refer to the section in the user documentation titled "Setting up TV channels (Auto Scan)" to complete TV setup. Refer to the user documentation for advanced connections.
-
 1
1
 |
 |
