HP PSC 2500 HP PSC 2500 series All-in-One - (English) Windows/Mac Network Setu - Page 2
Network Setup Poster - Side 2 - wireless setup
 |
View all HP PSC 2500 manuals
Add to My Manuals
Save this manual to your list of manuals |
Page 2 highlights
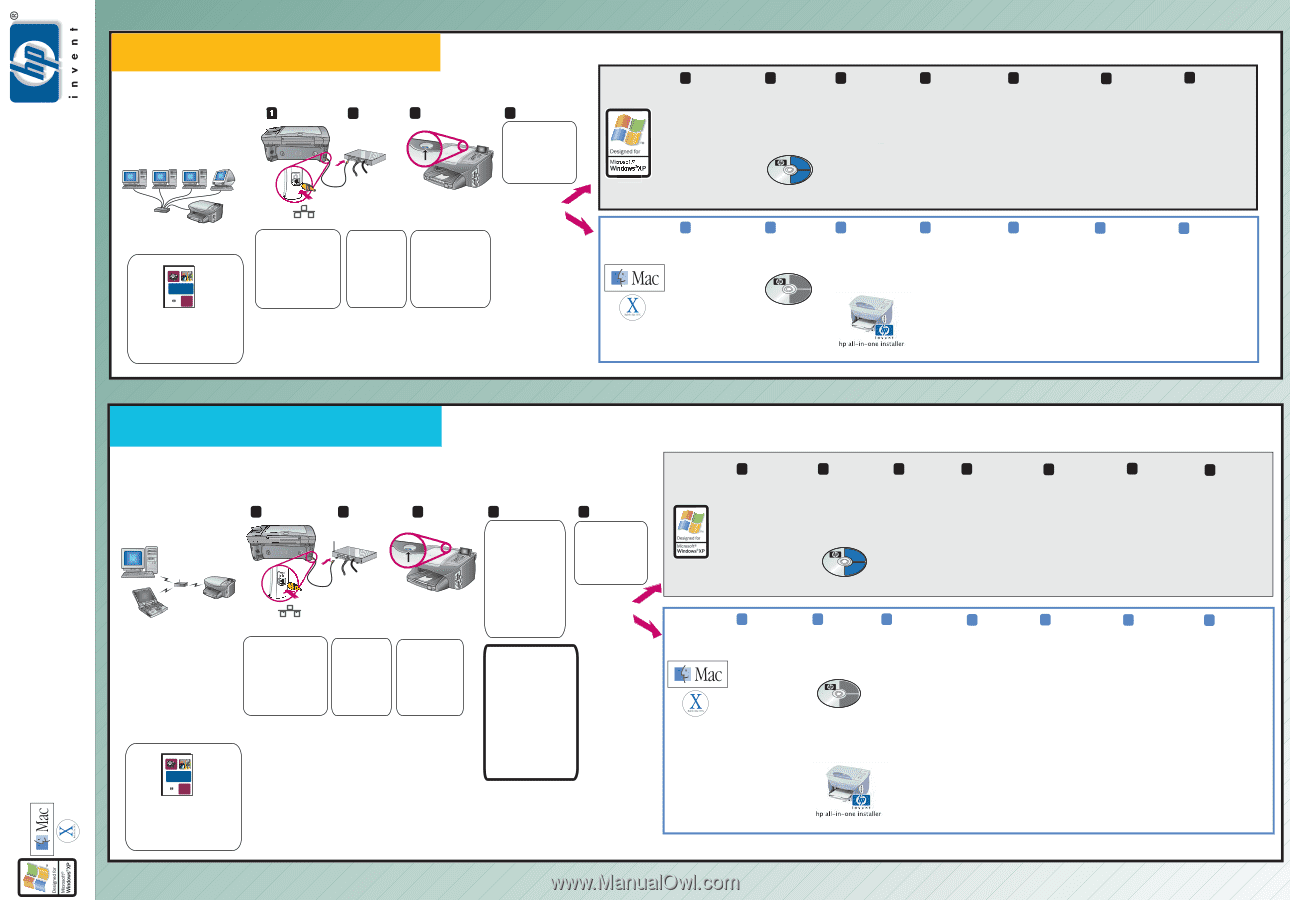
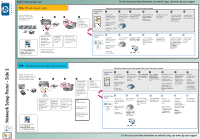
Side 2 - Start on other side. 10a Wired network setup Wired setup allows your HP PSC to communicate to 1 your computers through a router/hub/switch. 2 3 4 Choose Windows or Macintosh, and then follow the steps carefully. hp psc 2500 photosmart series all-in-one reference guide If you have any questions, see the Wired Network Setup chapter in the Reference Guide. ETHERNET Remove the yellow plug from the ETHERNET jack. Connect the ETHERNET cable to the back of the HP PSC. Connect the ETHERNET cable to the hub/router/ switch. NOTE: You can use the cable from the box or purchase a longer cable. STOP! Make sure the blue network light on the HP PSC is lit. This might take 60 seconds. For the most up-to-date information on network setup, see www. hp.com/support WINDOWS USERS: Follow these boxed steps for each computer that is part of the wired network. 5 6 7 8 Turn on your computer and wait for the desktop to appear. Make sure you are logged onto the network. Insert the HP PSC Windows CD and then, follow the onscreen instructions. Choose Through the network as your connection type. Choose the second option, connect using a network cable as your connection type. Disable any firewall software. 9 Complete the rest of the onscreen instructions. 10 11 After your computer restarts, follow all onscreen instructions including the Fax Setup Wizard. Congratulations! You are ready to use the HP PSC. MACINTOSH USERS: 5 Turn on your computer and wait for the desktop to appear. Make sure you are logged onto the network. Disable any firewall software. 6 7 Insert the HP PSC Macintosh CD. Double-click the HP All-In-One Installer icon on your folder. 8 In the first dialog box, you must select Network as the device connection type. 9 Choose wired network as your connection type. 1010 1111 Complete all onscreen instructions including the Setup Assistant. In the Select Device dialog box, make sure TCP/IP (network) is selected. Congratulations! You are ready to use the HP PSC. Network Setup Poster - Side 2 10b Wireless network setup (infrastructure) Wireless setup allows your HP PSC to communicate to your computers through a wireless access point or base station. 1 2 3 ETHERNET Remove the yellow plug from the ETHERNET jack. Connect the ETHERNET cable to the back of the HP PSC. Connect the ETHERNET cable to the access point. (You will remove this later.) STOP! Make sure the blue network light on the HP PSC is lit. This might take 60 seconds. hp psc 2500 photosmart series all-in-one reference guide If you have any questions, see the Wireless Network Setup chapter in the Reference Guide. 4 In the box below, write down the information listed. Use during step 10. If you are unsure, see the documentation or web page for the access point/base station. 5 Choose Windows or Macintosh, and then follow the steps carefully. SSID /Network Name: WEP Key/Password (if applicable): For Macintosh, this is called Network Name and Password. Follow these boxed steps for each computer that is part of the wireless network. WINDOWS USERS: 6 Turn on your computer and wait for the desktop to appear. Make sure you are logged onto the network. Disable any firewall software. 7 Insert the HP PSC Windows CD and then, follow the onscreen instructions. 8 9 Choose Through the network as your connection type. Choose connect using wireless communication as your connection type. 10 11 Complete the rest of the onscreen instructions. Enter the information your wrote down earlier. Make sure the blue network light is steady. Refer to the Reference Guide for help. When you see the Unplug Cable dialog box, disconnect the cable from your HP PSC and access point. 12 After your computer restarts, complete all onscreen instructions including the Fax Setup Wizard. Congratulations! You are ready to use the HP PSC. 12 MACINTOSH 6 USERS: Turn on your computer and wait for the desktop to appear. Make sure you are logged onto the network. Disable any firewall software. 7 Insert the HP PSC Macintosh CD. Double-click the HP All-In-One Installer icon on your desktop. 8 In the first dialog box, you must select Network as the device connection type. 9 Choose wireless network as your connection type. 1010 Enter the information that you wrote down earlier. Make sure the blue network light is steady. Refer to the Reference Guide for help. 1111 12 Complete all onscreen instructions including the Setup Assistant. In the Select Device dialog box, make sure TCP/IP (network) is selected. Congratulations! You are ready to use the HP PSC. For the most up-to-date information on network setup, see www. hp.com/support
-
 1
1 -
 2
2
 |
 |