HP PageWide Enterprise Color 556 Installation Guide - Page 6
Windows® 8.0, 8.1, and 10, Windows® 7, Windows® XP and Windows Vista®, Windows® 8.0, 8.1 et 10,
 |
View all HP PageWide Enterprise Color 556 manuals
Add to My Manuals
Save this manual to your list of manuals |
Page 6 highlights
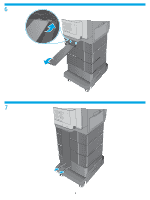
11 EN OS X: The list of installed options should automatically update during the first print job after installing the accessory. If not, perform the following steps: 1. From the Apple menu ( ), choose System Preferences. 2. Choose Print & Scan (or Printers & Scanners). 3. Choose the printer, click the Options & Supplies button, and then choose the Options tab. 4. Manually configure the accessory. Windows® 8.0, 8.1, and 10: When attaching the accessory before installing the printer software, this procedure is not necessary. When attaching the accessory after installing the printer software, perform the following steps: 1. Scroll to the bottom-left corner of the screen, and right-click the window that displays. For Windows 10, Right-click the Start button in the lower-left of the open desktop. 2. Select Control Panel. Under Hardware and Sound, select View devices and printers. 3. Right-click the name of the printer, and then select Printer Properties. 4. Click the Device Settings tab. 5. Update the installed options. The steps vary according to connection type and print driver: • For a network or USB connection with the HP Universal Print Driver (UPD): In the Installable Options section under Automatic Configuration, select Update Now. • For a network or USB connection with the HP PCL 6 print driver: Select Update Now. • For a network or USB connection with the HP PCL-6 version 4 print driver: Manually install the accessory by clicking the drop-down box next to the tray to be installed, and then select Installed. Windows® 7: When attaching the accessory before installing the printer software, this procedure is not necessary. When attaching the accessory after installing the printer software, perform the following steps: 1. Make sure the printer is turned on and connected to the computer or network. 2. Open the Windows Start menu, and then click Devices and Printers. 3. Right-click the name of this printer, and select Printer Properties. 4. Click the Device Settings tab. 5. Update the installed options. The steps vary according to connection type and print driver: • For a network or USB connection with the HP Universal Print Driver (UPD): In the Installable Options section under Automatic Configuration, select Update Now. • For a network or USB connection with the HP PCL 6 print driver: Select Update Now. Windows® XP and Windows Vista®: When attaching the accessory before installing the printer software, this procedure is not necessary. When attaching the accessory after installing the printer software, perform the following steps: 1. Make sure the printer is turned on and connected to the computer or network. 2. Open the Windows Start menu, and then click Devices and Printers (or Printers and Faxes for XP). 3. Right-click the name of this printer, and select Printer Properties (or Properties for XP). 4. Click the Device Settings tab. 5. Click the Installable Options section. 6. For a USB or network connection: In the drop-down box next to Automatic Configuration, select Update Now. FR OS X : une fois l'accessoire mis en place, la liste des options installées doit se mettre à jour automatiquement lors de la première tâche d'impression. Si ce n'est pas le cas, procédez comme suit : 1. Dans le menu Apple ( ), cliquez sur Préférences système. 2. Sélectionnez Imprimer et numériser (ou Imprimantes et scanners). 3. Sélectionnez l'imprimante, cliquez sur le bouton Options et fournitures, puis sélectionnez l'onglet Options. 4. Configurez manuellement l'accessoire. Windows® 8.0, 8.1 et 10 : si vous fixez l'accessoire avant l'installation du logiciel de l'imprimante, cette procédure n'est pas nécessaire. Lorsque vous connectez l'accessoire après l'installation du logiciel de l'imprimante, effectuez les étapes suivantes : 1. Faites défiler jusqu'au coin inférieur gauche de l'écran et cliquez avec le bouton droit sur la fenêtre qui s'affiche. Pour Windows 10, cliquez avec le bouton droit sur le bouton Démarrer situé dans la partie gauche inférieure du bureau ouvert. 2. Sélectionnez Panneau de configuration. Sous Matériel et audio, sélectionnez Afficher les périphériques et imprimantes. 3. Cliquez avec le bouton droit de la souris sur le nom de l'imprimante, puis sélectionnez Propriétés de l'imprimante. 4. Cliquez sur l'onglet Paramètres du périphérique. 5. Mettez à jour les options installées. Les étapes varient selon le type de connexion et le pilote de l'imprimante : • Pour une connexion réseau ou USB avec le HP Universal Print Driver (pilote d'impression universel - UPD) : dans la section Options installables sous Configuration automatique, sélectionnez Mettre à jour maintenant. • Pour une connexion réseau ou USB avec le pilote d'impression HP PCL 6 : sélectionnez Mettre à jour maintenant. • Pour une connexion réseau ou USB avec le pilote d'impression HP PCL-6 version 4 : installez manuellement l'accessoire en cliquant dans le champ déroulant en regard du bac à installer, puis sélectionnez Installé. Windows® 7 : si vous fixez l'accessoire avant l'installation du logiciel de l'imprimante, cette procédure n'est pas nécessaire. Lorsque vous connectez l'accessoire après l'installation du logiciel de l'imprimante, effectuez les étapes suivantes : 1. Assurez-vous que l'imprimante est sous tension et qu'elle est connectée à votre ordinateur ou au réseau. 2. Ouvrez le menu Démarrer de Windows, puis cliquez sur Périphériques et imprimantes. 3. Cliquez avec le bouton droit sur le nom de cette imprimante et choisissez Propriétés de l'imprimante. 4. Cliquez sur l'onglet Paramètres du périphérique. 5. Mettez à jour les options installées. Les étapes varient selon le type de connexion et le pilote de l'imprimante : • Pour une connexion réseau ou USB avec le HP Universal Print Driver (pilote d'impression universel - UPD) : dans la section Options installables sous Configuration automatique, sélectionnez Mettre à jour maintenant. • Pour une connexion réseau ou USB avec le pilote d'impression HP PCL 6 : sélectionnez Mettre à jour maintenant. Windows® XP et Windows Vista® : si vous fixez l'accessoire avant l'installation du logiciel de l'imprimante, cette procédure n'est pas nécessaire. Lorsque vous connectez l'accessoire après l'installation du logiciel de l'imprimante, effectuez les étapes suivantes : 1. Assurez-vous que l'imprimante est sous tension et qu'elle est connectée à votre ordinateur ou au réseau. 2. Ouvrez le menu Démarrer de Windows, puis cliquez sur Périphériques et imprimantes (ou sur Imprimantes et télécopieurs sous XP). 3. Cliquez avec le bouton droit sur le nom de cette imprimante et sélectionnez Propriétés de l'imprimante (ou Propriétés pour XP). 4. Cliquez sur l'onglet Paramètres du périphérique. 5. Cliquez sur la section Options installables. 6. Pour une connexion réseau ou USB : Dans la liste déroulante en regard de Configuration automatique, sélectionnez Mettre à jour maintenant. 6
-
 1
1 -
 2
2 -
 3
3 -
 4
4 -
 5
5 -
 6
6 -
 7
7 -
 8
8 -
 9
9 -
 10
10 -
 11
11 -
 12
12 -
13
-
14
-
15
-
16
-
17
-
18
-
19
-
20
-
21
-
22
-
23
-
24
-
25
-
26
-
27
-
28
 |
 |
