HP PageWide Enterprise Color MFP 785 3 x 550 Tray with Stand Accessory Install - Page 6
Windows®
 |
View all HP PageWide Enterprise Color MFP 785 manuals
Add to My Manuals
Save this manual to your list of manuals |
Page 6 highlights
9 EN Windows®: If you attached the accessory before installing the printer software, it is configured during software installation. If you attached the accessory after software installation, you need to update the software settings from the Device Settings tab in Printer Properties to configure it. OS X: After you attach the accessory and send the first print job, the accessory should be automatically configured. If not, open System Preferences, choose Printers & Scanners, select your printer, then click Options & Supplies and manually configure the accessory on the Options tab. FR Windows® : Si vous avez branché l'accessoire avant d'installer le logiciel de l'imprimante, il est configuré pendant l'installation du logiciel. Si vous avez branché l'accessoire après l'installation du logiciel, vous devez mettre à jour les paramètres du logiciel à partir de l'onglet Paramètres du Dispositif dans Propriétés de l'Imprimante pour le configurer. OS X : Après avoir fixé l'accessoire et envoyé le premier travail d'impression, l'accessoire doit être automatiquement configuré. Dans le cas contraire, ouvrez Préférences du Système, choisissez Imprimantes & Scanners, sélectionnez votre imprimante, puis cliquez sur Options & Fournitures et configurez manuellement l'accessoire dans l'onglet Options. IT Windows®: se l'accessorio è stato collegato prima dell'installazione del software della stampante, viene configurato durante l'installazione del software. Se l'accessorio è stato collegato dopo l'installazione del software della stampante, è necessario aggiornare le impostazioni del software dalla scheda Impostazioni dispositivo in Proprietà stampante per configurarlo. OS X: dopo aver collegato l'accessorio e inviato il primo processo di stampa, l'accessorio dovrebbe eseguire la configurazione automaticamente. In caso contrario, aprire Preferenze di sistema, selezionare Stampanti e scanner, selezionare la propria stampante, quindi fare clic su Opzioni e materiali di consumo e configurare manualmente l'accessorio nella scheda Opzioni. ES Windows®: Si conecta el accesorio antes de instalar el software de la impresora, se configurará durante la instalación del software. Si conecta el accesorio después de la instalación del software, necesitará actualizar la configuración del software en la pestaña Configuración del dispositivo en Propiedades de la impresora para configurarlo. OS X: Después de conectar el accesorio y enviar el primer trabajo de impresión, el accesorio se configurará automáticamente. Si no, abra Preferencias del sistema, elija Impresoras y Escáneres, seleccione su impresora y luego haga clic en Opciones y Suministros , y configúrelo manualmente en la pestaña Opciones. DA Windows®: Hvis du har monteret tilbehøret, før du har installeret printersoftwaren, konfigureres det under softwareinstallationen. Hvis du har monteret tilbehøret efter softwareinstallationen, skal du opdatere softwareindstillingerne fra fanen Enhedsindstillinger i Printeregenskaber for at konfigurere det. OS X: Når du har monteret tilbehøret og sender det første printjob, bør tilbehøret automatisk blive konfigureret. Hvis det ikke sker, skal du åbne Systemindstillinger, vælge Printere og scannere, vælge din printer og derefter klikke på Funktioner og forbrugsvarer og manuelt konfigurere tilbehøret på fanen Funktioner. NL Windows®: Als u het accessoire hebt aangesloten voordat u de printersoftware hebt geïnstalleerd, wordt dit geconfigureerd tijdens de installatie van de software. Als u het accessoire hebt aangesloten na de installatie van de software moet u de software-instellingen bijwerken in het tabblad Apparaatinstellingen in Eigenschappen van printer om dit te configureren. OS X: Nadat u het accessoire hebt aangesloten en de eerste afdruktaak hebt verzonden, moet het accessoire automatisch worden geconfigureerd. Zo niet, open dan Systeemvoorkeuren, kies Printers en scanners, selecteer uw printer, klik vervolgens op Opties en supplies en configureer het accessoire handmatig in het tabblad Opties. 6
-
 1
1 -
 2
2 -
 3
3 -
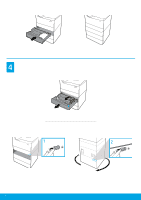
 4
4 -
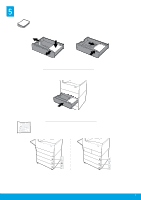
 5
5 -
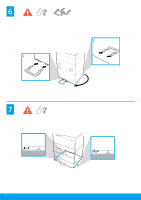
 6
6 -
 7
7 -
 8
8 -
 9
9 -
 10
10 -
 11
11 -
 12
12
 |
 |
