HP PageWide Managed P57750dw OfficeJet Pro X and PageWide 300 400 500 series - - Page 4
For Wide 500 series and Wide Managed products
 |
View all HP PageWide Managed P57750dw manuals
Add to My Manuals
Save this manual to your list of manuals |
Page 4 highlights
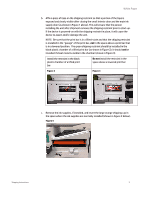
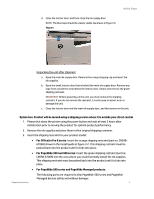
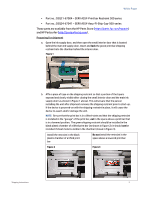
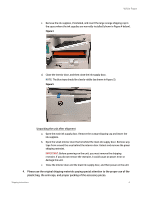
White Paper d. Close the interior door, and then close the ink supply door. NOTE: The blue tape should be clearly visible (as shown in Figure 5). Figure 5 Unpacking the unit after shipment a. Open the main ink supply door. Remove the orange shipping cap and insert the ink supplies. b. Open the small interior door that is behind the main ink supply door. Remove any tape from around the area behind the interior door. Unlock and remove the green shipping restraint. IMPORTANT: Before powering-on the unit, you must remove the shipping restraint. If you do not remove the restraint, it could cause an assert error or damage the unit. c. Close the interior door and the main ink supply door, and then power on the unit. Option two: Product will be moved using a shipping service where it is outside your direct control 1. Please shut down the printer using the power button and wait at least 2 hours after initialization prior to moving the product for optimal product performance. 2. Remove the ink supplies and place them in their original shipping container. 3. Insert the shipping restraint for your product model: • For OfficeJet Pro X series: Insert the orange shipping restraint (part no: CN59867068) shown in the install guide in figure 3.2. This shipping restraint must be pushed back into the product until it clicks into place. • For PageWide 300 and 400 series: Insert the green shipping restraint (part no: CN598-67068) into the area where you would normally install the ink supplies. This shipping restraint must be pushed back into the product until it clicks into place. • For PageWide 500 series and PageWide Managed products: Shipping Instructions The following parts are required to ship PageWide 500 series and PageWide Managed devices safely and without damage: 4
-
 1
1 -
 2
2 -
 3
3 -
 4
4 -
 5
5 -
 6
6 -
 7
7
 |
 |
