HP Pavilion 11-u000 Maintenance and Service Guide - Page 49
cable is attached to the hard drive with double-sided adhesive., of the front end of the hard drive.
 |
View all HP Pavilion 11-u000 manuals
Add to My Manuals
Save this manual to your list of manuals |
Page 49 highlights
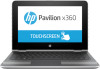
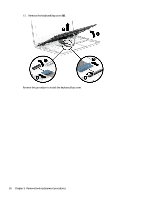
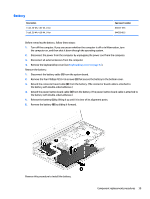
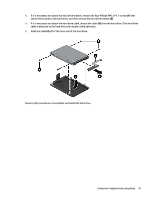
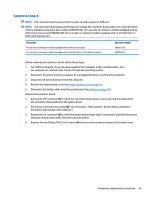
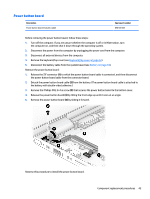
4. If it is necessary to replace the hard drive bracket, remove the four Phillips PM3.0×4.1 screws (1) that secure the bracket to the hard drive, and then remove the hard drive bracket (2). 5. If it is necessary to replace the hard drive cable, detach the cable (3) from the hard drive. (The hard drive cable is attached to the hard drive with double-sided adhesive.) 6. Slide the cable (4) off of the front end of the hard drive. Reverse this procedure to reassemble and install the hard drive. Component replacement procedures 41
-
 1
1 -
2
-
3
-
4
-
5
-
6
-
7
-
8
-
9
-
10
-
11
-
12
-
13
-
14
-
15
-
16
-
17
-
18
-
19
-
20
-
21
-
22
-
23
-
24
-
25
-
26
-
27
-
28
-
29
-
30
-
31
-
32
-
33
-
34
-
35
-
36
-
37
-
38
-
39
-
40
-
41
-
42
-
43
-
 44
44 -
 45
45 -
 46
46 -
 47
47 -
 48
48 -
 49
49 -
 50
50 -
 51
51 -
 52
52 -
 53
53 -
 54
54 -
55
-
56
-
57
-
58
-
59
-
60
-
61
-
62
-
63
-
64
-
65
-
66
-
67
-
68
-
69
-
70
-
71
-
72
-
73
-
74
-
75
-
76
-
77
-
78
-
79
-
80
-
81
-
82
-
83
-
84
-
85
-
86
-
87
-
88
-
89
-
90
 |
 |

4.
If it is necessary to replace the hard drive bracket, remove the four Phillips PM3.0×4.1 screws
(1)
that
secure the bracket to the hard drive, and then remove the hard drive bracket
(2)
.
5.
If it is necessary to replace the hard drive cable, detach the cable
(3)
from the hard drive. (The hard drive
cable is attached to the hard drive with double-sided adhesive.)
6.
Slide the cable
(4)
off
of the front end of the hard drive.
Reverse this procedure to reassemble and install the hard drive.
Component replacement procedures
41