HP Pavilion 15-cc700 Maintenance and Service Guide 1 - Page 46
and right sides of the bottom cover from the keyboard/top cover.
 |
View all HP Pavilion 15-cc700 manuals
Add to My Manuals
Save this manual to your list of manuals |
Page 46 highlights
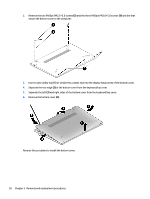
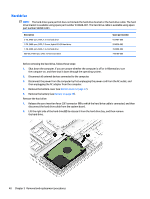
2. Remove the two Phillips PM2.5×5.6 screws (2) and the three Phillips PM2.0×5.8 screws (3) and the that secure the bottom cover to the computer: 3. Insert a case utility tool (1) or similar thin, plastic tool into the display hinge areas of the bottom cover. 4. Separate the rear edge (2) of the bottom cover from the keyboard/top cover. 5. Separate the left (3) and right sides of the bottom cover from the keyboard/top cover. 6. Remove the bottom cover (4). Reverse this procedure to install the bottom cover. 38 Chapter 5 Removal and replacement procedures
-
 1
1 -
2
-
3
-
4
-
5
-
6
-
7
-
8
-
9
-
10
-
11
-
12
-
13
-
14
-
15
-
16
-
17
-
18
-
19
-
20
-
21
-
22
-
23
-
24
-
25
-
26
-
27
-
28
-
29
-
30
-
31
-
32
-
33
-
34
-
35
-
36
-
37
-
38
-
39
-
40
-
 41
41 -
 42
42 -
 43
43 -
 44
44 -
 45
45 -
 46
46 -
 47
47 -
 48
48 -
 49
49 -
 50
50 -
 51
51 -
52
-
53
-
54
-
55
-
56
-
57
-
58
-
59
-
60
-
61
-
62
-
63
-
64
-
65
-
66
-
67
-
68
-
69
-
70
-
71
-
72
-
73
-
74
-
75
-
76
-
77
-
78
-
79
-
80
-
81
-
82
-
83
-
84
-
85
-
86
-
87
-
88
-
89
-
90
-
91
-
92
-
93
-
94
-
95
-
96
 |
 |

2.
Remove the two Phillips PM2.5×5.6 screws
(2)
and the three Phillips PM2.0×5.8 screws
(3)
and the that
secure the bottom cover to the computer:
3.
Insert a case utility tool
(1)
or similar thin, plastic tool into the display hinge areas of the bottom cover.
4.
Separate the rear edge
(2)
of the bottom cover from the keyboard/top cover.
5.
Separate the left
(3)
and right sides of the bottom cover from the keyboard/top cover.
6.
Remove the bottom cover
(4)
.
Reverse this procedure to install the bottom cover.
38
Chapter 5
Removal and replacement procedures