HP Pavilion Elite m9000 Getting Started Guide - Page 136
Making a LightScribe label, Windows Start Button, Programs, Roxio, Express Labeler, Disc Label
 |
View all HP Pavilion Elite m9000 manuals
Add to My Manuals
Save this manual to your list of manuals |
Page 136 highlights
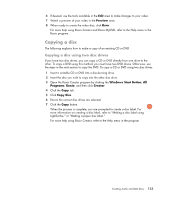
Making a LightScribe label To make a LightScribe label: 1 Place the disc into the disc drive with the top of the disc facing down. The top is the gold non-reflective side of the disc, opposite of the side that you record data onto. 2 Close the drive. 3 Open Roxio Express Labeler by clicking the Windows Start Button, All Programs, Roxio, and then click Express Labeler. 4 Under Step 1: Select Project, select Disc Label. 5 Under Step 2: Edit, design the disc label. a Click Disc Titles to set the disc title and subtitle. b Click Tracks to add song titles or file names. c Click the arrows to the left and right of Layout to view the different label layouts available. You can also use the mouse to drag the title, subtitle, and track names around the label. d Click the arrows to the left and right of Background to view the different label backgrounds available. To use an image from your computer hard disk drive, click Background, and then click Import Background. Then navigate to an image on the hard disk drive and click Open. 6 When you are ready to create the LightScribe label, click Print. 7 Under Disc Label, select 12 cm LightScribe Disc. 8 Click OK to create the LightScribe label. The estimated time to complete the label displays, along with a progress bar. It is possible to continue to work on the computer while the LightScribe label is created. For more help using Roxio Express Labeler, refer to the Help menu in the Roxio Express Labeler program. 126 Getting Started
-
 1
1 -
2
-
3
-
4
-
5
-
6
-
7
-
8
-
9
-
10
-
11
-
12
-
13
-
14
-
15
-
16
-
17
-
18
-
19
-
20
-
21
-
22
-
23
-
24
-
25
-
26
-
27
-
28
-
29
-
30
-
31
-
32
-
33
-
34
-
35
-
36
-
37
-
38
-
39
-
40
-
41
-
42
-
43
-
44
-
45
-
46
-
47
-
48
-
49
-
50
-
51
-
52
-
53
-
54
-
55
-
56
-
57
-
58
-
59
-
60
-
61
-
62
-
63
-
64
-
65
-
66
-
67
-
68
-
69
-
70
-
71
-
72
-
73
-
74
-
75
-
76
-
77
-
78
-
79
-
80
-
81
-
82
-
83
-
84
-
85
-
86
-
87
-
88
-
89
-
90
-
91
-
92
-
93
-
94
-
95
-
96
-
97
-
98
-
99
-
100
-
101
-
102
-
103
-
104
-
105
-
106
-
107
-
108
-
109
-
110
-
111
-
112
-
113
-
114
-
115
-
116
-
117
-
118
-
119
-
120
-
121
-
122
-
123
-
124
-
125
-
126
-
127
-
128
-
129
-
130
-
 131
131 -
 132
132 -
 133
133 -
 134
134 -
 135
135 -
 136
136 -
 137
137 -
 138
138 -
 139
139 -
 140
140 -
 141
141 -
142
-
143
-
144
-
145
-
146
-
147
-
148
-
149
-
150
-
151
-
152
-
153
-
154
-
155
-
156
-
157
-
158
-
159
-
160
-
161
-
162
-
163
-
164
-
165
-
166
-
167
-
168
-
169
-
170
-
171
-
172
-
173
-
174
-
175
-
176
-
177
-
178
-
179
-
180
-
181
-
182
-
183
-
184
-
185
-
186
-
187
-
188
-
189
-
190
 |
 |
