HP Pavilion HDX9575LA Security - Windows Vista - Page 18
Registering fingerprints, Fingerprint Reader, Start Here, VeriSoft Access Manager, Log On, Finish
 |
View all HP Pavilion HDX9575LA manuals
Add to My Manuals
Save this manual to your list of manuals |
Page 18 highlights
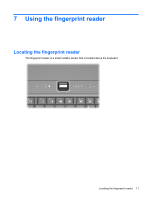
Registering fingerprints A fingerprint reader allows you to log on to Windows using a fingerprint registered in VeriSoft Access Manager, instead of using a Windows password. Before you can use a fingerprint logon to Windows, you must set up the fingerprint reader. To see a step-by-step demonstration of how to set up the fingerprint reader, double-click the Fingerprint Reader, Start Here icon located on the desktop. After you have viewed the demonstration, follow the steps below to register your fingerprints. 1. In Windows, double-click the VeriSoft Access Manager icon in the notification area of the taskbar. 2. On the "My Identity" page, click Log On, located in the upper-left corner of the page. The VeriSoft Access Manager Logon Wizard opens. NOTE: If you are already logged on to Windows, skip to step 5. 3. On the "Introduce Yourself" page, enter the user's Windows password, if one has been established, and then click Next. 4. On the "Completing the VeriSoft Logon Wizard" page, click Finish. 5. On the "Select a Task" page, click Register Fingerprints. NOTE: The factory settings of VeriSoft Access Manager requires registration of at least 2 different fingers. 6. When the VeriSoft Registration Wizard opens, click Next, and then slowly swipe your finger across the sensor. NOTE: The factory setting for enrolling the first fingerprint is the right index finger. You can change the default by clicking the finger you want to register first, on either the left hand or the right hand. When you click a finger, it will be outlined to show it has been selected. 7. Continue swiping the same finger over the fingerprint sensor until the finger on the screen turns green. NOTE: The progress indicator advances after each finger swipe. Multiple swipes are necessary to register a fingerprint. NOTE: If you need to start over during the fingerprint registration process, right-click the highlighted finger on the screen and then click Start Over. 8. Click a different finger on the screen to register, and then repeat steps 5 and 6. NOTE: If you click Finish before registering at least 2 fingers, an error message is displayed. Click OK to continue. 9. After you have registered at least 2 fingers, click Finish. 10. To set up the fingerprint reader for a different Windows user, log on to Windows with that user's credentials and then repeat steps 1 through 8. 12 Chapter 7 Using the fingerprint reader
-
 1
1 -
2
-
3
-
4
-
5
-
6
-
7
-
8
-
9
-
10
-
11
-
12
-
 13
13 -
 14
14 -
 15
15 -
 16
16 -
 17
17 -
 18
18 -
 19
19 -
 20
20 -
 21
21
 |
 |
