HP Pavilion a700 Upgrading and Servicing Guide - Page 17
WARNING: For Parallel ATA drives
 |
View all HP Pavilion a700 manuals
Add to My Manuals
Save this manual to your list of manuals |
Page 17 highlights
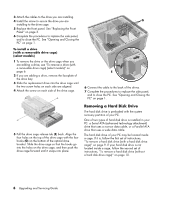
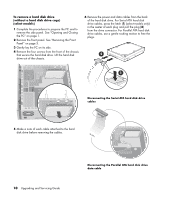
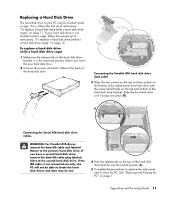
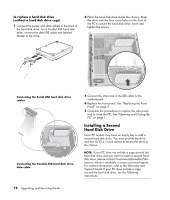
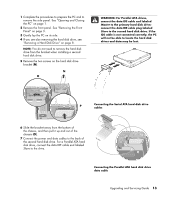
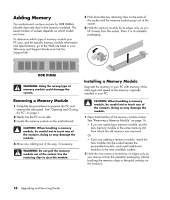
1 Complete the procedures to prepare the PC and to remove the side panel. See "Opening and Closing the PC" on page 1. 2 Remove the front panel. See "Removing the Front Panel" on page 3. 3 Gently lay the PC on its side. 4 If you are also removing the hard disk drive, see "Removing a Hard Disk Drive" on page 8. NOTE: You do not need to remove the hard disk drive from the bracket when installing a second hard disk drive. 5 Remove the two screws on the hard disk drive bracket (N). N O WARNING: For Parallel ATA drives, connect the data IDE cable end labeled Master to the primary hard disk drive; connect the data IDE cable plug labeled Slave to the second hard disk drive. If the IDE cable is not connected correctly, the PC will not be able to locate the hard disk drives and data may be lost. P Connecting the Serial ATA hard disk drive cables 6 Slide the bracket away from the bottom of the chassis, and then pull it up and out of the chassis (O). 7 Connect the power and data cables to the back of the second hard disk drive. For a Parallel ATA hard disk drive, connect the data IDE cable end labeled Slave to the drive. MASTER SLAVE To CPU Connecting the Parallel ATA hard disk drive data cable Upgrading and Servicing Guide 13
-
 1
1 -
2
-
3
-
4
-
5
-
6
-
7
-
8
-
9
-
10
-
11
-
 12
12 -
 13
13 -
 14
14 -
 15
15 -
 16
16 -
 17
17 -
 18
18 -
 19
19 -
 20
20 -
 21
21 -
 22
22 -
23
-
24
 |
 |
