HP Pavilion a800 Creating Disc Labels with LightScribe - Page 7
Theme, Apply, Edit Background, Change, Background, Add Image, LightScribe Print, Print
 |
View all HP Pavilion a800 manuals
Add to My Manuals
Save this manual to your list of manuals |
Page 7 highlights
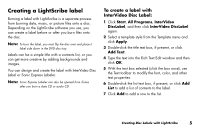
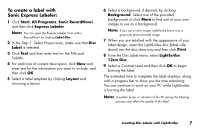
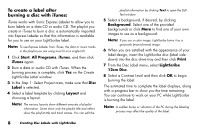
8 To enter text for a list item, move the cursor over one of the item boxes (Title, Artist, or Length); click the box; and then enter text. 9 Repeat steps 7 and 8 for each item you want to add to the list of contents. 10 Click OK when you are finished with the list. 11 Select a background for the disc label: • Click the Theme menu and choose one of the provided theme images. Click Apply. Or • Click Edit Background and then click Change Background to add a background image to the label. Follow the onscreen instructions to browse to and select an image file. InterVideo Disc Label supports .jpg, .bmp, and .png image files. Note: If you use a color image or theme, LightScribe burns it as a greyscale (monochrome) image. 12 Click Add Image and follow the onscreen instructions to browse to and select an image file. 13 Click and drag the image to the area you want it to appear on the label. You can resize the image by clicking and dragging the sides or corners of the image. Note: To remove an image from the label, click the image and then press Delete on your keyboard. 14 When you are satisfied with the appearance of your label design, click LightScribe Print. 15 Click Print, insert the LightScribe disc (label side down) in the disc tray, and then click OK. The estimated time to complete the label displays, along with a progress bar. You can continue to work on your PC while LightScribe is burning the label. Note: A sudden bump or vibration of the PC during the labeling process may affect the quality of the label. 6 Creating Disc Labels with LightScribe
-
 1
1 -
 2
2 -
 3
3 -
 4
4 -
 5
5 -
 6
6 -
 7
7 -
 8
8 -
 9
9 -
 10
10
 |
 |
