HP Pavilion d4400 Getting Started Guide - HP Pavilion PC - Page 105
Saving the movie project, Recording the movie project to disc, Save muvee, Computer Playback, E-mail
 |
View all HP Pavilion d4400 manuals
Add to My Manuals
Save this manual to your list of manuals |
Page 105 highlights
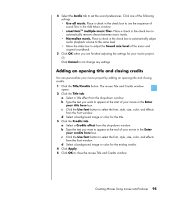
Saving the movie project Once you are satisfied with the look of your movie project, you are ready to save it. You can save the movie to a file on your hard disk drive or create a VCD or DVD disc: 1 Click the Save muvee button. The Save muvee window opens. 2 Choose the movie file type to save to your hard disk drive: • Computer Playback • E-mail • DV (camcorder) • DVD • VCD (video CD) • SVCD • Web Streaming Click the Change Settings button to change the video and audio settings of the movie file type as required (advanced users only). 3 Click the Save button. 4 Enter a name for the output movie. Select a folder on your hard disk drive, as required. The movie saves. You can watch the preview as it saves. 5 Click the Save button. 6 Click Yes to preview the movie file. Recording the movie project to disc To create a DVD, VCD, or SVCD disc: 1 Click the Burn to Disc button. The muvee Burner window opens. 2 Type the disc title. 3 Select the video(s) to burn to the disc: • Select the order of the chapters. • Add or delete videos, as required. 4 Select the disc menu theme from the drop-down list. 5 Select the CD or DVD burner drive. 6 Select the type of video disc to create: DVD, VCD, or SVCD. 7 Click Burn Now to begin burning your movie to disc. To save the current settings for future use, click Burn Later. 8 Click OK when the recording is complete. Close the muvee Burner window. Creating Movies Using muvee autoProducer 97
-
 1
1 -
2
-
3
-
4
-
5
-
6
-
7
-
8
-
9
-
10
-
11
-
12
-
13
-
14
-
15
-
16
-
17
-
18
-
19
-
20
-
21
-
22
-
23
-
24
-
25
-
26
-
27
-
28
-
29
-
30
-
31
-
32
-
33
-
34
-
35
-
36
-
37
-
38
-
39
-
40
-
41
-
42
-
43
-
44
-
45
-
46
-
47
-
48
-
49
-
50
-
51
-
52
-
53
-
54
-
55
-
56
-
57
-
58
-
59
-
60
-
61
-
62
-
63
-
64
-
65
-
66
-
67
-
68
-
69
-
70
-
71
-
72
-
73
-
74
-
75
-
76
-
77
-
78
-
79
-
80
-
81
-
82
-
83
-
84
-
85
-
86
-
87
-
88
-
89
-
90
-
91
-
92
-
93
-
94
-
95
-
96
-
97
-
98
-
99
-
 100
100 -
 101
101 -
 102
102 -
 103
103 -
 104
104 -
 105
105 -
 106
106 -
 107
107 -
 108
108 -
 109
109 -
 110
110 -
111
-
112
-
113
-
114
-
115
-
116
 |
 |