HP Pavilion dv6-6100 Resolving Start Up and No Boot Problems Checklist - Page 1
HP Pavilion dv6-6100 Manual
 |
View all HP Pavilion dv6-6100 manuals
Add to My Manuals
Save this manual to your list of manuals |
Page 1 highlights
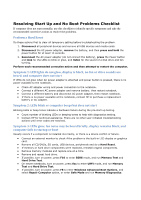
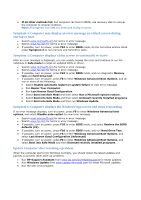
Resolving Start Up and No Boot Problems Checklist If computer does not start normally, use this checklist to identify specific symptoms and take the recommended corrective actions to resolve the problems. Perform a Hard Reset Do these actions first to clear all temporary setting before troubleshooting the problem. 1. Disconnect all peripheral devices and remove all USB devices and media cards. 2. Disconnect the AC power adapter, remove the battery, and then press and hold the power button for at least 15 seconds. 3. Reconnect the AC power adapter (do not connect the battery), press the Power button and look for the LEDs to blink or glow, and listen for the sound of a disk drive and fan turning. Perform each recommended corrective action and then attempt to restart the computer. Symptom 1: LED lights do not glow, display is black, no fan or drive sounds are heard, and computer does not start If LEDs do not glow when AC power adapter is attached and power button is pressed, there is no power available to the notebook. Check AC adapter wiring and power connection to the notebook. Connect a different AC power adapter and remove battery. then restart notebook. Connect a different battery and disconnect AC power adapter, then restart notebook. If there is no power available at the notebook, contact HP to purchase a replacement battery or AC adapter. Symptom 2: LEDs blink or computer beeps but does not start Blinking LEDs or beep tones indicate a hardware failure during the pre-start up testing. Count number of blinking LEDs or beeping tones to help with diagnostics testing. Contact HP for technical assistance. There are no other user-initiated troubleshooting actions until error codes are resolved. Symptom 3: LEDs glow, fan noise may be heard briefly, display remains black, and computer fails to startup or boot Usually occurs if a component is installed incorrectly, or there is a device conflict or failure. Connect an external monitor to check if the problem is the built-in LCD display or graphics card. Remove all CD/DVDs, SD cards, USB devices, peripherals and do a Hard Reset. If memory or hard drive components were replaced, reinstall original components. Remove memory modules and replace one-at-a-time. Remove and reseat hard drive. If possible, turn on power, press F10 to enter BIOS mode, and run Memory Test and Hard Drive Test. On newer notebooks, turn on power, press Esc to enter UEFI mode, and run Memory Test and Hard Drive Test. If possible, turn on power, press F8 to enter Windows Advanced Boot Options, and select Repair Computer option, or enter Safe Mode and run Memory Diagnostics.
-
 1
1 -
 2
2
 |
 |