HP Photosmart 2600 Setup Guide - Page 8
Go to step 17 on Connect the USB cable - printer
 |
View all HP Photosmart 2600 manuals
Add to My Manuals
Save this manual to your list of manuals |
Page 8 highlights
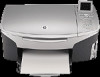
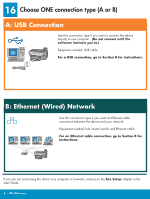
A2 Connect the USB cable Windows Users: a You may have to wait several minutes before you see the onscreen prompt to connect the USB cable. Once the prompt appears, connect the USB cable to the port on the back of the HP all-in-one, and then to any USB port on your computer. Macintosh Users: a Connect the USB cable from your computer to the USB port on the back of the device. If you do not see these screens, see Troubleshooting in the last section. b Double-click the HP All-in-One installer icon. c Make sure you complete all screens, including the Setup Assistant. You must select USB. Also, you must click the Print Center button to add the HP all-in-one to your printer list. b Follow the onscreen instructions to complete the Fax Setup Wizard and Sign up now screens. A3 Go to step 17 on page 11. 8 • HP all-in-one
-
 1
1 -
2
-
 3
3 -
 4
4 -
 5
5 -
 6
6 -
 7
7 -
 8
8 -
 9
9 -
 10
10 -
 11
11 -
 12
12
 |
 |
