HP Photosmart 320 HP Photosmart 320 series digital camera - (English) User Gui - Page 16
Installing the software, Windows, Macintosh - photosmart software
 |
View all HP Photosmart 320 manuals
Add to My Manuals
Save this manual to your list of manuals |
Page 16 highlights
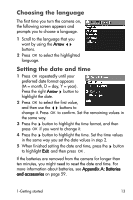
Installing the software The software allows you to unload images from the camera, view them, print them, and e-mail them. It also allows you to configure the Share menu on the camera. NOTE For Windows computers, the HP Photo & Imaging software needs at least Internet Explorer 5.0 (Service Pack 2) in order to function properly. Windows 1 Insert the HP Photo & Imaging CD into the CD drive of your computer. The installation window automatically appears. NOTE If the installation window does not appear, click Start, and then click Run. Type X:\Setup.exe, where X is the letter of your CD drive. 2 Click Next, and then follow the on-screen instructions to install the software. To install any bonus software 1 Click Start, click Run, and in the Open box, type X:\Bonus\setup.exe (where X is the drive letter of your CD drive). 2 Click OK, and then follow the on-screen instructions to install the bonus software. Macintosh 1 Insert the HP Photo & Imaging CD into the CD drive of your computer. 2 Double-click the CD icon on the desktop. 3 Double-click the installer icon. 4 Follow the on-screen instructions to install the software. 14 hp photosmart 320 user's manual
-
 1
1 -
2
-
3
-
4
-
5
-
6
-
7
-
8
-
9
-
10
-
 11
11 -
 12
12 -
 13
13 -
 14
14 -
 15
15 -
 16
16 -
 17
17 -
 18
18 -
 19
19 -
 20
20 -
 21
21 -
22
-
23
-
24
-
25
-
26
-
27
-
28
-
29
-
30
-
31
-
32
-
33
-
34
-
35
-
36
-
37
-
38
-
39
-
40
-
41
-
42
-
43
-
44
-
45
-
46
-
47
-
48
-
49
-
50
-
51
-
52
-
53
-
54
-
55
-
56
-
57
-
58
-
59
-
60
-
61
-
62
-
63
-
64
-
65
-
66
-
67
-
68
-
69
-
70
-
71
-
72
-
73
-
74
-
75
-
76
-
77
-
78
-
79
-
80
 |
 |
