HP Photosmart 7600 HP Photosmart 7600 series - (English) Setup Guide - Page 2
connect the printer to your computer - ink
 |
View all HP Photosmart 7600 manuals
Add to My Manuals
Save this manual to your list of manuals |
Page 2 highlights
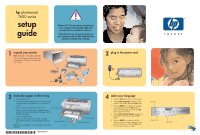
5 install the print cartridges 1. If the printer is not on, press the ON button. 2. Lift the top cover. 3. Open both print cartridge cradle latches by pulling each latch forward and then up. 4. Pull the pink pull-tab to remove the clear tape from each print cartridge. Do not touch or remove the copper contacts. 5. Insert the HP #57 tri-color print cartridge in the left stall. Insert the HP #58 photo print cartridge in the right stall. 6. Close both print cartridge cradle latches by pushing down on each latch until it snaps into place. 7. Close the top cover and press the OK button to print a calibration page. This verifies that the print cartridges are installed correctly. Do not touch or remove the ink nozzles or the copper contacts! HP #57 HP #58 install optional print cartridges Be sure to purchase an HP #56 black print cartridge and an HP #59 photo gray print cartridge separately. • To print text documents faster and better, replace the photo print cartridge in the right stall with an HP #56 black print cartridge. • To print optimal black and white photos, replace the print cartridge in the right stall with an HP #59 photo gray print cartridge. • To go back to printing beautiful color photos, remove the black or photo gray print cartridge and reinstall the HP #58 photo print cartridge in the right stall. Store the unused print cartridge in the print cartridge protector in the print cartridge storage area in your printer. Print cartridge protector 6 install the hp photosmart printer software Windows PC: Do not connect the printer to your computer with the USB cable until prompted by the installation software. Macintosh: Do not connect the printer to your computer with the USB cable until the software installation has finished. Note: For more detailed installation instructions or troubleshooting information, see the HP Photosmart Setup & Support Reference Guide. Windows PC 1. Be sure you have completed boxes 1 through 5. If your computer is off, turn it on. Important: Disable virus-checking software before you install the printer software. 2. Insert the HP Photosmart CD into your computer's CD-ROM drive. Wait for the files to load. The following dialog box appears: 3. Click Next, then follow the onscreen instructions to install the printer software. Note: If the dialog box does not appear, use Windows Explorer or My Computer to locate your CD-ROM drive, then double-click setup.exe. The HP Photosmart printer dialog box appears. 4. Continue with box 7 to connect the printer to your computer. Macintosh 1. Be sure you have completed boxes 1 through 5. If your computer is off, turn it on. 2. Insert the HP Photosmart CD into your computer's CD-ROM drive. 3. Double-click the HP Photosmart CD icon. 4. Double-click the HP Photosmart Install icon. Follow the onscreen instructions to install the printer software. 5. Continue with box 7 to connect the printer to your computer. 7 connect the printer to your computer 1. Purchase a USB-compliant interface cable separately. 2. Plug one end of the USB cable into your computer's USB port. 3. Plug the other end of the USB cable into the USB port on the back of your printer. Note: The USB port on the front of your printer is for connecting a HP direct-printing digital camera or notebook computer. Important: Be sure the printer is connected directly to your Windows PC. Installing the printer software when the printer is connected to the Windows PC through a USB hub can cause errors and prevent a successful installation. 4. Continue with step 5 to finish the software installation. Windows PC Macintosh Windows PC 5. After connecting the printer to your computer, continue following the onscreen instructions to finish installing the HP Photosmart printer software and the HP Photo & Imaging software. At the end of the installation, the computer may restart. When the update software window appears, click Check Now or Close. When the welcome window appears, click where it says Click here to print a sample page to verify that the printer and computer are setup and communicating properly. Macintosh 5. OS X: After connecting the printer to your computer, select the printer in the Print dialog box. If the printer does not appear in the list, select Edit Printer List to add the printer. See the HP Photosmart Setup & Support Reference Guide for more information. OS 9: After connecting the printer to your computer, select the printer in the Chooser. See the HP Photosmart Setup & Support Reference Guide for more information. need more help? ? www.hp.com/support Printed in USA 05/03 v1.1.0 • Printed on recycled paper © 2003 Hewlett-Packard Company Windows is a registered trademark of Microsoft Corporation Macintosh is a registered trademark of Apple Computer, Inc.
-
 1
1 -
 2
2
 |
 |
