HP Photosmart 7900 HP Photosmart Networking Guide - Page 6
Install the printer software on each client
 |
View all HP Photosmart 7900 manuals
Add to My Manuals
Save this manual to your list of manuals |
Page 6 highlights
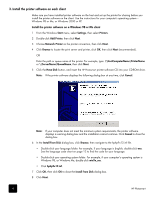
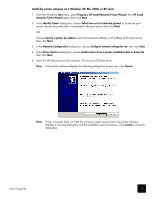
3. Install the printer software on each client Make sure you have installed printer software on the host and set up the printer for sharing before you install the printer software on the client. Use the instructions for your computer's operating system- Windows 98 or Me, or Windows 2000 or XP. Install the printer software on a Windows 98 or Me client 1 From the Windows Start menu, select Settings, then select Printers. 2 Double-click Add Printer, then click Next. 3 Choose Network Printer as the printer connection, then click Next. 4 Click Browse to locate the print server and printer, click OK, then click Next (recommended). OR Enter the path or queue name of the printer. For example, type: \\HostComputerName\PrinterName or \\ServerName\QueueName, then click Next. 5 Click the Have Disk button, and insert the HP Photosmart printer software CD into your CD-ROM drive. Note: If the printer software displays the following dialog box at any time, click Cancel. Note: If your computer does not meet the minimum system requirements, the printer software displays a warning dialog box and the installation cannot continue. Click Cancel to close the dialog box. 6 In the Install From Disk dialog box, click Browse, then navigate to the hphp9x12.inf file. • Double-click your language folder. For example, if your language is English, double-click enu. See the language code chart on page 12 to find the code for your language. • Double-click your operating system folder. For example, if your computer's operating system is Windows 98, or Windows Me, double-click win9x_me. • Click hphp9x12.inf. 7 Click OK, then click OK to close the Install From Disk dialog box. 8 Click Next. 6 HP Photosmart
-
 1
1 -
 2
2 -
 3
3 -
 4
4 -
 5
5 -
 6
6 -
 7
7 -
 8
8 -
 9
9 -
 10
10 -
 11
11 -
 12
12 -
13
-
14
-
15
 |
 |
