HP Photosmart A510 Setup Guide - Page 1
HP Photosmart A510 Manual
 |
View all HP Photosmart A510 manuals
Add to My Manuals
Save this manual to your list of manuals |
Page 1 highlights
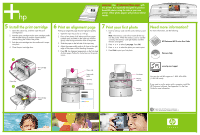
Setup Guide HP Photosmart A510 series printer *Q7020-90103* Q7020-90103 1 Unpack the printer Remove the protective tape from inside and around the printer. The box contains the following items: 1. HP Photosmart A510 series printer 2. Setup Guide (this poster) 3. User Guide 4. HP Photosmart software and electronic Help on CD 5. Power supply 6. HP Advanced Photo Paper and resealable media bag 7. HP 110 Tri-color Inkjet print cartridge Note: Contents may vary by country/region. Please check the packaging for the actual box contents. 2 Plug in the power cord 1. Connect the power cord to the back of the printer. 2. Plug the power cord into a working electrical outlet. 2 1 3 Turn on the printer Set language and country 1. Remove the protective film from the printer screen. 2. Press On to turn on the printer. 3. When Select Language appears on the printer screen, press or to highlight your language. Press OK. 4. When Set LCD language to (your language) appears on the printer screen, press or to highlight Yes. Press OK. 5. When Select country/region appears on the printer screen, press or to highlight your country/region. Press OK. 4 Prepare the print cartridge 1. Open the print cartridge package. 2. Pull the pink pull-tab to remove the clear tape from the print cartridge. 1 2 3 4 5 6 7 On button Printer screen OK button Arrow buttons Do not touch or remove the ink nozzles or the coppercolored contacts!
-
 1
1 -
 2
2
 |
 |
