HP Photosmart C5500 Setup Guide - Page 10
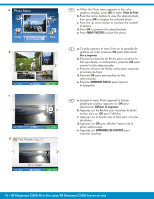
Photo Menu
 |
View all HP Photosmart C5500 manuals
Add to My Manuals
Save this manual to your list of manuals |
Page 10 highlights
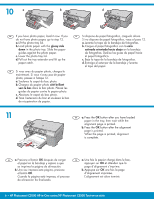
a Photo Menu Create View & Print Save b Print c Options OK View 0 Print Edit OK Done d Print Preview: Page 1/2 EN a. When the Photo menu appears in the color graphics display, press OK to select View & Print. b. Press the arrow buttons to view the desired photo, then press OK to display the selected photo. c. Press the up arrow button to increase the number of photos. d. Press OK to preview the selected photo. e. Press PRINT PHOTOS to print the photo. ES a. Cuando aparece el menú Foto en la pantalla de gráficos en color, presione OK para seleccionar Ver e imprimir. b. Presione los botones de flecha para visualizar la foto que desee; a continuación, presione OK para mostrar la foto seleccionada. c. Presione el botón de flecha arriba para aumentar el número de fotos. d. Presione OK para previsualizar la foto seleccionada. e. Presione IMPRIMIR FOTOS para imprimir la fotografía. FR a. Lorsque le menu Photo apparaît à l'écran graphique couleur, appuyez sur OK pour sélectionner Afficher & Imprimer. b. Appuyez sur les flèches pour visualiser la photo voulue, puis sur OK pour l'afficher. c. Appuyez sur la touche vers le haut pour voir plus de photos. d. Appuyez sur OK pour afficher l'aperçu de la photo sélectionnée. e. Appuyez sur IMPRIMER LES PHOTOS pour imprimer la photo. 8.5 x 11 paper Next Settings Print 10 • HP Photosmart C5500 All-in-One series/HP Photosmart C5500 Tout-en-un série
-
 1
1 -
2
-
3
-
4
-
 5
5 -
 6
6 -
 7
7 -
 8
8 -
 9
9 -
 10
10 -
 11
11 -
 12
12
 |
 |
