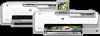
HP Photosmart D7200 Setup Guide - Page 10
B1 - Ethernet
 |
View all HP Photosmart D7200 manuals
Add to My Manuals
Save this manual to your list of manuals |
Page 10 highlights
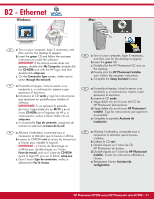
B1 - Ethernet EN a. Locate your Ethernet cable. b. Remove the yellow plug from the back of the device. c. Connect one end of the Ethernet cable to the Ethernet port on the back of the device. d. Connect the other end of the Ethernet cable to the router (not in the Internet port). e. Go to Section B2 of this Setup Guide to install your software. ES a. Localice el cable Ethernet. b. Extraiga el conector amarillo de la parte posterior del dispositivo. c. Conecte un extremo del cable Ethernet al puerto Ethernet situado en la parte posterior del dispositivo. d. Conecte el otro extremo del cable Ethernet al direccionador (no al puerto de Internet). e. Vaya a la sección B2 de esta guía de instalación para instalar el software. FR a. Localisez votre câble Ethernet. b. Retirez la prise jaune à l'arrière du périphérique. c. Connectez une extrémité du câble Ethernet au port Ethernet à l'arrière du périphérique. d. Connectez l'autre extrémité du câble Ethernet au routeur (pas sur le port Internet). e. Passez à la Section B2 du présent Guide de configuration pour installer votre logiciel. Important: Your computer and the HP Photosmart must be on the same active, working network. If you are using a DSL or cable modem, make sure you do not connect the Ethernet cable from the HP Photosmart to the cable modem. Connect it to the router only. Important : votre ordinateur et le HP Photosmart doivent se trouver sur le même réseau de travail actif. Si vous utilisez un modem câble ou DSL, assurez-vous de ne pas connecter le câble Ethernet du HP Photosmart au modem. Connectez-le uniquement au routeur. Importante: El equipo y el dispositivo HP Photosmart deben estar instalados en la misma red activa. Si utiliza una conexión DSL o un módem por cable, asegúrese de que no conecta el cable Ethernet desde el dispositivo HP Photosmart hasta el módem. Conéctelo sólo al direccionador. 10 • HP Photosmart D7200 series/HP Photosmart série D7200
-
 1
1 -
2
-
3
-
4
-
 5
5 -
 6
6 -
 7
7 -
 8
8 -
 9
9 -
 10
10 -
 11
11 -
 12
12 -
 13
13 -
 14
14 -
 15
15 -
16
 |
 |
