HP Presario SR2000 Upgrading and Servicing Guide - Page 11
Adding Memory - motherboard
 |
View all HP Presario SR2000 manuals
Add to My Manuals
Save this manual to your list of manuals |
Page 11 highlights
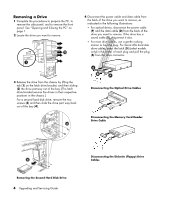
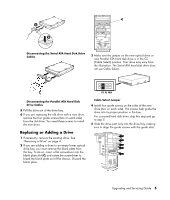
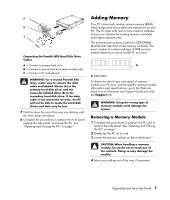
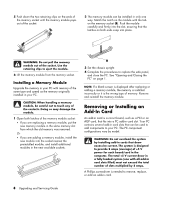
Connecting the Parallel ATA Hard Disk Drive Cables A - Connect to primary hard drive B - Connect to second hard drive (select models only) C - Connect to PC motherboard WARNING: For a second Parallel ATA drive, make sure to connect the data cable end labeled Master (A) to the primary hard disk drive, and the connector labeled Slave (B) to the secondary hard disk drive. If the data cable is not connected correctly, the PC will not be able to locate the hard disk drives and data may be lost. 7 Push the drive the rest of the way into the bay until the drive snaps into place. 8 Complete the procedures to replace the front panel, replace the side panel, and close the PC. See "Opening and Closing the PC" on page 1. Adding Memory Your PC comes with random access memory (RAM), which temporarily stores data and instructions on your PC. The PC ships with one or more memory modules, but you can replace the existing memory module(s) with higher-capacity ones. The motherboard contains sockets for DDR DIMMs (double data rate dual in-line memory modules). The exact number of sockets and type of DDR memory module depends on which model PC you have. A DDR DIMM To determine which type and speed of memory module your PC uses, and for specific memory module information and specifications, go to the Web site listed in your Warranty and Support Guide and click the Support link. WARNING: Using the wrong type of memory module could damage the system. Removing a Memory Module 1 Complete the procedures to prepare the PC and to remove the side panel. See "Opening and Closing the PC" on page 1. 2 Gently lay the PC on its side. 3 Locate the memory sockets on the motherboard. CAUTION: When handling a memory module, be careful not to touch any of the contacts. Doing so may damage the module. 4 Move any cabling out of the way, if necessary. Upgrading and Servicing Guide 7
-
 1
1 -
2
-
3
-
4
-
5
-
 6
6 -
 7
7 -
 8
8 -
 9
9 -
 10
10 -
 11
11 -
 12
12 -
 13
13 -
 14
14 -
 15
15 -
 16
16
 |
 |
