HP Pro 3505 Maintenance & Service Guide HP Pro 3400, 3405 and 3410 Microto - Page 89
Troubleshooting Without Diagnostics, on Preparation for Disassembly, Access Panel
 |
View all HP Pro 3505 manuals
Add to My Manuals
Save this manual to your list of manuals |
Page 89 highlights
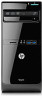
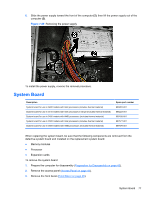
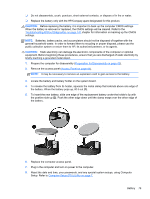
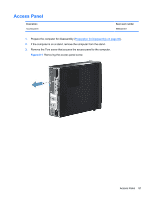
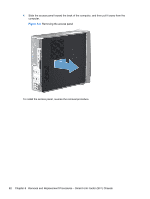
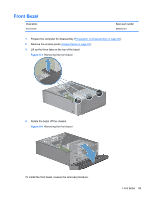
❑ Do not disassemble, crush, puncture, short external contacts, or dispose of in fire or water. ❑ Replace the battery only with the HP/Compaq spare designated for this product. CAUTION: Before replacing the battery, it is important to back up the computer CMOS settings. When the battery is removed or replaced, the CMOS settings will be cleared. Refer to the Troubleshooting Without Diagnostics on page 141 chapter for information on backing up the CMOS settings. NOTE: Batteries, battery packs, and accumulators should not be disposed of together with the general household waste. In order to forward them to recycling or proper disposal, please use the public collection system or return them to HP, its authorized partners, or its agents. CAUTION: Static electricity can damage the electronic components of the computer or optional equipment. Before beginning these procedures, ensure that you are discharged of static electricity by briefly touching a grounded metal object. 1. Prepare the computer for disassembly (Preparation for Disassembly on page 43). 2. Remove the access panel (Access Panel on page 44). NOTE: It may be necessary to remove an expansion card to gain access to the battery. 3. Locate the battery and battery holder on the system board. 4. To release the battery from its holder, squeeze the metal clamp that extends above one edge of the battery. When the battery pops up, lift it out (1). 5. To insert the new battery, slide one edge of the replacement battery under the holder's lip with the positive side up (2). Push the other edge down until the clamp snaps over the other edge of the battery. 6. Replace the computer access panel. 7. Plug in the computer and turn on power to the computer. 8. Reset the date and time, your passwords, and any special system setups, using Computer Setup. Refer to Computer Setup (F10) Utility on page 7. Battery 79
-
 1
1 -
2
-
3
-
4
-
5
-
6
-
7
-
8
-
9
-
10
-
11
-
12
-
13
-
14
-
15
-
16
-
17
-
18
-
19
-
20
-
21
-
22
-
23
-
24
-
25
-
26
-
27
-
28
-
29
-
30
-
31
-
32
-
33
-
34
-
35
-
36
-
37
-
38
-
39
-
40
-
41
-
42
-
43
-
44
-
45
-
46
-
47
-
48
-
49
-
50
-
51
-
52
-
53
-
54
-
55
-
56
-
57
-
58
-
59
-
60
-
61
-
62
-
63
-
64
-
65
-
66
-
67
-
68
-
69
-
70
-
71
-
72
-
73
-
74
-
75
-
76
-
77
-
78
-
79
-
80
-
81
-
82
-
83
-
 84
84 -
 85
85 -
 86
86 -
 87
87 -
 88
88 -
 89
89 -
 90
90 -
 91
91 -
 92
92 -
 93
93 -
 94
94 -
95
-
96
-
97
-
98
-
99
-
100
-
101
-
102
-
103
-
104
-
105
-
106
-
107
-
108
-
109
-
110
-
111
-
112
-
113
-
114
-
115
-
116
-
117
-
118
-
119
-
120
-
121
-
122
-
123
-
124
-
125
-
126
-
127
-
128
-
129
-
130
-
131
-
132
-
133
-
134
-
135
-
136
-
137
-
138
-
139
-
140
-
141
-
142
-
143
-
144
-
145
-
146
-
147
-
148
-
149
-
150
-
151
-
152
-
153
-
154
-
155
-
156
-
157
-
158
-
159
-
160
-
161
-
162
-
163
-
164
-
165
-
166
-
167
-
168
-
169
-
170
-
171
-
172
-
173
-
174
-
175
-
176
-
177
-
178
-
179
-
180
-
181
-
182
-
183
-
184
-
185
-
186
-
187
-
188
-
189
-
190
-
191
-
192
-
193
-
194
-
195
-
196
-
197
-
198
-
199
-
200
-
201
 |
 |
