HP Pro 4300 Illustrated Parts & Service Map HP Compaq Pro 4300 All-in-One - Page 3
System Setup and Boot - compaq all in one
 |
View all HP Pro 4300 manuals
Add to My Manuals
Save this manual to your list of manuals |
Page 3 highlights
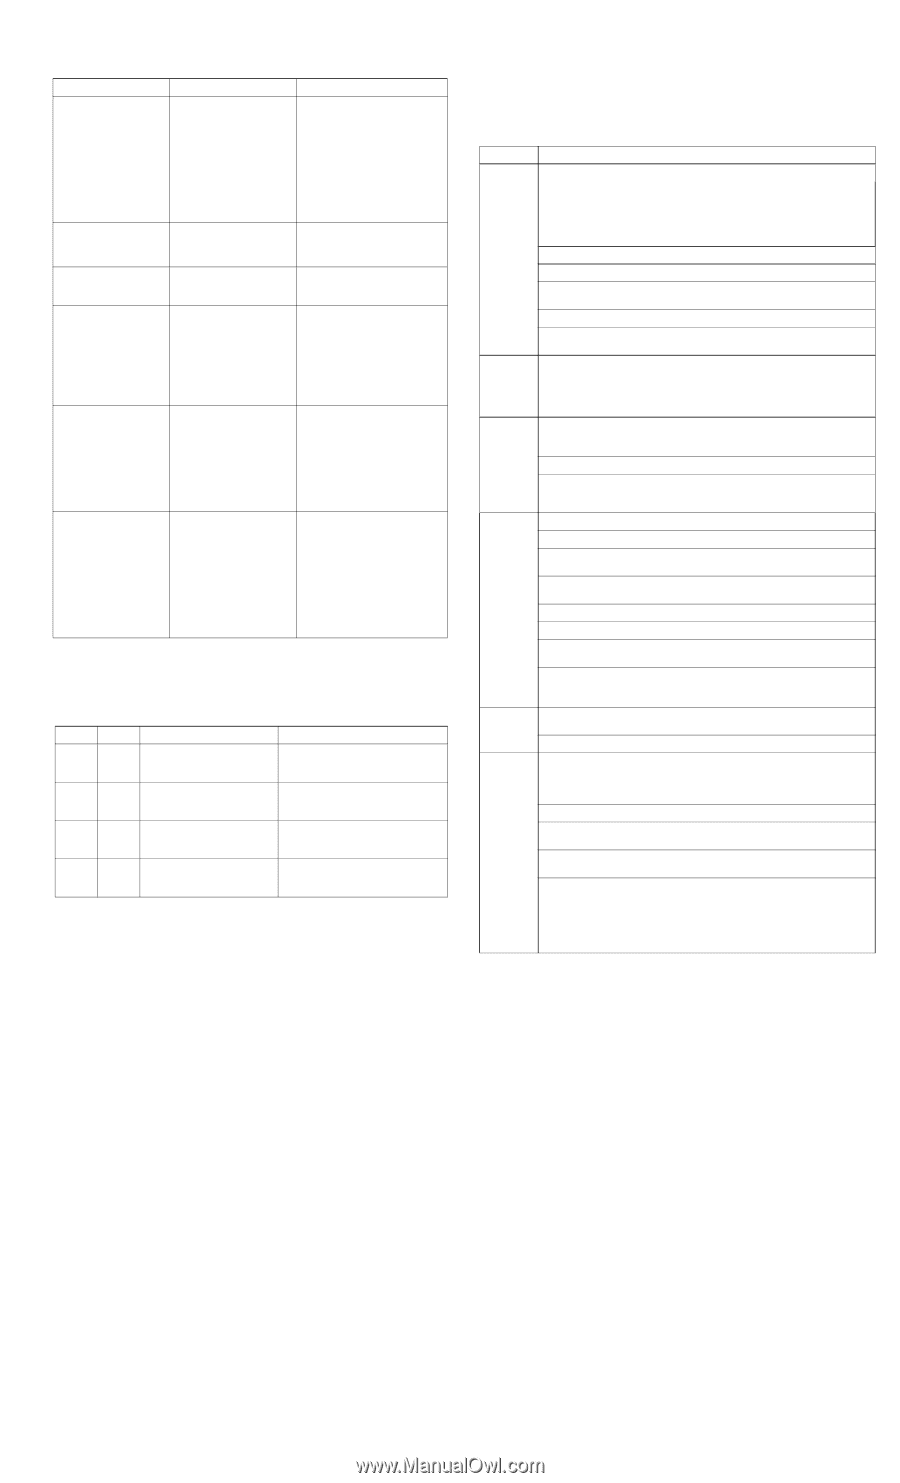
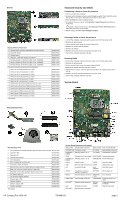
Common POST Error Messages Screen Message ERROR: No boot disk has been detected or the disk has failed. 511-CPU Fan not Detected Unsupported CPU Time & Date Not Set Keyboard error 1720-SMART Hard Drive Detects Imminent Failure Probable Cause Recommended Action The computer cannot read the boot sector of the boot disk. 1. Check drive data and power cables. 2. Use F10 Setup to make sure the firstboot device is set to drive C or the primary hard drive. 3. The drive has failed due to mechanical or virus corruption. Replace the drive. CPU fan is not connected 1. Reseat CPU fan. or may have malfunctioned. 2. Reseat fan cable. 3. Replace CPU fan. Recently installed proces- Install a processor supported sor is not by your supported by the system system. Invalid time or date in configuration memory. RTC (real-time clock) battery may need to be replaced. CMOS jumper may not be properly installed. Reset the date and time under Control Panel (Computer Setup can also be used). If the problem persists, replace the RTC battery. Check for proper placement of the CMOS jumper if applicable. Keyboard failure. 1. Reconnect keyboard with computer turned off. 2. Check connector for bent or missing pins. 3. Ensure that none of the keys are depressed. 4. Replace keyboard. 5. Replace system board. Hard drive is about to fail. 1. Determine if hard drive is giving correct error message. Enter Computer Setup and run the Drive Protection System test under Storage > DPS Self-test. 2. Apply hard drive firmware patch if applicable. 3. Back up contents and replace hard drive. Diagnostic LEDs LED Color Power White Power White Power White Power White LED Activity 5 blinks, 1 blink every second followed by a 2 second pause. 6 blinks, 1 blink every second followed by a 2 second pause. 7 blinks, 1 blink every second followed by a 2 second pause. 8 blinks, 1 blink every second followed by a 2 second pause. State/Message Pre-video memory error. Pre-video graphics error. System board failure (ROM). Invalid ROM based on Checksum. System Setup and Boot Access the Setup Utility during the computer boot sequence by pressing the Esc key while "Press the ESC key for Startup Menu" message is displayed at the bottom of the screen, and then pressing the F10 key. If you do not press Esc at the appropriate time, you must restart the computer and again press Esc when the monitor light turns green. Computer Setup Menu Heading Option/Description File System Information - Lists the following main system specifications: • Product name • Integrated MAC Address • SKU number (some models) • System BIOS • Processor type/speed/stepping • Chassis serial number • Cache size (L1/L2/L3) • Asset tag • Installed memory size/speed/ch About - Displays copyright notice. Set Time and Date - Allows you to set system time and date. Apply Defaults and Exit - Applies the selected default settings and clears any established passwords. Ignore Changes and Exit - Exits Computer setup without saving changes. Save Changes and Exit - Saves changes to system configuration or default settings and exits Computer Setup. Storage Device Configuration - Lists all installed BIOS-controlled storage devices. The following options are available: • Hard Disk - View drive size, model, firmware version, serial number. • CD-ROM - View drive model, firmware version, serial number. • Diskette - View drive model. Only displays when device connected. Storage Options - Allows you to set: • SATA Emulation - Choose how the SATA controller and devices are accessed by the OS. SATA Emulation choices are AHCI or IDE. DPS Self-Test - Execute self-tests on ATA hard drives. Boot Order - Specify boot order for UEFI and legacy boot sources. Also specify hard drive boot order. • Shortcut to Temporarily Override Boot Order Security Setup Password - Set and enable the setup (Admin) password. Power-On Password - Set and enable power-on password. Device Security - Set Device Available/Device Hidden for: system audio, network controller, and SATA ports. USB Security - Set Device Available/Device Hidden for front USB ports, rear USB ports, internal USB ports. Slot Security - Disable the Mini Card slots. Network Boot - Enables/disables boot from OS (NIC models only). System IDs - Displays product name, serial number, UUID, SKU number, asset tag, family name, build ID, keyboard locale setting. System Security - Enable/disable: • Data Execution Prevention (enable/disable) • Virtualization Technology/Directed IO (VTx/VTd) (enable/disable) Power Hardware Power Management - Enable/disable SATA bus power management and S5 maximum power savings. Thermal - Control minimum fan speed. Advanced Power-On Options - Allows you to set: • POST messages - Enable/disable • After Power Loss - Off/on/previous state • POST Delay - None, 5, 10, 15, 20, or 60 seconds BIOS Power-On - Set the computer to turn on at a preset time. Bus Options (some models) - Allows you to enable/disable PCI SERR# Generation and PCI VGA palette snooping. Onboard Devices - Allows you to set resources for or disable on-board system devices. Device Options - Allows you to set: • Num Lock State at Power-on - off/on • Multi-Processor - enable/disable • Hyper-threading - enable/disable • NIC Option ROM Download - enable/disable • Processor Frequency Multiplier HP Compaq Pro 4300 AIO 700498-001 page 3
-
 1
1 -
 2
2 -
 3
3
 |
 |