HP Q2009 User's Guide q1859, q2009, q2159 LCD Display - Page 24
Using the On-Screen Display (OSD), OSD Menu Selections - model
 |
UPC - 884420319344
View all HP Q2009 manuals
Add to My Manuals
Save this manual to your list of manuals |
Page 24 highlights
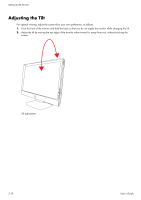
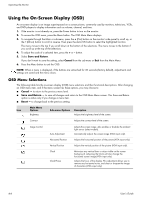
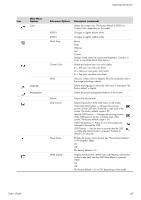
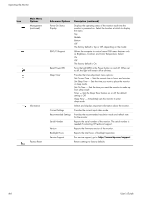
Operating the Monitor Using the On-Screen Display (OSD) An on-screen display is an image superimposed on a screen picture, commonly used by monitors, televisions, VCRs, and DVD players to display information such as volume, channel, and time. 1. If the monitor is not already on, press the Power button to turn on the monitor. 2. To access the OSD menu, press the Menu button. The OSD Main Menu displays. 3. To navigate through the Main or sub-menu, press the + (Plus) button on the monitor's side panel to scroll up, or the - (Minus) button to scroll in reverse. Then press the Auto/OK button to select the highlighted function. The menu moves to the top if you scroll down at the bottom of the selections. The menu moves to the bottom if you scroll up at the top of the selections. 4. To adjust the scale of a selected item, press the + or - button. 5. Select Save and Return. If you don't want to save the setting, select Cancel from the sub-menu or Exit from the Main Menu. 6. Press the Menu button to exit the OSD. NOTE: When a menu is displayed, if the buttons are untouched for 30 seconds (factory default), adjustments and settings are saved and the menu closes. OSD Menu Selections The following table lists the on-screen display (OSD) menu selections and their functional descriptions. After changing an OSD menu item, and if the menu screen has these options, you may choose to: ■ Cancel - to return to the previous menu level. ■ Save and Return - to save all changes and return to the OSD Main Menu screen. This Save and Return option is active only if you change a menu item. ■ Reset - to change back to the previous setting. Icon Main Menu Options Brightness Sub-menu Options Description Adjusts the brightness level of the screen. Contrast Adjusts the contrast level of the screen. Image Control Auto Adjustment Horizontal Position Vertical Position Clock Clock Phase Adjusts the screen image. Also enables or disables the ambient light sensor (select models). Automatically adjusts the screen image (VGA input only). Adjusts the horizontal position of the picture (VGA input only). Adjusts the vertical position of the picture (VGA input only). Minimizes any vertical bars or strips visible on the screen background. Adjusting the Clock will also change the horizontal screen image (VGA input only). Adjusts the focus of the display. This adjustment allows you to remove any horizontal noise, and clear or sharpen the image of characters (VGA input only). 4-4 User's Guide
-
 1
1 -
2
-
3
-
4
-
5
-
6
-
7
-
8
-
9
-
10
-
11
-
12
-
13
-
14
-
15
-
16
-
17
-
18
-
 19
19 -
 20
20 -
 21
21 -
 22
22 -
 23
23 -
 24
24 -
 25
25 -
 26
26 -
 27
27 -
 28
28 -
 29
29 -
30
-
31
-
32
-
33
-
34
-
35
-
36
-
37
-
38
-
39
-
40
-
41
-
42
-
43
-
44
 |
 |