HP R1500 HP 3 Phase UPS User Guide - Page 58
Preparing the rails for integrated shipping
 |
View all HP R1500 manuals
Add to My Manuals
Save this manual to your list of manuals |
Page 58 highlights
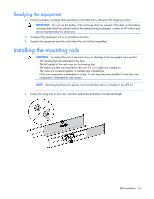
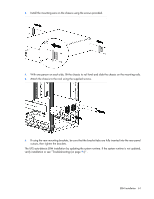
4. Insert screws through the mounting rail into the cage nuts or clip nuts. 5. Tighten the wing nuts or hex nuts. Preparing the rails for integrated shipping If the unit is to be shipped in a rack: 1. Remove the hex nuts from the mounting rail. 2. Install the rail reinforcement plates and tighten using the hex nuts with captive washers, included in the kit, instead of the nuts included with the rail. ERM installation 58
-
 1
1 -
2
-
3
-
4
-
5
-
6
-
7
-
8
-
9
-
10
-
11
-
12
-
13
-
14
-
15
-
16
-
17
-
18
-
19
-
20
-
21
-
22
-
23
-
24
-
25
-
26
-
27
-
28
-
29
-
30
-
31
-
32
-
33
-
34
-
35
-
36
-
37
-
38
-
39
-
40
-
41
-
42
-
43
-
44
-
45
-
46
-
47
-
48
-
49
-
50
-
51
-
52
-
 53
53 -
 54
54 -
 55
55 -
 56
56 -
 57
57 -
 58
58 -
 59
59 -
 60
60 -
 61
61 -
 62
62 -
 63
63 -
64
-
65
-
66
-
67
-
68
-
69
-
70
-
71
-
72
-
73
-
74
-
75
-
76
-
77
-
78
-
79
-
80
-
81
-
82
-
83
-
84
-
85
-
86
-
87
-
88
-
89
-
90
-
91
-
92
-
93
-
94
-
95
-
96
-
97
-
98
-
99
-
100
-
101
-
102
-
103
-
104
-
105
-
106
-
107
-
108
-
109
-
110
-
111
-
112
-
113
-
114
-
115
 |
 |

ERM installation 58
4.
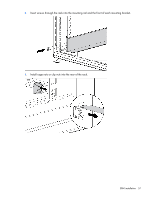
Insert screws through the mounting rail into the cage nuts or clip nuts.
5.
Tighten the wing nuts or hex nuts.
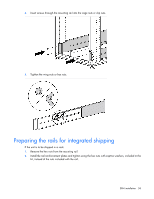
Preparing the rails for integrated shipping
If the unit is to be shipped in a rack:
1.
Remove the hex nuts from the mounting rail.
2.
Install the rail reinforcement plates and tighten using the hex nuts with captive washers, included in the
kit, instead of the nuts included with the rail.