HP Rp7410 User Guide, Third Edition - hp rp7405/rp7410 Servers
HP Rp7410 - Server - 0 MB RAM Manual
 |
View all HP Rp7410 manuals
Add to My Manuals
Save this manual to your list of manuals |
HP Rp7410 manual content summary:
- HP Rp7410 | User Guide, Third Edition - hp rp7405/rp7410 Servers - Page 1
User Guide hp rp7405/7410 Servers Third Edition Manufacturing Part Number: A6752-96008 21102 USA © Copyright 2002 - HP Rp7410 | User Guide, Third Edition - hp rp7405/rp7410 Servers - Page 2
The information in this document is subject to change without notice. Hewlett-Packard makes no warranty of any kind with regard to this manual, including, but not limited to, the implied warranties of merchantability and fitness for a particular purpose. Hewlett-Packard shall not be held liable for - HP Rp7410 | User Guide, Third Edition - hp rp7405/rp7410 Servers - Page 3
the Cell Boards 42 Powering On the hp rp7405/rp7410 Server 44 Selecting a Boot Partition using the Management Processor 45 Verifying the System Configuration using Boot Console Handler (BCH 46 Booting HP-UX using Boot Console Handler (BCH 47 3. Troubleshooting Common Installation Problems 50 - HP Rp7410 | User Guide, Third Edition - hp rp7405/rp7410 Servers - Page 4
a PCI Card 81 Removing and Replacing the Mass Storage Backplane 84 Removing the Backplane 84 Replacing the Backplane 86 Removing and Replacing a MP/SCSI Board 87 Removing a MP/SCSI board 88 Replacing a MP/SCSI Board 88 A. Replaceable Parts B. System Specifications Dimensions and Weights 94 - HP Rp7410 | User Guide, Third Edition - hp rp7405/rp7410 Servers - Page 5
Contents Acoustic Noise Specification 98 Air Flow 98 C. Site Preparation Electrical Considerations 102 Electrical Load Requirements (Circuit Breaker Sizing 103 Power Quality 104 Sources of Electrical Disturbances 104 Power System Protection 104 Distribution Hardware 105 Wire Selection 105 - HP Rp7410 | User Guide, Third Edition - hp rp7405/rp7410 Servers - Page 6
Contents vi - HP Rp7410 | User Guide, Third Edition - hp rp7405/rp7410 Servers - Page 7
/rp7410 Field Replaceable Unit (FRU) List 90 Table B-1. hp rp7405/rp7410 Server Dimensions and Weights 94 Table B-2. hp rp7405/rp7410 Component Weights 94 Table B-3. Power Cords 95 Table B-4. AC Power Specifications 96 Table B-5. System Power Requirements 96 Table B-6. Typical hp rp7405/rp7410 - HP Rp7410 | User Guide, Third Edition - hp rp7405/rp7410 Servers - Page 8
Tables viii - HP Rp7410 | User Guide, Third Edition - hp rp7405/rp7410 Servers - Page 9
5. C-Tick Label xvi Figure 1-1. hp rp7405/rp7410 Server (front view 2 Figure 1-2. hp rp7405/rp7410 Server (without front bezel 3 Figure 1-3. hp rp7410 8-Way Block Diagram 6 Figure 1-4. Cell Controller 7 Figure 1-5. Cell Board 7 Figure 1-6. Memory Subsystem 8 Figure 1-7. Internal Disks 10 - HP Rp7410 | User Guide, Third Edition - hp rp7405/rp7410 Servers - Page 10
73 Figure 4-13. PCI Smart Fan Assembly Detail 74 Figure 4-14. BPS Location 75 Figure 4-15. BPS Detail 76 Figure 4-16. PCI Power Module Location 77 Figure 4-17. PCI Power Module Detail 78 Figure 4-18. Locating the VRMs on PCI Backplane 79 Figure 4-19. PCI Cards 81 Figure 4-20. PCI Gate - HP Rp7410 | User Guide, Third Edition - hp rp7405/rp7410 Servers - Page 11
Preface - HP Rp7410 | User Guide, Third Edition - hp rp7405/rp7410 Servers - Page 12
Revision History Table 1 Revisions Revision Part Number Third A6752-96008 Second First A6752-96002 A6752-91001 Release Date Description November 2002 Corrected power cord and power reqirements section. Corrected DIMM oading order. Other general corrections. August 2002 Changed title, - HP Rp7410 | User Guide, Third Edition - hp rp7405/rp7410 Servers - Page 13
Notational Conventions WARNING Warnings highlight procedures or information necessary to avoid injury to personnel. The warning should tell the reader exactly what will result from what actions and how to avoid them. CAUTION A caution highlights procedures or information necessary to avoid - HP Rp7410 | User Guide, Third Edition - hp rp7405/rp7410 Servers - Page 14
the cabinet manually. To source. Trained service personnel must follow the service guidelines. WARNING Do not stand in front of the equipment as it is rolled off the pallet onto the ramps. When removing the equipment from the shipping pallet, follow the guidelines specified in the Installation - HP Rp7410 | User Guide, Third Edition - hp rp7405/rp7410 Servers - Page 15
Figure 1 Declaration of Conformity xi - HP Rp7410 | User Guide, Third Edition - hp rp7405/rp7410 Servers - Page 16
energy and, if not installed and used in accordance with the instruction manual, may cause harmful interference to radio communications. Operation of this equipment in a residential area is likely to cause harmful interference in which case the user will be required to correct the interference at - HP Rp7410 | User Guide, Third Edition - hp rp7405/rp7410 Servers - Page 17
notice, 2000.10.26) • BB: certification year • CCCC: registration number Figure 3 Korean RFI Translation Class A Equipment: Please note that this this product may cause radio interference in which case the user may be required to take adequate measures. Canada RFI Statement This Class A - HP Rp7410 | User Guide, Third Edition - hp rp7405/rp7410 Servers - Page 18
suggestions in this guide are based on requirements for a country outside North America. Throughout this manual, the [LAHJ] acronym will be used to indicate Local Authority Has Jurisdiction. Acoustics (Germany) Acoustic Noise (A-weighted Power Systems These products should not be connected to power - HP Rp7410 | User Guide, Third Edition - hp rp7405/rp7410 Servers - Page 19
Conditions See installation instructions before connecting this equipment to the input supply. Voir la notice d'installation avant de raccorder au réseau. WARNING NORDIC Class 1 Equipment Denmark: Før tilslutning af de øvrige ledere, se medfølgende installationsvejledning. WARNING NORDIC - HP Rp7410 | User Guide, Third Edition - hp rp7405/rp7410 Servers - Page 20
There is a danger of explosion if battery is installed incorrectly. Replace only with the same or equivalent type recommended by the manufacturer. Dispose of used batteries according to the manufacturer's instructions and local disposal requirements. IMPORTANT Switzerland: Annex 4.10 of SR 814.013 - HP Rp7410 | User Guide, Third Edition - hp rp7405/rp7410 Servers - Page 21
the Fibre communications port. In the USA, the OLM is certified as a Class 1 laser product conforming to the requirements contained in the Department of Health and Human Services (DHHS) regulation 21 CFR, Subchapter J. The certification is indicated by a label on the plastic OLM housing. Outside the - HP Rp7410 | User Guide, Third Edition - hp rp7405/rp7410 Servers - Page 22
xviii - HP Rp7410 | User Guide, Third Edition - hp rp7405/rp7410 Servers - Page 23
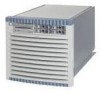
over its predecessor but in a smaller volume. Its shallower depth allows it to fit in a standard rack. In addition to the hp rp7410, Hewlett-Packard offers a series of cost-effective servers based on the hp rp7410 with somewhat less performance. See "hp rp7405 Servers" on page 5. Chapter 1 1 - HP Rp7410 | User Guide, Third Edition - hp rp7405/rp7410 Servers - Page 24
internal peripherals including disks and DVD/tape. Its high availability features include N+1 hot-pluggable fans and power, redundant power cords, and hot-pluggable PCI cards and internal disks. It uses the PA8700 PA-RISC processors. Figure 1-1 hp rp7405/rp7410 Server (front view) 2 Chapter 1 - HP Rp7410 | User Guide, Third Edition - hp rp7405/rp7410 Servers - Page 25
the processors and memory to the off-board I/O. The CC provides a crossbar connection, which allows communication with other cell boards in the system. It connects to the PDH and SINC hardware. Each cell board holds up to 16 DIMMS. There can be one or two cell boards installed in a server. The cell - HP Rp7410 | User Guide, Third Edition - hp rp7405/rp7410 Servers - Page 26
) link-to-PCI converter ASICs. It also includes connectors for attaching the cell boards, PCI backplane, MP Core I/O MP/SCSI boards, SCSI cables, bulk power, chassis fans, front panel display, intrusion switches, and the system scan card. Unlike Superdome or the rp8400, there are no XBC chips on the - HP Rp7410 | User Guide, Third Edition - hp rp7405/rp7410 Servers - Page 27
processors/cell boards, memory, core I/O, etc. according to the corporate price list. In addition, these servers may be upgraded to fully functional hp rp7410 servers with the kits given in Table 1-2. Table 1-2 hp rp7405-to-rp7410 Upgrades Kit Description Upgrade Part Number Upgrade kit - HP Rp7410 | User Guide, Third Edition - hp rp7405/rp7410 Servers - Page 28
Introduction Detailed hp rp7405/rp7410 Description Detailed hp rp7405/rp7410 Description Figure 1-3 hp rp7410 8-Way Block Diagram 6 Chapter 1 - HP Rp7410 | User Guide, Third Edition - hp rp7405/rp7410 Servers - Page 29
Introduction Detailed hp rp7405/rp7410 Description Cell Board The cell board contains the processors, main memory, and the cell controller (CC) ASIC that interfaces the processors and memory to the off-board I/O. Shown in Figure 1-4 is the CC. This is the heart of the cell board. The CC provides a - HP Rp7410 | User Guide, Third Edition - hp rp7405/rp7410 Servers - Page 30
Introduction Detailed hp rp7405/rp7410 Description The hp rp7405/rp7410 has a 48V distributed power system and receives the 48V power from the system backplane board. The cell board contains DC-to-DC converters to generate the required voltage rails. The DC-to-DC converters on the cell board do not - HP Rp7410 | User Guide, Third Edition - hp rp7405/rp7410 Servers - Page 31
Introduction Detailed hp rp7405/rp7410 Description PDH Riser Board The PDH riser board is a daughter card for the cell board. It contains a micro-processor memory interface microcircuit, processor-dependent hardware (PDH) including the processor dependant code (PDC) Flash memory, and a - HP Rp7410 | User Guide, Third Edition - hp rp7405/rp7410 Servers - Page 32
. System partitioning is configured by the system management processor. Internal Disk Devices for hp rp7405/rp7410 As Figure 1-4 shows, in an hp rp7405/rp7410 cabinet the top internal disk drives connect to cell 1 through the MP Core I/O for cell 1 (for 1/0/0/3/0.6) and the LAN/SCSI card in slot - HP Rp7410 | User Guide, Third Edition - hp rp7405/rp7410 Servers - Page 33
fans, front panel display, intrusion switches, and the system scan card. Figure 1-8 System Backplane Block Diagram MP Core I/O MP/SCSI MP Core I/O MP/SCSI System backplane PCI backplane Cell board 0 Cell board 1 Cell boards are perpendicular to the system backplane. Bulk power supply Only - HP Rp7410 | User Guide, Third Edition - hp rp7405/rp7410 Servers - Page 34
5V, to determine the type of the cards inserted. The circuitry controls the voltage rail supplied to the connector for powering the card's I/O pads, VIO. The card can either be of the 5V only, or universal type. 5V only cards require VIO to be 5V, whereas universal cards operate 5V as well as 3.3V - HP Rp7410 | User Guide, Third Edition - hp rp7405/rp7410 Servers - Page 35
Swap Slot. MP/SCSI MP Core I/O Board The hp rp7405/rp7410 accommodates two sets of MP Core I/O functionality. Each MP Core I/O board set consists of a MP/SCSI board and a Procurium LAN/SCSI board. At least one MP/SCSI board is required (independent of partitions) An additional MP/SCSI board can be - HP Rp7410 | User Guide, Third Edition - hp rp7405/rp7410 Servers - Page 36
a removable media device is required on the mass storage backplane. The mass storage backplane incorporates a circuit that allows power to the internal removable media device to be programmatically cycled. Package Description Dimensions The dimensions of the hp rp7405/rp7410 are as follows: • Width - HP Rp7410 | User Guide, Third Edition - hp rp7405/rp7410 Servers - Page 37
Figure 1-10 Right-Front View of hp rp7405/rp7410 PCI cards Front panel display board PCI DC-to-DC converters Cell boards Bulk powers supplies Slide The PCI I/O card section, located towards the rear, is accessed by removing the top cover. The PCI OLR fan modules are located in front of the - HP Rp7410 | User Guide, Third Edition - hp rp7405/rp7410 Servers - Page 38
Introduction Detailed hp rp7405/rp7410 Description Cell boards are accessed from the right side of the chassis behind a removable side cover. Figure 1-11 Left-Rear View of hp rp7405/rp7410 System backplane MP Core I/O MP/SCSIs 16 Chapter 1 - HP Rp7410 | User Guide, Third Edition - hp rp7405/rp7410 Servers - Page 39
2 Installation Chapter 2 17 - HP Rp7410 | User Guide, Third Edition - hp rp7405/rp7410 Servers - Page 40
. The customer should complete the form and return it to the shipping representative. NOTE The server may come already racked, or ready for rack installation. Unpacking a Racked Server This section contains information pertaining to unpacking the cabinet. WARNING Wear protective glasses while - HP Rp7410 | User Guide, Third Edition - hp rp7405/rp7410 Servers - Page 41
Installation Unpacking the Server CAUTION The plastic wrapping material should be cut off rather than pulled off. Pulling the plastic covering off represents an ESD hazard. Figure 2-1 Removing the Polystraps and Cardboard Chapter 2 19 - HP Rp7410 | User Guide, Third Edition - hp rp7405/rp7410 Servers - Page 42
Installation Unpacking the Server Step 5. Remove four bolts holding down the ramps and remove the ramps. See Figure 2-2. Figure 2-2 Removing the Shipping Bolts and Plastic Cover 20 Chapter 2 - HP Rp7410 | User Guide, Third Edition - hp rp7405/rp7410 Servers - Page 43
Installation Unpacking the Server Step 6. Remove the six bolts from the base attaching the rack to the pallet. See Figure 2-3. Figure 2-3 Preparing to Roll Off the Pallet WARNING Make sure that the leveling feet on the rack are raised before you roll the rack down the ramp and any time you roll - HP Rp7410 | User Guide, Third Edition - hp rp7405/rp7410 Servers - Page 44
the weight of the server, it must be centered on the lifter forks before raising it off the pallet to avoid injury. Never extend more than one server from the same cabinet while installing or servicing either an hp rp7405/rp7410 or another server product. Failure to follow these instructions could - HP Rp7410 | User Guide, Third Edition - hp rp7405/rp7410 Servers - Page 45
Lifter Installation Unpacking the Server Step 1. Follow the instructions on the outside of the server packaging to remove the banding and carton top from the server pallet. Figure 2-6 Server with Shipping Box Removed Step 2. Remove all cartons from the pallet leaving only the server. Chapter - HP Rp7410 | User Guide, Third Edition - hp rp7405/rp7410 Servers - Page 46
Installation Unpacking the Server Step 3. Observe Figure 2-7. Remove the two foam cushion for lift access. Figure 2-7 Remove Cushions for Lift Access Remove cushion Remove cushion Clearance for RonI lift is 28"x5" Step 4. Insert the lifter forks under the server. Step 5. Carefully roll the lift - HP Rp7410 | User Guide, Third Edition - hp rp7405/rp7410 Servers - Page 47
the lifter and server away from the pallet. Do not raise the server any higher than necessary when moving it over to the rack. Figure 2-9 Lifting the Server to the Rack NOTE If you are installing the system in a rack, refer to the hp J1530A Rack Integration Kit Installation Guide. Chapter 2 25 - HP Rp7410 | User Guide, Third Edition - hp rp7405/rp7410 Servers - Page 48
attempting this procedure, it is recommended that you first remove all Cell Boards and AC power supplies. Instructions for removing these components can be found in the Removal and Replacement chapter of the service manual. Check with local safety regulations before attempting to move the system - HP Rp7410 | User Guide, Third Edition - hp rp7405/rp7410 Servers - Page 49
Unpacking the Server Step 4. With one handle in each hand, install the pin end of the panel into the backside of the front rack mount ears on the chassis. Figure 2-11 Inserting the Pins Into the Rack Step 5. Pull the spring plunger out, move the handles apart and install the shoulder washer end of - HP Rp7410 | User Guide, Third Edition - hp rp7405/rp7410 Servers - Page 50
Figure 2-13 Lifting the Server Installing Server Into the Rack Any hp rp7405/rp7410 server that is to be installed into a rack is shipped with equipment slides. With every set of slides comes an installation guide: installation guide, hp J1530A, rack installation kit (lower case intended). Follow - HP Rp7410 | User Guide, Third Edition - hp rp7405/rp7410 Servers - Page 51
the Cable Management Arm (CMA) Once the server is installed in the rack, the CMA must be installed on the rear of the server. Follow the instructions for installing the CMA can be found in the installation guide, hp J1530A, rack installation kit (lower case intended). Figure 2-14 Cable Management - HP Rp7410 | User Guide, Third Edition - hp rp7405/rp7410 Servers - Page 52
before powering off the server. Cell Boards The server requires at least one cell board to operate. Install the first cell board slot 1 (lower slot) and the second cell board in slot 0 (upper). Cell Board 0 enables the PCI cards in Chassis 0 and Cell Board 1 enables the PCI cards in Chassis 1. MP - HP Rp7410 | User Guide, Third Edition - hp rp7405/rp7410 Servers - Page 53
Unpacking the Server Embedded Disks The hp rp7405/rp7410 server can operate in the diskless (LAN boot) mode. If disks are to be installed, the top two disks are driven by the primary MP Core I/O set. Install the first embedded disk in the top left location. Install the second embedded disk - HP Rp7410 | User Guide, Third Edition - hp rp7405/rp7410 Servers - Page 54
rank are numbered a,b,c,d. Install DIMMs in ascending order: rack 0, 1, 2 and 3. It is not necessary to balance the number of DIMMs across both cell boards. For Example: one rank = slots 0a, 0b, 0c and 0d. Valid Memory Configurations DIMMs must be loaded in sets of four at specific locations. For - HP Rp7410 | User Guide, Third Edition - hp rp7405/rp7410 Servers - Page 55
order. Figure 2-19 shows the order in which the DIMM slots must be populated. Figure 2-19 DIMM Loading Sequence Block 1 shows the minimum memory configuration per cell board. Each cell board, therefore, could have up to four different density DIMMs (if there were that many), as long as each set - HP Rp7410 | User Guide, Third Edition - hp rp7405/rp7410 Servers - Page 56
Installation Connecting AC Input Power Connecting AC Input Power The hp rp7405/rp7410 has five line cord configurations: > pwrgrd Power grid configuration preference. 1. Grid A only (Cords A0,A1 required) 2. Grid B only (Cords B0,B1 required) 3. Grids A & B (Cords A0,A1,B0,B1 required) 4. Cords - HP Rp7410 | User Guide, Third Edition - hp rp7405/rp7410 Servers - Page 57
the server whenever a power source is connected. This voltage is present even when the main power switch is in the off position. Failure to observe this warning could result in personal injury or damage to equipment. NOTE System firmware will prevent boot when a single power cord configuration - HP Rp7410 | User Guide, Third Edition - hp rp7405/rp7410 Servers - Page 58
MP/SCSI board and the LAN/SCSI board. The MP/SCSI board is oriented vertically and accessed from the back of the server. The LAN/SCSI is accessed from the PCI expansion card bay. Only the primary MP core I/O board set (MP/SCSI slot 1 & LAN/SCSI slot 8, Chassis 1) is required for a single partition - HP Rp7410 | User Guide, Third Edition - hp rp7405/rp7410 Servers - Page 59
/rp7410. The MP monitors the activity of either a one partition or a multiple partition configuration. During installation, communicating with the MP enables such tasks as: • Verifying that the components are present and installed correctly • Setting LAN IP addresses • Shutting down cell board power - HP Rp7410 | User Guide, Third Edition - hp rp7405/rp7410 Servers - Page 60
hp rp7405/rp7410 server for the first time: 1. Verify that the AC voltage at the input source is within specifications for each hp rp7405/rp7410 being installed. 2. If not already done so, power on the serial display device. The preferred tool is the CE tool running Reflection 1. To power up the MP - HP Rp7410 | User Guide, Third Edition - hp rp7405/rp7410 Servers - Page 61
Installation MP Core I/O Connections On the front of the hp rp7405/rp7410, a solid green Standby Power, a solid green MP Present, and a flashing amber Attention light will illuminate after about 30 seconds. Figure 2-22 Front Panel Display 2. Check the bulk power supply LED for each BPS. When on, the - HP Rp7410 | User Guide, Third Edition - hp rp7405/rp7410 Servers - Page 62
Installation MP Core I/O Connections The MP Main Menu appears: Figure 2-23 MP Main Menu MP login: Admin MP password: Welcome to the rp7410 Management Processor (c) Copyright 1995-2001 Hewlett-Packard Co., All Rights Reserved. MP MAIN MENU: CO: Consoles VFP: Virtual Front Panel CM: Command Menu CL: - HP Rp7410 | User Guide, Third Edition - hp rp7405/rp7410 Servers - Page 63
Installation MP Core I/O Connections NOTE The value in the "IP address" field has been set at the factory. The customer must provide the actual LAN indicate the parameters have been updated and return to the MP Command Menu prompt (MP:CM>) 9. To check the LAN parameters and status, enter the - HP Rp7410 | User Guide, Third Edition - hp rp7405/rp7410 Servers - Page 64
port on the MP. After login to the MP, verify that the MP detects the presence of all the cells installed in the cabinet. It is important for the MP to detect the cell boards. If it does not, the partitions will not boot. To determine if the MP detects the cell boards: 1. At the MP prompt, enter cm - HP Rp7410 | User Guide, Third Edition - hp rp7405/rp7410 Servers - Page 65
an asterisk (*) in the column marked MP. 4. Verify that there is an asterisk (*) for each of the cells installed in the cabinet, by comparing what is in the Cells column with the cells physically located inside the cabinet. Figure 5-9 shows that cells are installed in slots 0 and 1. In the cabinet - HP Rp7410 | User Guide, Third Edition - hp rp7405/rp7410 Servers - Page 66
Installation Powering On the hp rp7405/rp7410 Server Powering On the hp rp7405/rp7410 Server After powering on the Management Processor (MP) (+3.3 V HKP), and checking that the MP detects the presence of the cell boards, power up the server. If using a LAN crossover cable with the laptop, review - HP Rp7410 | User Guide, Third Edition - hp rp7405/rp7410 Servers - Page 67
Installation Selecting a Boot Partition using the Management Processor Selecting a Boot Partition using the Management Processor At this point in the installation process, the hardware is set up, the Management Processor (MP) is connected to the LAN, the AC and DC power have been turned on, and the - HP Rp7410 | User Guide, Third Edition - hp rp7405/rp7410 Servers - Page 68
command from the menu to verify the type and quantity of processors, memory and I/O cards: • PR (Processors) • ME (Memory) • IO (Check the PCI Device Information to determine if the values match the devices installed in the server) Once the parameters have been verified, use the ma command to - HP Rp7410 | User Guide, Third Edition - hp rp7405/rp7410 Servers - Page 69
Installation Booting HP-UX using Boot Console Handler (BCH) Booting HP-UX using Boot Console Handler (BCH) If Instant Ignition was ordered, HP-UX will have been installed in the factory at the Primary Path address. If HP-UX is at a path other than the Primary Path, use the pa (path) command (from - HP Rp7410 | User Guide, Third Edition - hp rp7405/rp7410 Servers - Page 70
Installation Booting HP-UX using Boot Console Handler (BCH) 48 Chapter 2 - HP Rp7410 | User Guide, Third Edition - hp rp7405/rp7410 Servers - Page 71
3 Troubleshooting Chapter 3 49 - HP Rp7410 | User Guide, Third Edition - hp rp7405/rp7410 Servers - Page 72
steps: a. Log users off the LAN and power down the server. b. Extend the server out of the rack and remove the top cover. c. Simplify the hp rp7405/rp7410 to the minimum configuration. The minimum configuration consists of the following: • One cell • Two processors • One quad of memory DIMMS (size - HP Rp7410 | User Guide, Third Edition - hp rp7405/rp7410 Servers - Page 73
Troubleshooting Common Installation Problems 9. Boot the server and if it does not function properly, refer to the following procedures. The Server Does Not Power On Use these steps to check for power related problems: 1. Check each bulk power supply's (BPS) LED. The LED is located in the lower - HP Rp7410 | User Guide, Third Edition - hp rp7405/rp7410 Servers - Page 74
Red Off Description One or more partition running No partition running, or SP not installed, or SP installed and not active One or more Partitions have reported a fault No Partitions running, or SP not installed, or SP installed and not active Bulk Power Supply LEDs There is a single three-color - HP Rp7410 | User Guide, Third Edition - hp rp7405/rp7410 Servers - Page 75
Troubleshooting Common Installation Problems Table 3-3 LED Fault PCI Power Supply LEDs (Continued) Driven By State Description Each Supply Flash Yellow On Yellow Flash Red On Red Off The temperature within the power supply is above the lower threshold. The temperature of the power supply is - HP Rp7410 | User Guide, Third Edition - hp rp7405/rp7410 Servers - Page 76
Troubleshooting Common Installation Problems OL* LEDs Table 3-6 OL* LEDs Location LED Chassis Beside Cell Board Power Cell and On Cell Driven By State Cell LPM On Green PCI OL* Board MP Core I/O Panel Cell Attention PCI Slot Power SP via GPM LBA PCI Slot Attention LBA PCI Slot Power - HP Rp7410 | User Guide, Third Edition - hp rp7405/rp7410 Servers - Page 77
Troubleshooting Common Installation Problems Table 3-8 MP Core I/O LEDs (Continued) LED Driven By State Description Management Processor SP Active On Green Service Processor on this MP Core I/O Board is managing box. Off SP is not managing box. Management Processor SP POST Off SP is - HP Rp7410 | User Guide, Third Edition - hp rp7405/rp7410 Servers - Page 78
Troubleshooting Common Installation Problems 56 Chapter 3 - HP Rp7410 | User Guide, Third Edition - hp rp7405/rp7410 Servers - Page 79
4 Removal and Replacement Chapter 4 57 - HP Rp7410 | User Guide, Third Edition - hp rp7405/rp7410 Servers - Page 80
Down nPartitions and Powering Off Hardware Components When you remove and replace hardware you may need to shut down one or more nPartitions on the server. In some cases you also will need to power off hardware components as part of the remove and replace procedure. This section gives details on how - HP Rp7410 | User Guide, Third Edition - hp rp7405/rp7410 Servers - Page 81
nPartition to reset and boot to its BCH interface; if auto-boot is configured it also boots HP-UX.) Powering Off Hardware Components This procedure is for powering off and powering on components that are to be removed and replaced. Step 1. Login to the server's service processor (MP). Step 2. If the - HP Rp7410 | User Guide, Third Edition - hp rp7405/rp7410 Servers - Page 82
Shutting Down nPartitions and Powering Off Hardware Components Step 9. Use the MP Command menu's PE command to power on the hardware component that you powered off. Step 10. Use the MP Command menu's PS command to confirm the status of the newly replaced component. NOTE You may need to allow - HP Rp7410 | User Guide, Third Edition - hp rp7405/rp7410 Servers - Page 83
Removal and Replacement Removing and Replacing the Top Cover Removing and Replacing the Top Cover It is necessary to remove and replace one or more of the covers to access the components within the server chassis. CAUTION Observe all ESD safety precautions before attempting this procedure. - HP Rp7410 | User Guide, Third Edition - hp rp7405/rp7410 Servers - Page 84
the rear of the chassis. Step 2. Slide the cover toward the rear of the chassis. Step 3. Lift the cover up and away from the chassis. Replacing the Top Cover Step 1. Slide the cover into position. It should easily slide into position; however, a slow firm pressure will be needed to properly seat - HP Rp7410 | User Guide, Third Edition - hp rp7405/rp7410 Servers - Page 85
are located in the front of the chassis. The nPartition must be shutdown to remove or replace the drive that serves as the boot disk. Refer to "Shutting Down nPartitions and Powering Off Hardware Components" for more information. The remainder of the internal disk drives are hot pluggable. CAUTION - HP Rp7410 | User Guide, Third Edition - hp rp7405/rp7410 Servers - Page 86
slide the disk drive from the chassis. Replacing a Disk Drive NOTE Sometimes using the diskinfo and ioscan commands will produce encached data. To resolve this, these commands should be run when the disk drive is removed. Step 1. Before installing the disk drive, enter the following command - HP Rp7410 | User Guide, Third Edition - hp rp7405/rp7410 Servers - Page 87
#pvcreate #vgcfgrestore Removal and Replacement Removing and Replacing a Disk Drive Chapter 4 65 - HP Rp7410 | User Guide, Third Edition - hp rp7405/rp7410 Servers - Page 88
to remove or replace it. Refer to "Shutting Down nPartitions and Powering Off Hardware Components" for more information. CAUTION Observe all ESD safety precautions before attempting this procedure. Failure to follow ESD safety precautions could result in damage to the server. Figure 4-5 CD/DVD - HP Rp7410 | User Guide, Third Edition - hp rp7405/rp7410 Servers - Page 89
Removing a CD/DVD Drive Figure 4-6 CD/DVD Detail Removal and Replacement Removing and Replacing a CD/DVD Drive Step 1. To remove the CD/DVD, depress the front locking latch to loosen the drive from the chassis. Step 2. Disengage the cables - HP Rp7410 | User Guide, Third Edition - hp rp7405/rp7410 Servers - Page 90
Removal and Replacement Removing and Replacing a CD/DVD Drive Replacing a CD/DVD Figure 4-7 CD/DVD Detail Step 1. Connect the cables to the rear of the CD/DVD. Step 2. Slide the drive in the chassis. CAUTION Before attempting to install the drive into the chassis, position the data cable over - HP Rp7410 | User Guide, Third Edition - hp rp7405/rp7410 Servers - Page 91
Flash Red Off Meaning Fan is at speed and in sync or not at speed less than 6 seconds Fan is not keeping up with speed/sync pulse for greater than 6 seconds Fan failed/stalled or has run slow or fast for greater than 6 seconds Fan is not installed or no power is applied to fan Chapter 4 69 - HP Rp7410 | User Guide, Third Edition - hp rp7405/rp7410 Servers - Page 92
4-9 Front Fan Detail Step 1. Push the Fan Release Pin away from the fan. Step 2. Slide the fan away from the connector. Step 3. Pull the fan away from the chassis. Replacing a Front Smart Fan Assembly Step 1. Position the fan assembly on the chassis fan guide pins. Step 2. Slide the fan into the - HP Rp7410 | User Guide, Third Edition - hp rp7405/rp7410 Servers - Page 93
Flash Red Off Meaning Fan is at speed and in sync or not at speed less than 6 seconds Fan is not keeping up with speed/sync pulse for greater than 6 seconds Fan failed/stalled or has run slow or fast for greater than 6 seconds Fan is not installed or no power is applied to fan Chapter 4 71 - HP Rp7410 | User Guide, Third Edition - hp rp7405/rp7410 Servers - Page 94
Rear Fan Detail Step 1. Push the Fan Release Pin away from the fan. Step 2. Slide the fan away from the connector. Step 3. Pull the fan away from the chassis. Replacing a Rear Smart Fan Assembly Step 1. Carefully position the fan assembly on the chassis fan guide pins. Step 2. Slide the fan into - HP Rp7410 | User Guide, Third Edition - hp rp7405/rp7410 Servers - Page 95
Flash Red Off Meaning Fan is at speed and in sync or not at speed less than 6 seconds Fan is not keeping up with speed/sync pulse for greater than 6 seconds Fan failed/stalled or has run slow or fast for greater than 6 seconds Fan is not installed or no power is applied to fan Chapter 4 73 - HP Rp7410 | User Guide, Third Edition - hp rp7405/rp7410 Servers - Page 96
Removal and Replacement Removing and Replacing a PCI Smart Fan Assembly Removing a PCI Smart Fan Assembly Figure 4-13 PCI Smart Fan Assembly Detail Step 1. Securely grasp the two thumb holds on the fan assembly. NOTE The two right side fans, as viewed from the front, are located very close to - HP Rp7410 | User Guide, Third Edition - hp rp7405/rp7410 Servers - Page 97
and Replacing a Bulk Power Supply The bulk power supply is located in the front of the chassis. The BPS is a hot swappable component. CAUTION Observe all ESD safety precautions before attempting this procedure. Failure to follow ESD safety precautions could result in damage to the server. Figure - HP Rp7410 | User Guide, Third Edition - hp rp7405/rp7410 Servers - Page 98
and Replacement Removing and Replacing a Bulk Power Supply Removing a BPS Figure 4-15 BPS Detail Step 1. Pull the extraction levers located on the upper front outer portion of the BPS. Step 2. Slide the BPS forward using the extractions levers to remove it from the chassis. Replacing a BPS - HP Rp7410 | User Guide, Third Edition - hp rp7405/rp7410 Servers - Page 99
safety precautions could result in damage to the server. Figure 4-16 PCI Power Module Location PCI Power Modules Table 4-4 PCI Power Module LED Indications LED LED State Meaning Power LED (Green) Fault LED (Multi-color) Off Power module failure On Normal operation Off Normal operation - HP Rp7410 | User Guide, Third Edition - hp rp7405/rp7410 Servers - Page 100
Removal and Replacement Removing and Replacing a PCI Power Module (Brick) Removing a PCI Power Module (Brick) Figure 4-17 PCI Power Module Detail Step 1. Securely grasp the handle on the front of the power module. Step 2. Firmly depress the securing thumb latch. Step 3. Slide the module from the - HP Rp7410 | User Guide, Third Edition - hp rp7405/rp7410 Servers - Page 101
the PCI Voltage Regulator Modules Removing and Replacing the PCI Voltage Regulator Modules Removing PCI VRM Step 1. Power down server. IMPORTANT Power must be removed from both PCI Chassis 0 and PCI Chassis 1 to continue. Step 2. Remove right side cover. Step 3. Remove PCI side panel. Step - HP Rp7410 | User Guide, Third Edition - hp rp7405/rp7410 Servers - Page 102
Removal and Replacement Removing and Replacing the PCI Voltage Regulator Modules Step 4. Put right side cover back onto chassis. Step 5. Power server back up. 80 Chapter 4 - HP Rp7410 | User Guide, Third Edition - hp rp7405/rp7410 Servers - Page 103
(OLAR). IMPORTANT Some PCI I/O cards cannot be added or replaced online (while HP-UX remains running). For these cards, you must shut down HP-UX on the nPartition before performing the card replacement or addition. See "Shutting Down nPartitions and Powering Off Hardware Components" on page 58. Step - HP Rp7410 | User Guide, Third Edition - hp rp7405/rp7410 Servers - Page 104
, you must shut down HP-UX on the nPartition before replacing the defective card. Step 4. Locate the PCI slot where the selected card resides. On the server, you can view the PCI slots and slot LEDs from the rear of the cabinet. The selected slot will be powered off (its green power LED will be off - HP Rp7410 | User Guide, Third Edition - hp rp7405/rp7410 Servers - Page 105
blinking) the slot's attention indicator. SAM also resumes the card's drivers. Step 15. Confirm that the replacement card is online and powered in, using SAM's I/O Cards screen. Step 16. Synchronize the PDH and I/O card SCSI parameters. 1. When powering up system, go into CO (console window). When - HP Rp7410 | User Guide, Third Edition - hp rp7405/rp7410 Servers - Page 106
the Mass Storage Backplane Removing and Replacing the Mass Storage Backplane Removing the Backplane Step 1. Remove all internal disks. Figure 4-21Locating Internal Disks Drive 1-1 Drive 1-2 Drive 0-2 Drive 0-1 Step 2. Remove the top and - HP Rp7410 | User Guide, Third Edition - hp rp7405/rp7410 Servers - Page 107
Removal and Replacement Removing and Replacing the Mass Storage Backplane Ensure that you notice where each is removed, so that they may be correctly reinstalled. Figure 4-22Locating the Mass Storage Backplane - HP Rp7410 | User Guide, Third Edition - hp rp7405/rp7410 Servers - Page 108
and Replacement Removing and Replacing the Mass Storage Backplane Replacing the Backplane Step 1. Align and press the backplane/bracket assembly into its mount. Step 2. Fasten the two captive screws. Step 3. Connect all cables to the backplane. Step 4. Install the PCI side panel. Step 5. Install the - HP Rp7410 | User Guide, Third Edition - hp rp7405/rp7410 Servers - Page 109
Removal and Replacement Removing and Replacing a MP/SCSI Board Removing and Replacing a MP/SCSI Board The MP/SCSI board is located in the rear of the chassis. The MP/SCSI board is a hot pluggable component. There may be up to two MP/SCSI boards installed in a system. CAUTION Observe all ESD - HP Rp7410 | User Guide, Third Edition - hp rp7405/rp7410 Servers - Page 110
Replacement Removing and Replacing a MP/SCSI Board Removing a MP/SCSI board Figure 4-25 MP/SCSI Detail MP for Cell 0 MP for Cell 1 (Partition 0) Step 1. Label and remove all cables connected to the MP/SCSI board to be removed. Step 2. Loosen the two retaining screws securing the MP/SCSI board - HP Rp7410 | User Guide, Third Edition - hp rp7405/rp7410 Servers - Page 111
A Replaceable Parts Appendix A 89 - HP Rp7410 | User Guide, Third Edition - hp rp7405/rp7410 Servers - Page 112
panel Assembly, PCI Card Cage Assembly, PCI OLR Assembly, PCI OLR Paddle Assembly, PCI Separator (W/Light Pipe) Assembly, Slide rail, left Assembly, Slide rail, right Assembly, Smart Fan (Front/Rear) (qty 4) Assembly, Smart Fan (PCI C/C) (qty 6) Replacement Part Number A6537-67001 A6098AX 8120 - HP Rp7410 | User Guide, Third Edition - hp rp7405/rp7410 Servers - Page 113
-PDU 4.5m C19/C20 Kit, Removable Media Rail M-Cable Nameplate, rp7405 Nameplate, rp7410 Panel, PCI, Upper Right Side PCA, Front Panel (Display)a PCA, LAN/SCSI (Procurium) PCA, Mass Storage Backplane PCA, MP/SCSI (Core IO) PCA, System Backplane Replacement Part Number A6752-04066 J1479-60001 A6752 - HP Rp7410 | User Guide, Third Edition - hp rp7405/rp7410 Servers - Page 114
Replaceable Parts Table A-1 hp rp7405/rp7410 Field Replaceable Unit (FRU) List (Continued) FRU Description Replacement Part Number Exchange Part Number PCI Filler Plate 5001-6892 PCI Power Module (Brick) 0950-3819 Power Cord, C19/CEE 7-7 4.5m Black CA Assembly 8120-6899 Power Cord, C19/ - HP Rp7410 | User Guide, Third Edition - hp rp7405/rp7410 Servers - Page 115
B System Specifications This chapter describes the basic server configuration and its physical specifications and requirements: Appendix B 93 - HP Rp7410 | User Guide, Third Edition - hp rp7405/rp7410 Servers - Page 116
the total system weight. The size and number of miscellaneous pallets will be determined by the equipment ordered by the customer. Table B-2 hp rp7405/rp7410 Component Weights Quantity 1 or 2 1 1 2 1 2 Description Cell board System backplane PCI backplane Bulk power supply Mass storage backplane - HP Rp7410 | User Guide, Third Edition - hp rp7405/rp7410 Servers - Page 117
Cords The supplied power cord length is 15 feet (457.4 cm). Table B-3 lists the various power cables available for use with a hp rp7405/rp7410 system. Each power cord is 15 feet (4.5 meters) in length with a IEC 60320-1 C19 female connector attached to one end. Table B-3 Power Cords Part Number - HP Rp7410 | User Guide, Third Edition - hp rp7405/rp7410 Servers - Page 118
an hp rp7405/rp7410 server. These tables provide information to help determine the amount of AC power needed for your computer room. Table B-4 AC Power Specifications Requirements Nominal input voltage Minimum Operating Voltage Maximum Operating Voltage Frequency range (minimum maximum) Number of - HP Rp7410 | User Guide, Third Edition - hp rp7405/rp7410 Servers - Page 119
System Specifications Environmental Specifications Environmental Specifications This section provides the environmental, power dissipation, noise emission, and air flow specifications for the hp rp7405/rp7410 server. Temperature and Humidity The cabinet is actively cooled using forced convection in - HP Rp7410 | User Guide, Third Edition - hp rp7405/rp7410 Servers - Page 120
remove the resulting heat from the cabinet. The fans within the power supply will operate at full speed during standby. Typical Power Dissipation and Cooling Table B-6 Typical hp rp7405/rp7410 Configurations Cell Boards Memory Per Cell Board PCI Cards (assumes 10 watts each) DVDs Hard Disk - HP Rp7410 | User Guide, Third Edition - hp rp7405/rp7410 Servers - Page 121
System Specifications Environmental Specifications Figure B-1 illustrates the location of the inlet and outlet airducts on a single cabinet. Figure B-1 Airflow Diagram Appendix B 99 - HP Rp7410 | User Guide, Third Edition - hp rp7405/rp7410 Servers - Page 122
System Specifications Environmental Specifications 100 Appendix B - HP Rp7410 | User Guide, Third Edition - hp rp7405/rp7410 Servers - Page 123
C Site Preparation Appendix C 101 - HP Rp7410 | User Guide, Third Edition - hp rp7405/rp7410 Servers - Page 124
Site Preparation Electrical Considerations Electrical Considerations Proper design and installation of a power distribution system for an hp rp7405/rp7410 server requires specialized skills. Those responsible for this task must have a thorough knowledge and understanding of appropriate electrical - HP Rp7410 | User Guide, Third Edition - hp rp7405/rp7410 Servers - Page 125
(Circuit Breaker Sizing) Electrical Load Requirements (Circuit Breaker Sizing) It is always a good idea to derate power distribution systems for one or more of the following reasons: • To avoid nuisance tripping from load shifts or power transients, circuit protection devices should never - HP Rp7410 | User Guide, Third Edition - hp rp7405/rp7410 Servers - Page 126
, testing cannot conclusively rule out loss of service. Therefore, adherence to the following guidelines provides the best possible performance of power distribution systems for server equipment: • Dedicated power source-Isolates server power distribution system from other circuits in the facility - HP Rp7410 | User Guide, Third Edition - hp rp7405/rp7410 Servers - Page 127
of other metals used in power hardware. Because of this difference, aluminum conductors can cause connector hardware to work loose, overheat, and fail. Raceway Systems (electrical conduits) Raceways (electrical conduits) form part of the protective ground path for personnel and equipment. Raceways - HP Rp7410 | User Guide, Third Edition - hp rp7405/rp7410 Servers - Page 128
hp rp7405/rp7410 servers require two methods of grounding: • Power distribution safety grounding • High frequency intercabinet grounding Power Distribution Safety Grounding The power fault conditions. Power distribution systems consist of several parts. Hewlett-Packard recommends that these parts be - HP Rp7410 | User Guide, Third Edition - hp rp7405/rp7410 Servers - Page 129
adequate high frequency ground return paths. Therefore, the server is shipped with a ground strap for connecting the system cabinet to the site grounding grid (customer-supplied). When connecting this ground, ensure that the raised floor is properly grounded. Power panels located in close proximity - HP Rp7410 | User Guide, Third Edition - hp rp7405/rp7410 Servers - Page 130
to service entrance ground and server equipment). Details If it has been determined to be necessary, connect all Hewlett-Packard equipment cabinets to the site ground grid as follows: Step 1. Attach one end on each end of the ground strap consists of a terminal and connection hardware (a 1/4-in - HP Rp7410 | User Guide, Third Edition - hp rp7405/rp7410 Servers - Page 131
highlighted. Both power cable and data communications cable installations are discussed. NOTE In domestic installations, the proper receptacles should be installed prior to the arrival of Hewlett-Packard equipment. Refer to the appropriate installation guide for installation procedures. Wiring - HP Rp7410 | User Guide, Third Edition - hp rp7405/rp7410 Servers - Page 132
Preparation Environmental Elements Environmental Elements The following environmental elements can affect an hp rp7405/rp7410 server installation: • Computer room preparation • Cooling requirements • Humidity level • Air conditioning ducts • Dust and pollution control • Electrostatic discharge (ESD - HP Rp7410 | User Guide, Third Edition - hp rp7405/rp7410 Servers - Page 133
the system to meet building code requirements (for human occupancy) and to the air locally over the servers. This system called DataCoolTM Supply air temperature should be maintained within the following parameters: • Ceiling supply system-From 55° F (12.8° C) to 60° F (15.6° C) • Floor supply - HP Rp7410 | User Guide, Third Edition - hp rp7405/rp7410 Servers - Page 134
above the ceiling. • Above ceiling ducted air distribution system-Supply air is ducted into a ceiling diffuser system from upflow air Conditioning System Installation All air conditioning equipment, materials, and installation must comply with any applicable construction codes. Installation of the - HP Rp7410 | User Guide, Third Edition - hp rp7405/rp7410 Servers - Page 135
damage during servicing operations. Paper feed problems on high- particles in the site environment. Specifically, disk drives, tape drives up on the boards. Other failures to power supplies and other time, resulting in possible cause problems in mechanical parts. Small dust particles can be - HP Rp7410 | User Guide, Third Edition - hp rp7405/rp7410 Servers - Page 136
chair 24,600 V 23,000 V 18,500 V 14,800 V a. Source: B.A. Unger, Electrostatic Discharge Failures of Semiconductor Devices (Bell in the computer room: • Install conductive flooring (conductive adhesive method) when handling circuit boards. • Store spare electronic modules in antistatic containers - HP Rp7410 | User Guide, Third Edition - hp rp7405/rp7410 Servers - Page 137
-Cover with a commercial grade of fire-resistant, acoustic rated, fiberglass ceiling tile. • Sound deadening-Cover the walls with curtains or other sound deadening material. • Removable partitions-Use foam rubber models for most effectiveness. Appendix C 115 - HP Rp7410 | User Guide, Third Edition - hp rp7405/rp7410 Servers - Page 138
• Fire extinguishing system Additional safety devices are: • Circuit breakers • An emergency power cutoff switch • Devices specific to the geographic location i.e., earthquake protection Lighting Requirements for Equipment Servicing Adequate lighting and utility outlets in a computer room reduce the - HP Rp7410 | User Guide, Third Edition - hp rp7405/rp7410 Servers - Page 139
that must be considered for the installation or operation of an hp rp7405/rp7410 server. Facility characteristics are: • Floor loading • Windows • Altitude effects Floor Loading The computer room floor must be able to support the total weight of the installed computer system as well as the - HP Rp7410 | User Guide, Third Edition - hp rp7405/rp7410 Servers - Page 140
can support (without failure) when a wheel of specified diameter and width is rolled across the panel. Computed by dividing total equipment weight by installation of an hp rp7405/rp7410 server. Based on specific information provided by Hewlett-Packard, Tate Access Floors has approved its Series 800 - HP Rp7410 | User Guide, Third Edition - hp rp7405/rp7410 Servers - Page 141
Preparation Facility Characteristics Table C-4 Typical Raised Floor Specifications (Continued) Itema Rating Ultimate load 4000 lb computers in a room with windows. Sunlight entering a computer room may cause problems. Magnetic tape storage media is damaged if exposed to direct sunlight. Also, - HP Rp7410 | User Guide, Third Edition - hp rp7405/rp7410 Servers - Page 142
requirements for an hp rp7405/rp7410 server. This data should be used as the basic guideline for space plan developments. Other factors, such as airflow, lighting, and equipment space requirements must also be considered. Delivery Space Requirements utility outlets affect servicing operations. Plan - HP Rp7410 | User Guide, Third Edition - hp rp7405/rp7410 Servers - Page 143
provisions for the following: • Channels or fixtures used for routing data cables and power cables • Access to air conditioning ducts, filters, lighting, and electrical power hardware • Power conditioning equipment • Cabinets for cleaning materials • Maintenance area and spare parts Appendix C 121 - HP Rp7410 | User Guide, Third Edition - hp rp7405/rp7410 Servers - Page 144
from a variety of sources, including but not limited to raised floor tiles, worn air conditioning parts, heating ducts, rotor on the bottom of some raised floor tiles. Although this problem is relatively rare, it may be an issue within your before installation of electronic equipment. 122 Appendix C - HP Rp7410 | User Guide, Third Edition - hp rp7405/rp7410 Servers - Page 145
11, 13, 79 system, 4, 8, 11, 12, 13, 15, 59, 91, 94, 97 basic air conditioning equipment requirements, 110 basic air distribution systems, 111 booting HP-UX, 47 BPS (Bulk Power Supply), 39 C cable management arm, 29 cell board, 3, 4, 7, 9, 11, 12, 15, 16, 26, 30, 32, 37, 42, 44, 54, 94, 97 verifying - HP Rp7410 | User Guide, Third Edition - hp rp7405/rp7410 Servers - Page 146
87, 88, 91 removing and replacing, 87, 88 N noise emission specifications, 98 null modem cable connectivity, 38 part number, 38 O operating environment, 97 P password MP, 39 PCI backplane, 2, 4, 11, 13, 79 PDC Processor Dependent Code, 44 PDH riser board, 9 power applying cabinet, 44 cabinet switch
-
 1
1 -
 2
2 -
 3
3 -
 4
4 -
 5
5 -
 6
6 -
 7
7 -
8
-
9
-
10
-
11
-
12
-
13
-
14
-
15
-
16
-
17
-
18
-
19
-
20
-
21
-
22
-
23
-
24
-
25
-
26
-
27
-
28
-
29
-
30
-
31
-
32
-
33
-
34
-
35
-
36
-
37
-
38
-
39
-
40
-
41
-
42
-
43
-
44
-
45
-
46
-
47
-
48
-
49
-
50
-
51
-
52
-
53
-
54
-
55
-
56
-
57
-
58
-
59
-
60
-
61
-
62
-
63
-
64
-
65
-
66
-
67
-
68
-
69
-
70
-
71
-
72
-
73
-
74
-
75
-
76
-
77
-
78
-
79
-
80
-
81
-
82
-
83
-
84
-
85
-
86
-
87
-
88
-
89
-
90
-
91
-
92
-
93
-
94
-
95
-
96
-
97
-
98
-
99
-
100
-
101
-
102
-
103
-
104
-
105
-
106
-
107
-
108
-
109
-
110
-
111
-
112
-
113
-
114
-
115
-
116
-
117
-
118
-
119
-
120
-
121
-
122
-
123
-
124
-
125
-
126
-
127
-
128
-
129
-
130
-
131
-
132
-
133
-
134
-
135
-
136
-
137
-
138
-
139
-
140
-
141
-
142
-
143
-
144
-
145
-
146
 |
 |

User Guide
hp rp7405/7410 Servers
Third Edition
Manufacturing Part Number: A6752-96008
21102
USA
© Copyright 2002