HP Server Console 0x2x16 HP IP and Server Console Switches G2 User Guide - Page 67
Using the Main Menu
 |
View all HP Server Console 0x2x16 manuals
Add to My Manuals
Save this manual to your list of manuals |
Page 67 highlights
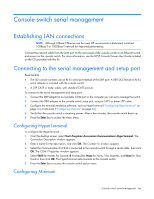
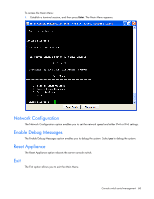
NOTE: The following example uses Red Hat Linux 3.0. For more information, refer to your Linux operating system Help or documentation. IMPORTANT: Minicom is a utility that is loaded during the installation of Linux. However, if you do not select the option to install the Linux Utilities during the operating system installation, you cannot use Minicom without downloading the Minicom X.X.i386.rpm file from the Red Hat website. (Refer to the procedure for installing RPMs on the Red Hat website.) To configure Minicom: 1. Log in to a Linux console or open a terminal, and enter minicom-s at the command prompt. The Configuration menu appears. 2. Select Serial Port Setup. The Change which setting? menu appears. 3. Select Option A (Serial Device). Manually change the device type from "dev/modem" to "/dev/ttyS0" and press Enter. 4. Select Option E (Bps/Par/Bits). The Comm Parameters menu appears. 5. Select E (Speed 9600 Bps), and press Enter. The designation 9600 8N1 appears next to Option E. 6. Select Option F (Hardware Flow Control). Be sure that the Change which setting? menu is configured as follows: A-Serial Device: /dev/ttyS0 B-Lockfile Location: /var/lock C-Callin Program: D-Callout Program: E-Bps/Par/Bits: 9600 8N1 F-Hardware Flow Control: No G-Software Flow Control: No 7. Press the Enter key to return to the Configuration menu. Scroll down to the Save setup as dfl option, and press the Enter key. 8. From the Configuration menu, scroll down to the Exit the Minicom option, and press Enter. 9. From the command prompt, enter Minicom. As soon as a connection is established, the main menu for the console switch appears. Follow the on-screen options to configure the console switch. Using the Main Menu The following configuration options are available from the Console Switch Main Menu: • Network configuration • Enable debug messages • Reset appliance • Exit Console switch serial management 67
-
 1
1 -
2
-
3
-
4
-
5
-
6
-
7
-
8
-
9
-
10
-
11
-
12
-
13
-
14
-
15
-
16
-
17
-
18
-
19
-
20
-
21
-
22
-
23
-
24
-
25
-
26
-
27
-
28
-
29
-
30
-
31
-
32
-
33
-
34
-
35
-
36
-
37
-
38
-
39
-
40
-
41
-
42
-
43
-
44
-
45
-
46
-
47
-
48
-
49
-
50
-
51
-
52
-
53
-
54
-
55
-
56
-
57
-
58
-
59
-
60
-
61
-
 62
62 -
 63
63 -
 64
64 -
 65
65 -
 66
66 -
 67
67 -
 68
68 -
 69
69 -
 70
70 -
 71
71 -
 72
72 -
73
-
74
-
75
-
76
-
77
-
78
-
79
-
80
-
81
-
82
-
83
 |
 |
