HP SignagePlayer mp8200s HP rp5800 Digital Signage PC, HP SignagePlayer mp8200 - Page 2
Welcome
 |
View all HP SignagePlayer mp8200s manuals
Add to My Manuals
Save this manual to your list of manuals |
Page 2 highlights
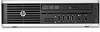
Welcome! Congratulations on your purchase of a new HP SignagePlayer featuring Scala QuickStart. This document will guide you through the process of getting your Player connected to the Scala QuickStart service. Carefully unpack your new HP SignagePlayer from the carton. You should find the following contents: • Player PC • Power Cord • Mouse • Keyboard Step1: Connect your Player to your Screen This may be a VGA, DVI, HDMI or DisplayPort connection depending on model. NOTE: For models with an optional video card, please use the video connectors on the expansion card. The motherboard video connectors are disabled in this configuration. Step 2: Connect an Internet Ethernet cable to your Player NOTE: If you would like to connect to the Internet via Wi-Fi or if you have an advanced network setting such as a proxy server, you will need to first configure that in Windows appropriately. If so, please connect the Keyboard and Mouse to your Player at this time. Step 3: Connect the power cords to the Player and Screen and switch both devices on. english-1
-
 1
1 -
 2
2 -
 3
3 -
 4
4 -
 5
5 -
 6
6 -
 7
7 -
 8
8 -
9
-
10
-
11
-
12
-
13
-
14
-
15
-
16
-
17
-
18
-
19
-
20
-
21
-
22
-
23
-
24
-
25
-
26
-
27
-
28
-
29
-
30
-
31
-
32
-
33
-
34
-
35
-
36
-
37
-
38
-
39
-
40
-
41
-
42
-
43
-
44
-
45
-
46
-
47
-
48
-
49
-
50
-
51
-
52
-
53
-
54
-
55
-
56
-
57
-
58
-
59
-
60
-
61
-
62
-
63
-
64
 |
 |
