HP Storage Blade for bh7800 Installation Guide, Second Edition - HP Carrier Gr - Page 40
Installing and Removing Blades
 |
View all HP Storage Blade for bh7800 manuals
Add to My Manuals
Save this manual to your list of manuals |
Page 40 highlights
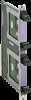
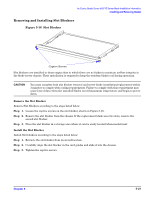
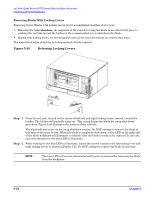
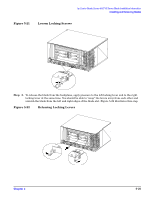
hp Carrier Grade Server bh3710 Server Blade Installation Information Installing and Removing Blades Installing and Removing Blades There are two types of blades used in the rp3710 Blade Server: • Blades that are held in place on the chassis by locking levers. This type of blade has a blue LED that lights to indicate when it is shut down and ready to be removed. • Carrier blades that can contain up to two components, such as Fibre Channel disks. The components are held in the Carrier blade by screws and each has its own handle. Carrier Blades are held in place on the chassis by screws and are installed and removed by grasping the component handles. Blade server cooling requirements dictate that all slots be closed, either by the server blades that are installed, or by slot blockers. Slot blockers come in two sizes: • Full size, 6U x 160 mm, used in the front slots and • Half size, 6U x 80 mm, used in the rear slots. Blades are installed from either the front or rear of the chassis. However, the blade type must match the slot type and size. Both types and sizes are identified with stickers as described in the previous section. The best way to ensure blade replacement within the requisite time window is to plan your installation in advance: • Ensure that you are properly grounded before commencing. • Have the blade ready for installation and near the blade server. • If you are removing a blade, have a slot blocker ready. • Have a number 1 Phillips screwdriver available. • Familiarize yourself with the operation before you begin. Following the planning instructions outlined above, prepare your equipment and select the empty slot(s) compatible with the type of blade you wish to install. Then, follow the steps listed below. 5- 20 Chapter 5
-
 1
1 -
2
-
3
-
4
-
5
-
6
-
7
-
8
-
9
-
10
-
11
-
12
-
13
-
14
-
15
-
16
-
17
-
18
-
19
-
20
-
21
-
22
-
23
-
24
-
25
-
26
-
27
-
28
-
29
-
30
-
31
-
32
-
33
-
34
-
 35
35 -
 36
36 -
 37
37 -
 38
38 -
 39
39 -
 40
40 -
 41
41 -
 42
42 -
 43
43 -
 44
44 -
 45
45 -
46
-
47
-
48
-
49
-
50
-
51
-
52
-
53
-
54
-
55
 |
 |
