HP StorageWorks 2/16V HP StorageWorks SAN Switch 2/8V, 2/16V, 2/16N and 4/32 I - Page 45
Table 8 Number of screws required to assemble the inner rails, SAN Switch 2/16V
 |
View all HP StorageWorks 2/16V manuals
Add to My Manuals
Save this manual to your list of manuals |
Page 45 highlights
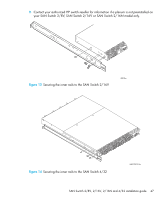
Table 8 Number of screws required to assemble the inner rails Switch #8-32 x 5/16-inch screws #8-32 x 3/16-inch screws SAN Switch 2/8V 10 Not Applicable SAN Switch 2/16V, 10 SAN Switch 2/16N Not Applicable SAN Switch 4/32 Not Applicable 10 6. Identify the screw holes on the inner rails for your specific switch. The screw holes are labelled as follows: a. To attach the inner rails to the SAN Switch 2/8V, SAN Switch 2/16V or SAN Switch 2/16N use the screw holes marked 8. b. To attach the inner rails to the SAN Switch 4/32 use the screw holes marked 16. NOTE: The mounting holes in the inner rails are marked 32, 16, and 8. For the SAN Switch 2/8V, SAN Switch 2/16V or SAN Switch 2/16N use the screw holes labelled 8. For the SAN Switch 4/32, use the mounting holes labelled 16. 7. Secure the two inner rails (one on each side) of the switch using the appropriate number of screws (refer to Table 8) as follows: • For the SAN Switch 2/8V, secure each inner rail (one on each side) to the switch using five #8-32 x 5/16-inch Phillips pan-head SEMS screws as shown in Figure 12. • For the SAN Switch 2/16V or 2/16N, secure each inner rail (one on each side) to the switch using five #8-32 x 5/16-inch Phillips pan-head SEMS screws, see Figure 13. • For the SAN Switch 4/32, secure each inner rail (one on each side) to the switch using five #8-32 x 3/16-inch Phillips pan-head screws with thread lock as shown in Figure 14. NOTE: For factory integration only, tighten the #8-32 x 5/16-inch Phillips pan-head SEMS screws and torque between 6 to 8 inch-pounds. SAN Switch 2/8V, 2/16V, 2/16N and 4/32 installation guide 45
-
 1
1 -
2
-
3
-
4
-
5
-
6
-
7
-
8
-
9
-
10
-
11
-
12
-
13
-
14
-
15
-
16
-
17
-
18
-
19
-
20
-
21
-
22
-
23
-
24
-
25
-
26
-
27
-
28
-
29
-
30
-
31
-
32
-
33
-
34
-
35
-
36
-
37
-
38
-
39
-
 40
40 -
 41
41 -
 42
42 -
 43
43 -
 44
44 -
 45
45 -
 46
46 -
 47
47 -
 48
48 -
 49
49 -
 50
50 -
51
-
52
-
53
-
54
-
55
-
56
-
57
-
58
-
59
-
60
-
61
-
62
-
63
-
64
-
65
-
66
-
67
-
68
-
69
-
70
-
71
-
72
-
73
-
74
-
75
-
76
-
77
-
78
-
79
-
80
-
81
-
82
-
83
-
84
-
85
-
86
-
87
-
88
-
89
-
90
-
91
-
92
-
93
-
94
-
95
-
96
-
97
-
98
-
99
-
100
-
101
-
102
-
103
-
104
-
105
-
106
-
107
-
108
-
109
-
110
-
111
-
112
-
113
-
114
-
115
-
116
-
117
-
118
-
119
-
120
-
121
-
122
-
123
-
124
-
125
-
126
 |
 |
