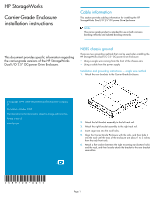
HP StorageWorks 2000sa HP StorageWorks Carrier-Grade Enclosure installation in - Page 2
Installation and grounding instructions - power supply cable, method, Gigabit Ethernet port cabling
 |
View all HP StorageWorks 2000sa manuals
Add to My Manuals
Save this manual to your list of manuals |
Page 2 highlights
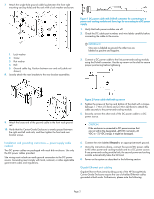
7. Attach the single-hole ground cable lug between the front right mounting ear (top hole) and the rack with a lock washer and screw. 1. Lock washer 2. Screw 3. Flat washer 4. Bolt 5. Ground cable lug. Position between ear and rail (cable not shown). 8. Loosely attach the rear brackets to the rear bracket assemblies. Figure 1 DC power cable with D-Shell connector for connecting to a power-and-cooling module and three lugs for connecting to a DC power supply . 1. Verify that both power switches are off. 2. Check the DC cable part numbers and wire labels carefully before connecting the cable to the source. IMPORTANT: One wire is labeled as ground; the other two are labeled as positive and negative. 3. Connect a DC power cable to the first power-and-cooling module, using the D-shell connector. Use the up arrow on the shell to ensure proper positioning before tightening. 9. Attach the loose end of the ground cable to the front rack ground rail. 10. Verify that the Carrier-Grade Enclosure is evenly spaced between the right and left rack rails, and then tighten the front and rear bracket screws. Installation and grounding instructions - power supply cable method Two DC power cables are packaged with each disk enclosure. Use only the DC power cables provided. Site wiring must include an earth ground connection to the DC power source. Grounding must comply with local, national, or other applicable government codes and regulations. Figure 2 Power cable shell with up arrow . 4. Tighten the screws at the top and bottom of the shell with a torque between 1.7 N-m (15 lb-in) and 2.3 N-m (20 lb-in) to attach the cable securely to the power-and-cooling module. 5. Securely connect the other end of the DC power cable to a DC power source. CAUTION: If the enclosure is connected to DC power sources that are not within the designated -48V DC nominal (-36 VDC to -72 VDC) range, it might be damaged. 6. Connect the wire labeled Ground to an appropriate earth ground. 7. Using the instructions above, connect the second DC power cable to the other power-and cooling-module and to a DC power source. If one power-and-cooling module fails, the second power-and-cooling module automatically takes the full load. 8. Power on the system as described in the following section. Gigabit Ethernet port cabling Gigabit Ethernet Ports (intra-building ports) of the HP StorageWorks Carrier-Grade Enclosure require the use of shielded Ethernet cables grounded at both ends. Furthermore, please note the following: Page 2
-
 1
1 -
 2
2 -
 3
3
 |
 |
