HP StorageWorks MSA 2/8 HP StorageWorks Fabric OS 3.X Document Addendum (AA-RW - Page 51
Modifying the RADIUS Server, Access the Switch Admin Window see
 |
View all HP StorageWorks MSA 2/8 manuals
Add to My Manuals
Save this manual to your list of manuals |
Page 51 highlights
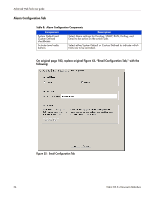
Advanced Web Tools user guide The RADIUS Configuration dialog box opens. 5. Enter the RADIUS server name, which should be a valid IP address or DNS. Each RADIUS server should have a unique IP address or DNS name for the RADIUS server. 6. Optional: Enter the port number. 7. Optional: Enter the secret string. 8. Optional: Enter the timeout time in minutes. 9. Optional: Select an authentication protocol from CHAP or PAP. The default value is CHAP and, if you do not change it, CHAP will be the authentication protocol. 10. Click OK. 11. Click the Apply button. Modifying the RADIUS Server To modify the RADIUS server: 1. Access the Switch Admin Window (see "About the Switch Admin Module.") 2. Enter the admin user name and password. 3. Select the AAA Service tab. 4. Select a RADIUS server from the RADIUS Configuration list. 5. Click Modify. The RADIUS Configuration dialog box opens. 6. Edit the RADIUS server name, which should be a valid IP address or Dynamic Name String (DNS). Each RADIUS server should have a unique IP address or DNS name for the RADIUS server. 7. Optional: Edit the port number. 8. Optional: Edit the secret string. 9. Optional: Edit the timeout time in minutes. 10. Optional: Select an authentication protocol from CHAP or PAP. The default value is CHAP; if you do not change it, CHAP will be the authentication protocol. 11. Click OK. 12. Click the Apply button. Modifying the RADIUS Server Order The RADIUS servers are contacted in the order they are listed, starting from the top of the list. To modify the order that the RADIUS servers are contacted: 1. Access the Switch Admin Window (see "About the Switch Admin Module.") 2. Enter the admin user name and password. 3. Select the AAA Service tab. 4. Select a RADIUS server from the RADIUS Configuration list. 5. Click the up and down arrows to rearrange the order of the RADIUS servers. 6. Click OK. 7. Click the Apply button. Fabric OS 3.x Document Addendum 51
-
 1
1 -
2
-
3
-
4
-
5
-
6
-
7
-
8
-
9
-
10
-
11
-
12
-
13
-
14
-
15
-
16
-
17
-
18
-
19
-
20
-
21
-
22
-
23
-
24
-
25
-
26
-
27
-
28
-
29
-
30
-
31
-
32
-
33
-
34
-
35
-
36
-
37
-
38
-
39
-
40
-
41
-
42
-
43
-
44
-
45
-
 46
46 -
 47
47 -
 48
48 -
 49
49 -
 50
50 -
 51
51 -
 52
52 -
 53
53 -
 54
54 -
 55
55 -
 56
56 -
57
-
58
-
59
-
60
-
61
-
62
-
63
-
64
-
65
-
66
-
67
-
68
-
69
-
70
-
71
-
72
-
73
-
74
-
75
-
76
-
77
-
78
-
79
-
80
-
81
-
82
-
83
-
84
-
85
-
86
-
87
-
88
-
89
-
90
-
91
-
92
-
93
-
94
-
95
-
96
-
97
-
98
-
99
-
100
-
101
-
102
-
103
-
104
-
105
-
106
-
107
-
108
-
109
-
110
-
111
-
112
-
113
-
114
-
115
-
116
-
117
-
118
-
119
-
120
-
121
-
122
-
123
-
124
-
125
-
126
-
127
-
128
-
129
-
130
-
131
-
132
-
133
-
134
-
135
-
136
-
137
-
138
-
139
-
140
-
141
-
142
-
143
-
144
-
145
-
146
-
147
-
148
-
149
-
150
-
151
-
152
-
153
-
154
-
155
-
156
-
157
-
158
-
159
-
160
-
161
-
162
-
163
-
164
-
165
-
166
-
167
-
168
-
169
-
170
-
171
-
172
-
173
-
174
-
175
-
176
-
177
-
178
-
179
-
180
-
181
-
182
-
183
-
184
-
185
-
186
-
187
-
188
-
189
-
190
-
191
-
192
-
193
-
194
-
195
-
196
-
197
-
198
-
199
-
200
-
201
-
202
-
203
-
204
-
205
-
206
-
207
-
208
-
209
-
210
-
211
-
212
-
213
-
214
-
215
-
216
-
217
-
218
-
219
-
220
-
221
-
222
-
223
-
224
-
225
-
226
-
227
-
228
-
229
-
230
-
231
-
232
-
233
-
234
-
235
-
236
-
237
-
238
-
239
-
240
-
241
-
242
-
243
-
244
-
245
-
246
-
247
-
248
-
249
-
250
 |
 |
