HP StoreOnce 4430 HP StoreOnce 4500 Backup System Start Here Poster (BB878-909 - Page 2
Using the HP StoreOnce Backup system, Troubleshooting and other sources of, information, Power - backup user guide
 |
View all HP StoreOnce 4430 manuals
Add to My Manuals
Save this manual to your list of manuals |
Page 2 highlights
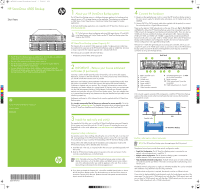
BB878-90901 StoreOnce 4500 Backup Eng back.pdf 1 21/06/2013 15:17 Three bonding modes are available: Mode 1, Mode 4 and Mode 6. Take care to choose the network bonding mode appropriate for your network environment and switch capability. For further information please refer to the Installation and Configuration Guide and the HP StoreOnce CLI Reference Guide on the CD. Connecting to a Fibre Channel SAN The HP StoreOnce Backup system is supplied with one FC card pre-installed. However, you must still connect the HP StoreOnce Backup system to an Ethernet network in order to use the StoreOnce Management Console. Please note that devices created on the HP StoreOnce Backup system can be accessed by all hosts on the SAN unless you configure zones on the Fibre Channel Fabric/Switch. Connecting to the Capacity Kit (optional) Install the rail kit and expansion model immediately below or above the HP StoreOnce Backup system, as described in Section 3. 1. Connect the square HD connector on the cable to the single high-density SAS port on the RAID controller on the rear of the HP StoreOnce Backup system. 2. Connect the mini-SAS connector on the other end of the cable to the IN connector on the rear of the Capacity Kit. 3. Use the supplied power cords to connect the Capacity Kit to the mains power supply. CAUTION: If you need to power down the Capacity Kit, make sure the HP StoreOnce Backup system is powered down first. This ensures that the system does not erroneously mark the drives as failed when the HP StoreOnce Backup system is powered up again. To power off the Capacity Kit, press the Power On button and wait for the system power LED to go from green to amber. NOTE: When installing/replacing a hot-plug device, it is not necessary to power down the units. 6 Using the HP StoreOnce Backup system Understanding the LEDs HP StoreOnce Backup system • Operator: Provides limited access for monitoring and viewing. User name = Operator; password = operator. Names and passwords are case sensitive. Accessing the HP StoreOnce Backup system The StoreOnce Web Management Console is the main interface for: • Monitoring the status and health of the HP StoreOnce Backup system and all configured backup devices • Creating and modifying VTL and NAS StoreOnce backup targets and Catalyst stores • Managing replication relationships and housekeeping 1 RAID controller 2 IN connector 3 Power connector C M Y CM MY 5 Power on CY CMY 1. If you have installed a Capacity Kit power it on first. You may need to hold down the power on button (on the rear of the unit) for a few seconds. K Capacity Kit (rear view) Item Description Status 1 System health LED Green = Normal operation Flashing amber = Degraded condition Flashing red = Critical condition 2 NIC status LED Off = no network connection or network not configured Steady green = network connected Flashing green = network activity 3 Power button LED Off = no power connected Steady green = power connected, device ready for use Flashing green = performing power on sequence Steady amber = device switched off or in hibernation with power connected 4 UID button/LED Steady blue identifies the HP StoreOnce Backup system in the rack Capacity Kit (optional) StoreOnce CLI Management Console The StoreOnce Command Line Interface (CLI) provides an alternative way of administering and monitoring the system. Some tasks, such as network and storage configuration, can be carried out only from the StoreOnce CLI. StoreOnce CLI commands must be run from an SSH terminal session and require an SSH client application (freely available from the internet) running on the management console. See the HP StoreOnce CLI Reference Guide for more information. Accessing the StoreOnce Web Management Console If DHCP is enabled on your network, simply connect to the Web Management Console or StoreOnce CLI from any machine connected to the network using the default host name printed on the top of the appliance. Enter your user name and password. Web: https: or StoreOnce CLI: ssh @ If DHCP is not enabled on your network, connect a console to the monitor and keyboard ports on the rear of the appliance and log in to the StoreOnce CLI to configure the appliance on the network. See the HP StoreOnce Installation and Configuration Guide for more information. NOTE: If you will be configuring Virtual Tape Library devices as backup targets, install all the required Tape drivers on backup servers and ensure the backup server is running software that supports HP Tape libraries. Tape drivers can be found on the StoreOnce Backup CD. Drivers are not needed for NAS Share and Catalyst Store backup targets. 1 Power On button 2. Power on the HP StoreOnce Backup system (the power button is on the front of the unit). HP StoreOnce Backup system (front view) 1 Power On button 3. As long as DHCP is enabled on the network, the appliance should now be accessible across the network. If it is not enabled, you must use StoreOnce CLI commands to configure the appliance on the network. Power off To power off your HP StoreOnce Backup system always use the StoreOnce CLI commands, as described in the HP StoreOnce CLI Reference Guide on the HP StoreOnce Backup CD. Item Description 1 Heartbeat LED 2 Fault LED 3 UID button/LED Status Off = no system activity Green = system activity Off = no fault condition Amber = fault condition Off = no active remote management Blue = identified Blue flashing = active remote management User accounts and passwords Two types of user account are set up automatically when the system is installed: • Administrator: Allows authorized users to create and edit management and StoreOnce functions. They can also create and manage users. User name = Admin; password = admin. 7 Troubleshooting and other sources of information For troubleshooting information, refer to the guides on the HP StoreOnce Backup system CD. These guides also contain reference information about iSCSI andRAID. If you cannot resolve problems, contact HP Support at www.hp.com/support. For the latest information about computer, OS and software compatibility, see www.hp.com/go/ebs. The following documents are available: • HP StoreOnce Backup User Guide (PDF): This guide describes how to use the Web Management Console. It is also available as online help. • HP StoreOnce CLI Reference Guide (PDF): This guide describes the StoreOnce CLI commands and how to use them. • HP StoreOnce Backup Installation and Configuration Guide (PDF): This guide describes how to install and carry out the initial configuration of your HP StoreOnce Backup system. • Linux and UNIX Configuration Guide (PDF): This guide contains information about configuring and using HP StoreOnce Backup systems with Linux and UNIX. • StoreOnce Best Practices for VTL, NAS, StoreOnce Catalyst and Replication implementations: This guide describes best practices and also include examples using different backup applications. You can find these documents from the Manuals page of the HP Business Support Center website: http://www.hp.com/support/manuals. In the Storage section, click Storage Solutions and then select your product.
-
 1
1 -
 2
2
 |
 |