HP Surestore 40fx Adding 1 Drive to the C1100 Series Jukebox - C1156-90000 - Page 9
Front RFI shield, Drive DIP switch settings, Check the DIP switches
 |
View all HP Surestore 40fx manuals
Add to My Manuals
Save this manual to your list of manuals |
Page 9 highlights
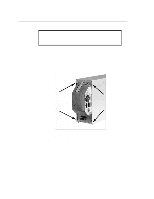
Figure 7: Front RFI shield Figure 8: Drive DIP switch settings 9. Check the DIP switches on the rear of the drive. Make sure they are set to the positions shown in the diagram. The right-end switch on the rearmost DIP switch is set to the ON position. All others are set OFF. 10. Slide the drive into the the jukebox chassis just above the current drive. Insert 1 T-10 screw through the right side of the chassis to support the drive . a. Hold the drive up by its front (inside the jukebox) and insert the other T-10 screw on the right side. 11. Using an extension on your Torx driver, insert and tighten the 2 T-10 screws that hold the drive on the left side of the jukebox. 9
-
 1
1 -
2
-
3
-
 4
4 -
 5
5 -
 6
6 -
 7
7 -
 8
8 -
 9
9 -
 10
10 -
 11
11 -
 12
12
 |
 |

9
Figure 7:
Front RFI shield
Figure 8:
Drive DIP switch settings
9.
Check the DIP switches
on the rear of the drive.
Make sure they are set to the positions shown in
the diagram. The right-end switch on the rearmost DIP switch is set to the ON position. All others
are set OFF.
10. Slide the drive into the the jukebox chassis just above the current drive. Insert 1 T-10 screw
through the right side of the chassis to support the drive .
a.
Hold the drive up by its front (inside the jukebox) and insert the other T-10 screw on the right
side.
11. Using an extension on your Torx driver, insert and tighten the 2 T-10 screws that hold the drive on
the left side of the jukebox.