HP Surestore 64 EFC Server Configuration Guide For the HP OmniBook 6000 PC - Page 7
Web Server Configuration, FTP Server Configuration
 |
View all HP Surestore 64 manuals
Add to My Manuals
Save this manual to your list of manuals |
Page 7 highlights
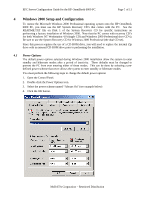
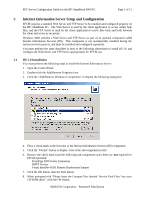
EFC Server Configuration Guide for the HP OmniBook 6000 PC Page 7 of 11 9. When prompted with "Insert Service Pack Files into the drive selected below", enter "c:\i386" in the edit box, then click the OK button. 5.2 Web Server Configuration The Web Server is used to download and install the EFCM client application to remote workstations, and to provide access to online help information from the EFCM application once installed. Installation of the EFC Management Applications software on the server automatically installs the appropriate web files to the default web publishing directory (c:\inetpub\wwwroot), and no additional web server configuration is required specifically for EFCM use. 5.3 FTP Server Configuration The FTP Server requires the following configuration settings for EFCM to function properly: • The FTP Server home directory must be located at "c:\inetpub\ftproot". This is the default configuration when IIS is first installed, so you do not need to configure this. • The FTP Server must accept anonymous connections. This is the default configuration when IIS is first installed, so you do not need to configure this. • The FTP Server home directory must have both read and write access permissions. The default setting for the home directory is read-only, so you must follow the steps described below to enable write permissions in the FTP Server home directory. • A virtual directory must be created to provide FTP read-only access to the EFCM program files. You must follow the steps described below to create the virtual directory. The following steps describe the procedure to configure the FTP Server home directory for read/write access and to create a new virtual directory for accessing the EFCM program files. 1. Open the Control Panel 2. Double-click the Administrative Tools icon 3. Double-click the Internet Service Manager icon 4. Expand the tree in the Internet Information Services panel to display the following two items: Default FTP Site Default Web Site 5. Right-click the Default FTP Site item and select "Properties" from the menu. 6. Click the "Home Directory" tab in the Default FTP Site Properties dialog box. 7. Place a check mark in both the Read and Write boxes, then click OK. 8. Right-click the Default FTP Site item again and select "New", "Virtual Directory". 9. Click the Next button in the Virtual Directory Creation Wizard. 10. Enter the name "EfcMan" in the Alias box, then click Next. 11. Enter the path "c:\Program Files\EFCM" in the Path box, then click Next (note: if EFCM has not yet been installed you must manually create this folder before you will be allowed to create the virtual directory). 12. Leave the Read option checked and the Write option unchecked, then click Next. 13. Click the Finish button. McDATA Corporation - Restricted Distribution
-
 1
1 -
 2
2 -
 3
3 -
 4
4 -
 5
5 -
 6
6 -
 7
7 -
 8
8 -
 9
9 -
 10
10 -
 11
11
 |
 |