HP TouchSmart 600-1151 User Guide - Page 14
Stereo Audio In TV, Audio Line Out
 |
View all HP TouchSmart 600-1151 manuals
Add to My Manuals
Save this manual to your list of manuals |
Page 14 highlights
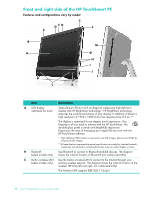
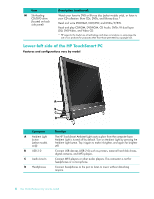
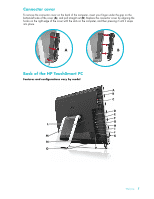
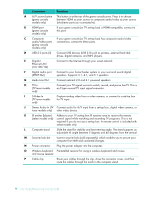
Connector Function A A/V source button This button is at the top of the game console ports. Press it to choose (game console between HDMI as your source or composite audio/video as your source models only) (whichever ports you connected to). B HDMI port (game console models only) If your game console (or TV set-top box) is HDMI-compatible, connect to this port. C Composite If your game console (or TV set-top box) has composite audio/video audio/video ports connections, connect to these ports. (game console models only) D USB 2.0 ports (3) Connect USB devices (USB 2.0) such as printers, external hard disk drives, digital cameras, and MP3 players. E Gigabit Ethernet LAN (10/100/1G) Connect to the Internet through your wired network. F Digital audio port Connect to your home theater system or your surround sound digital (SPDIF Out) speakers. Supports 3.1, 4.1, and 5.1 speakers. G Audio Line Out Connect external 2.0 and 2.1 powered speakers. H TV In (TV tuner models only) Connect your TV signal source to watch, record, and pause live TV. This is an F-type coaxial TV input signal connector. I S-Video In Capture analog video from a video camera, or connect to a set-top box (TV tuner models for TV input. only) J Stereo Audio In (TV Connect audio for A/V input from a set-top box, digital video camera, or tuner models only) other video device. K IR emitter (blaster) Adhere to your TV set-top box IR receiver area to receive the remote (select models only) control signal while watching and recording TV programs. This is not required if you do not use a set-top box. A remote control is included with select models only. L Computer stand Slide the stand for stability and best viewing angle. The stand supports an adjustable tilt angle between 5 degrees and 40 degrees from the vertical. M Security lock slot Insert a security lock (sold separately), which enables you to secure your computer from theft and unwanted changes. N Power connector Plug the power adapter into the computer. O Wireless keyboard Preinstalled receiver for using a wireless keyboard and mouse. and mouse receiver P Cable clip Route your cables through the clip, close the connector cover, and then route the cables through the notch in the computer stand. 8 User Guide (Features may vary by model)
-
 1
1 -
2
-
3
-
4
-
5
-
6
-
7
-
8
-
 9
9 -
 10
10 -
 11
11 -
 12
12 -
 13
13 -
 14
14 -
 15
15 -
 16
16 -
 17
17 -
 18
18 -
 19
19 -
20
-
21
-
22
-
23
-
24
-
25
-
26
-
27
-
28
-
29
-
30
-
31
-
32
-
33
-
34
-
35
-
36
-
37
-
38
-
39
-
40
-
41
-
42
-
43
-
44
-
45
-
46
-
47
-
48
-
49
-
50
-
51
-
52
-
53
-
54
-
55
-
56
-
57
-
58
-
59
-
60
-
61
-
62
-
63
-
64
-
65
-
66
-
67
-
68
-
69
-
70
-
71
-
72
-
73
-
74
-
75
-
76
 |
 |