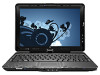
HP TouchSmart tx2-1305au Multimedia - Windows 7 - Page 26
The computer does not detect the optical drive, A disc does not play, Start, Control Panel
 |
View all HP TouchSmart tx2-1305au manuals
Add to My Manuals
Save this manual to your list of manuals |
Page 26 highlights
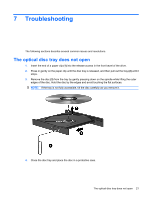
The computer does not detect the optical drive If the computer does not detect the optical drive, use Device Manager to troubleshoot the device and then update, uninstall, or disable the device driver: 1. Remove any discs from the optical drive. 2. Click Start > Control Panel > System and Security. Then in the System area, click Device Manager. 3. In the Device Manager window, click the arrow next to DVD/CD-ROM drives to expand the list to show all of the installed drives. NOTE: If the drive is not listed, install (or reinstall) the device driver as instructed. Refer to "A device driver must be reinstalled" later in this section. 4. Right-click the optical drive listing to perform the following tasks: ● Update the driver software ● Disable ● Uninstall ● Scan for hardware changes. Windows scans your system for installed hardware and installs any required drivers. ● Click Properties to see if the device is working properly: ◦ The Properties window provides details about the device to help you troubleshoot issues. ◦ Click the Driver tab to update, disable, or uninstall drivers for this device. A disc does not play ● Save your work and close all open programs before playing a CD or a DVD. ● Log off the Internet before playing a CD or a DVD. ● Be sure that you insert the disc properly. ● Be sure that the disc is clean. If necessary, clean the disc with filtered water and a lint-free cloth. Wipe from the center of the disc to the outer edge. ● Check the disc for scratches. If you find scratches, treat the disc with an optical disc repair kit available at many electronics stores. ● Disable Sleep mode before playing the disc. Do not initiate Hibernation or Sleep while playing a disc. Otherwise, you may see a warning message asking if you want to continue. If this message is displayed, click No. After you click No, the computer may behave in either of the following ways: ◦ Playback may resume. 22 Chapter 7 Troubleshooting
-
 1
1 -
2
-
3
-
4
-
5
-
6
-
7
-
8
-
9
-
10
-
11
-
12
-
13
-
14
-
15
-
16
-
17
-
18
-
19
-
20
-
 21
21 -
 22
22 -
 23
23 -
 24
24 -
 25
25 -
 26
26 -
 27
27 -
 28
28 -
 29
29 -
 30
30 -
 31
31
 |
 |
