HP Ultrium 448c HP StorageWorks Ultrium Tape Blade - (625052-001, November 201 - Page 2
Install drivers, Understanding the LEDs, Hardware encryption and your Ultrium SB3000c, and SB1760c
 |
View all HP Ultrium 448c manuals
Add to My Manuals
Save this manual to your list of manuals |
Page 2 highlights
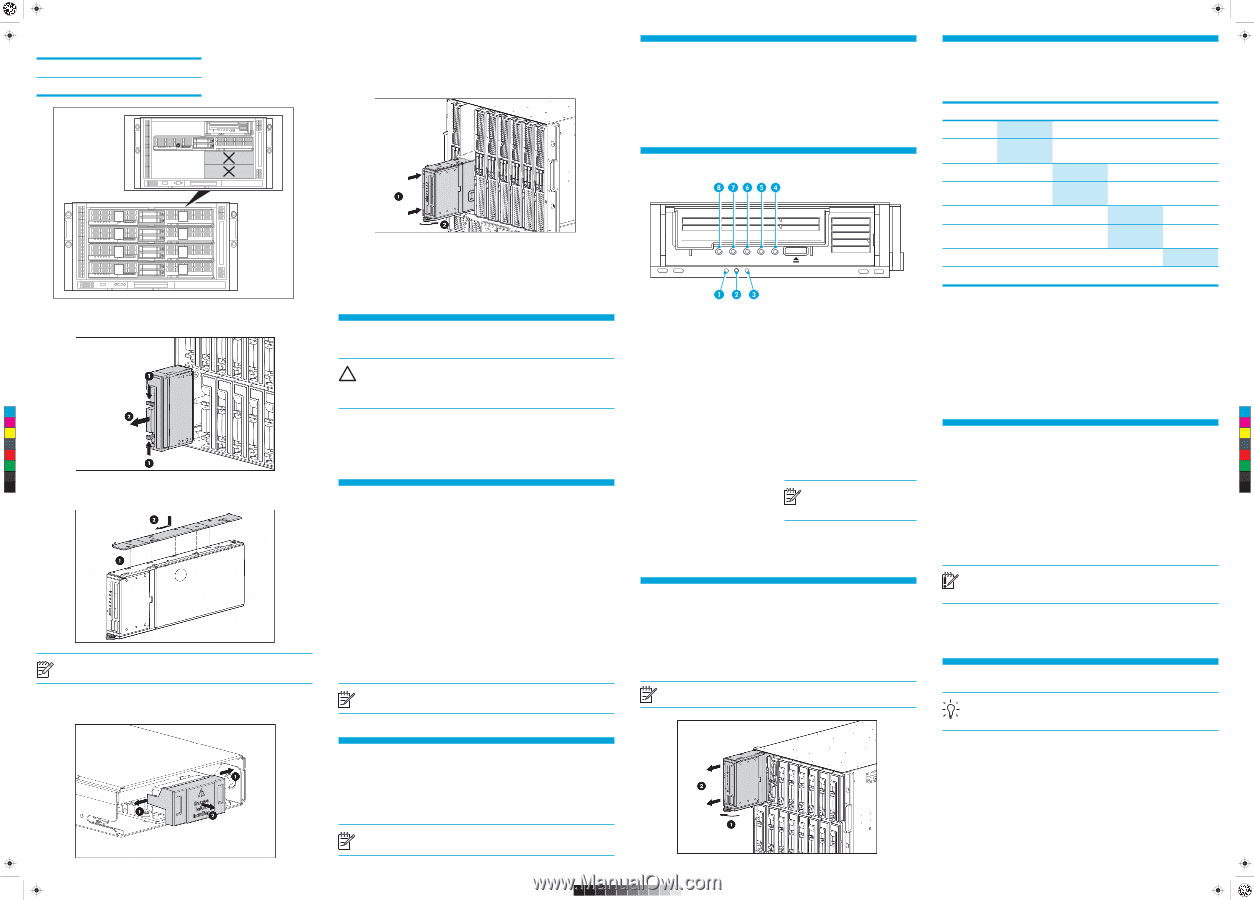
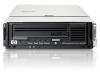
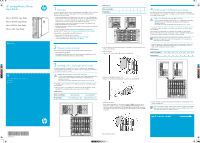
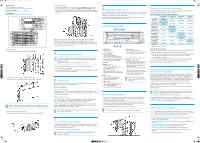
625052-001 Tape Blade Eng back.pdf 1 07/07/2010 15:07 c3000 enclosures Only one combination is supported. Partner server blade in HP Tape Blade in 3 and 7 8 4 8 3 7 2 6 1 5 4 8 3 7 2 6 1 5 3. Remove the blank. • Squeeze in the release catches (1) and pull out the blank (2). C M Y CM MY CY CMY K 4. c7000 enclosures only: Install the supplied coupler plate. • Align the slots, as illustrated (1) and slide forward to lock in place (2). NOTE: c3000 enclosures require a mini divider. This is supplied with the enclosure. Refer to the documentation provided with the enclosure for installation instructions. 5. Remove the tape blade connector cover. • Release the connector cover (1) and pull it away from the tape blade (2). 6. Install the tape blade: • Ensure that the tape blade is in the correct orientation (c7000: with the latch at the bottom of the blade assembly, as illustrated; c3000 horizontal orientation: with the latch to the right of the tape blade). Slide the tape blade into the bay (1), taking care not to apply any pressure to the cassette door. Push the latch (2) in to secure the blade in position. When installing the HP StorageWorks Tape Blade with a full-height server blade, a half-height server blade can be installed in the empty adjacent bay. In a c7000 enclosure this is the bay above the tape blade. In a c3000 enclosure this will be bay 4. This server blade cannot be partnered with the HP StorageWorks Tape Blade. If the bay is left empty, make sure a blank is fitted. 5 Powering up the tape blade CAUTION: To prevent improper cooling and thermal damage, do not operate the server blade or the enclosure unless all device bays are populated with either a component or a blank. Do not pull the tape blade out while the partner server is running. • Install the tape blade, as described above. The system health LED flashes red. • Power up the partner server blade. • Observe the system health LED on the tape blade. When the tape blade is recognized, the system health LED illuminates solid green. 6 Install drivers Drivers can be installed from the link on the HP StorageWorks CD-ROM or directly from the HP web site: http://www.hp.com/#Support. Two drivers are required: SAS controller driver The appropriate SAS controller driver for the tape blade must be installed first. You can identify the tape blade's SAS controller from the POST message (slot x ) or Windows Device Manager. HP Ultrium Tape driver The CD-ROM contains a Tape driver install package for Microsoft Windows operating systems. If you prefer to use Windows Device Manager to install the tape drivers manually, you will find them in the drivers directory on the CD-ROM. For other operating systems, the recommended backup applications use the operating system's standard, built-in device drivers. To upgrade drivers we recommend that you patch to the latest version of the operating system. NOTE: Certain backup applications require you to use their own Tape driver instead of the HP Ultrium Tape driver. 7 Verify tape drive operation HP StorageWorks Library & Tape Tools (L&TT) is the recommended diagnostic and support tool for your HP tape drive. Use it to confirm that your tape drive is functioning correctly and for any tape drive firmware updates. It is available free at www.hp.com/support/tapetools. NOTE: L&TT tests tape drive operation only; use the Onboard Administrator to diagnose the tape blade. 8 Upgrade backup software Some native backup applications may not be able to take advantage of the full performance capabilities of the tape drive. It is important to check www.hp.com/go/connect for software compatibility and install any recommended upgrades. The supplied HP StorageWorks Data Protector Express CD-ROM contains software that provides full support for all the features of your tape drive. Understanding the LEDs 1 UID LED - blue • On: Identified • Off: Not identified 2 System health LED • Green: Normal operation • Flashing amber: Degraded condition • Flashing red: Normal when tape blade first connected (or re-installed); persistent flashing indicates critical condition 3 Reserved 4 Ready - green • On: the drive is ready for use • Off: the drive power is off or there was a failure during self-test • Flashing: the drive is busy • Flashing repeated pattern: the drive is in OBDR (One-Button Disaster Recovery) mode 5 Drive - amber • Off: no fault has been detected • Flashing: the drive mechanism has detected a hardware error 6 Tape - amber • Off: no fault has been detected • Flashing: the cartridge currently in the drive is faulty (damaged or unsupported). Discard the cartridge. 7 Clean - amber • On: cleaning cartridge in use • Off: the drive does not require cleaning • Flashing: the drive needs cleaning Ultrium SB3000c drives only 8 Encryption - blue/amber • On (blue or amber): at power on • Off: drive is idle with no encryption key • Off with Ready LED flashing: drive is reading/writing unencrypted data or unloading cartridge • On (blue): drive is idle with encryption key • On (blue) with Ready LED flashing: drive is reading/writing encrypted data • Blue and Amber flashing alternately: encryption or decryption error NOTE: The Encryption LED only appears on the Ultrium SB3000c tape drive. Removing the tape blade 1. Unload the cartridge from the tape drive. Power down the partner server blade; this powers down the tape blade. (The tape blade is not a hot-plug device and should always be powered down before removal.) 2. Grasp the metal latch located at the bottom of the tape blade and pull the latch forward as far as it will go to release the locking mechanism. (On c3000 enclosures the release latch is on the right-hand side of the tape blade.) 3. Carefully slide the tape blade assembly out from the enclosure. NOTE: Do not pull on the tape drive bezel when removing the tape blade. Choosing and looking after media Your high-performance tape drive works best with high-performance HP Ultrium media. Always use the recommended cartridges (see table). table: HP StorageWorks Ultrium cartridge compatibility Ultrium SB3000c Ultrium SB1760c Ultrium SB920c drives drives drives Ultrium 3 TB* (C7975A) Read/Write (Recommended) not supported not supported Ultrium 3 TB* WORM (C7975W) Write Once Read Many (Recommended) not supported not supported Ultrium 1.6 TB* (C7974A) Read/Write Read/Write (Recommended) not supported Ultrium 1.6 TB* WORM (C7974W) Write Once Read Many Write Once Read Many (Recommended) not supported Ultrium 800 GB* (C7973A) Read only Read/Write Read/Write (Recommended) Ultrium 800 GB* WORM (C973W) Read only Write Once Read Many Write Once Read Many (Recommended) Ultrium 400 GB* (C7972A) not supported Read only Read/Write Ultrium 200 GB* (C7971A) not supported not supported Read only Ultrium 448c drives not supported not supported not supported not supported not supported not supported Read/Write (Recommended) Read/Write * Capacity assumes 2:1 compression. It pays to look after your media Many tape drive and backup failures are caused by damaged or badly handled tape media. • Keep media in the case provided and store it in the vertical orientation. • Follow the temperature, humidity and acclimitization guidelines on the media packaging. • Avoid dropping it or rough handling, as this is likely to damage the cartridge. • Inspect it regularly for damage. • Do not exceed normal cartridge life (260 full volume backup or restore operations). For detailed information on media care and best practice and to order online, refer to www.hp.com/go/storagemedia/ultrium. Hardware encryption and your Ultrium SB3000c and SB1760c tape blade The HP Ultrium SB3000c and SB1760 Tape Blades provide the ability to hardware encrypt your data, applying the strongest level of AES industry-standard encryption and protecting the data from unauthorized access and use. Encryption is supported only on Ultrium 3 TB (C7975A and C7975W) and 1.6 TB media (C7974A and C7974W); media encrypted on an HP Ultrium SB3000c or SB1760c tape blade can only be read on a compatible Ultrium tape blade or drive that supports hardware encryption. To make use of this feature you need a backup application that supports hardware encryption and Ultrium 3 TB or Ultrium 1.6 TB media. Hardware encryption can be used with or without compression and without speed or capacity penalties. IMPORTANT: Hardware encryption is a powerful feature, but should be used with care. If you need to import your media onto another machine or to recover after disaster you will be required to enter an encryption key. For more information about AES encryption, encryption keys, and using hardware encryption with your HP Ultrium SB3000c and SB1760c tape drive, see the White Papers on h18006.www.hp.com/storage/tapewhitepapers.html. Other sources of information TIP: HP TapeAssure provides additional management tools for Windows users. It provides valuable information about tape drive and media utilization, performance and health. Visit www.hp.com/go/tapeassure for a free download. • The HP StorageWorks Tape CD-ROM for full Installation and User instructions in English and 12 other languages. • www.hp.com/go/bladesystem/documentation for information about all BladeSystem components. • www.hp.com/support/tapetools for updates, compatibility information. • www.hp.com/support/ultrium for up-to-date product information. • www.hp.com/go/connect for recommended products and configurations. • www.hp.com/go/obdr for detailed information about HP One-Button Disaster Recovery. • www.hp.com for contact details of HP Customer Call Centers.
-
 1
1 -
 2
2
 |
 |