HP VL600 hp business pcs, remote software deployment, setup guide for PXE and - Page 24
dosundi.0, mkimage.exe, TEST.BIN, Myboot.1., con boot server, Multicast, Address range, Start/ - vectra support
 |
View all HP VL600 manuals
Add to My Manuals
Save this manual to your list of manuals |
Page 24 highlights
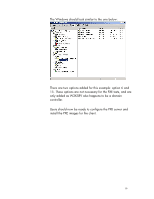
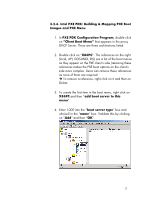
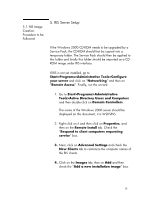
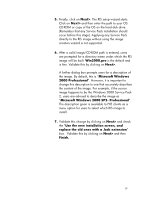
folder. Check the path you noted before (for example, [...]\X86PC\UNDI\BOOT). If the BOOT directory is not created at the [...]\X86PC\UNDI level, create it. If you have or are likely to have a floppyless PXE client(such as an e-PC), download the dosundi.0 file from hp's support web site at: http://www.support.vectra.hp.com/vectrasupport/leve l4/1441vdg175en.exe.html Copy this file to [...]\X86PC\UNDI\boot and rename it to Myboot.0. 13. Insert the floppy diskette you want to create a PXE image from into the floppy disk drive. Launch mkimage.exe from the [...]\PDK\system folder. This reads the floppy and creates a TEST.BIN in the [...]\system folder. Copy TEST.BIN in the [...]\x86pc\undi\boot folder and rename it Myboot.1. 14. Right click on Boot Server (green icon) and click on "configure boot server". In the General Options tab, check the number of the " Multicast Address range". This number should match the number of files provided in the "MTFTP files" tab, for example, 8 in this document. 15. Next, right click on the PXE server (in this document, this is W2KSRV), then on "Start/Stop Services" and then on "Start" of Intel PXE Services. MTFTP should also start. Once both have started the PXE server is ready to serve the PXE clients. 24
-
 1
1 -
2
-
3
-
4
-
5
-
6
-
7
-
8
-
9
-
10
-
11
-
12
-
13
-
14
-
15
-
16
-
17
-
18
-
 19
19 -
 20
20 -
 21
21 -
 22
22 -
 23
23 -
 24
24 -
 25
25 -
 26
26 -
 27
27 -
 28
28 -
 29
29 -
30
-
31
-
32
-
33
 |
 |